How to Enable Tax on iPOSpays
Merchants using iPOSpays can enable and configure taxes for transactions based on their business requirements. Taxes can be applied to regular transactions on payment terminals or to itemized transactions when using Register Lite or CloudPOS inventory. This document explains how ISOs and merchants can enable tax from the iPOSpays Portal, and how taxes can be applied and managed on payment terminals and Register Lite.
Supported Channels
The following channels support tax configuration and processing on iPOSpays:
-
POS
-
CloudPOS
— Quick Pay
— Itemized Billing
-
iPOSgo! (iOS & Android)
-
Generic Hosted Payment Page (via Merchant login on iPOSpays)
-
Register Lite
Tax Configuration Based on Merchant Use Case
Based on the merchant’s use case, taxes can be configured in different ways:
-
If the merchant uses POS, CloudPOS, or iPOSgo!, taxes can be configured from both the ISO login and the Merchant login in the Edit Parameter module of the iPOSpays Portal.
-
If the merchant uses Register Lite or CloudPOS Itemized Billing, taxes must be configured in the Inventory module under the Merchant Login.
Configuring the Tax for Merchants Processing Regular Transactions
Taxes can be configured on the payment terminal to apply tax percentages automatically during transactions. Both ISOs and Merchants can configure tax settings from the Tip & Taxes tab in the terminal parameters. However, some options are controlled only by the ISO, while merchants can configure the remaining parameters.
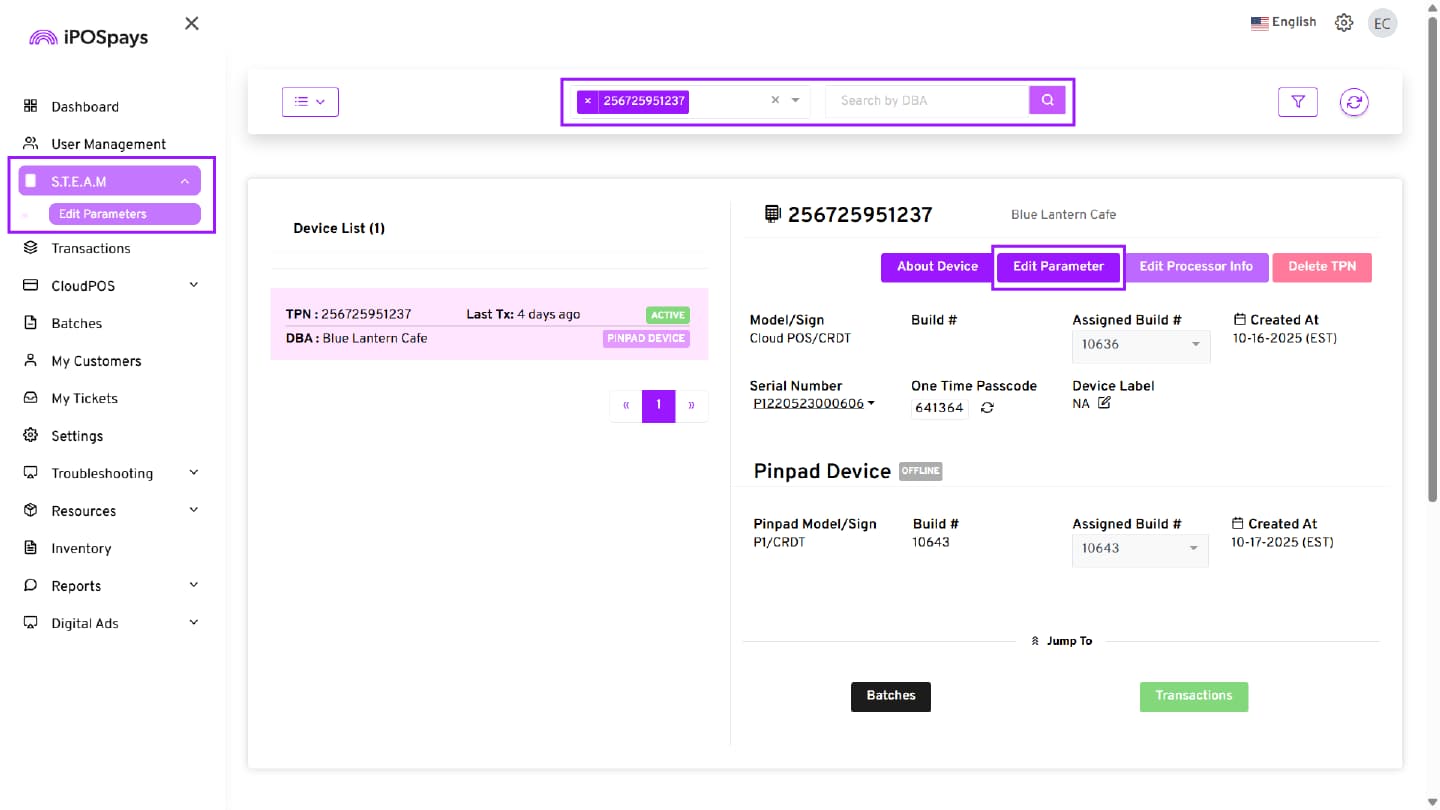
Step 1: Log In to iPOSpays Portal
Log in to the iPOSpays Portal using ISO credentials or Merchant credentials.
Step 2: Navigate to Terminal Settings
-
Click S.T.E.A.M from the left menu.
-
Select Edit Parameters.
Step 3: Search and Select the TPN
-
Use the search box to find the required TPN.
-
Select the TPN.
-
Click Edit Parameter.
Step 4: Configure Tax Settings
Configure the required tax parameters as described below.
General Tax Settings
-
Tax
— Click Yes to enable tax calculation on transactions.
— Click No to disable taxes for the terminal.
-
Tax1 Label
— Define the primary tax name (for example: State Tax, Sales Tax).
-
Tax1 Value
— Enter the default percentage for Tax1 (example: 10%).
-
Tax2 Label
— Define a secondary tax name if applicable (for example: Local Tax, City Tax).
-
Tax2 Value
— Enter the default percentage for Tax2 (example: 20%).
Reduced Tax Settings
-
Reduced Tax
— Click Yes to enable reduced tax rates for specific items or use cases. This parameter also supports Puerto Rico’s variable state tax for prepared foods.
— Click No to disable reduced tax.
-
Reduced Tax Label
— Define the label for the reduced tax (for example: Reduced Tax, Food Tax).
-
Reduced Tax Value
— Enter the reduced tax percentage (example: 6%).
ISO-Controlled Options
The ISO configures the following parameters and determines whether merchants can modify or remove tax during transactions.
-
Edit Taxes (ISO Only)
— Click Yes to allow editing tax details.
— Click No to prevent editing tax details.
-
Merchant Can Remove Tax (ISO Controlled)
— Click Yes to allow merchants to remove tax during a transaction.
— Click No to prevent tax removal at the terminal.
-
Password Protect Remove Option (ISO Controlled)
— Click Yes to require a password to remove tax during a transaction.
— Click No to allow tax removal without password protection.
The Edit Taxes option is available only for the ISO and is not displayed for merchants. The Merchant Can Remove Tax and Password Protect Remove Option settings are controlled by the ISO. These options appear for merchants, but they can be used only if the ISO enables them.
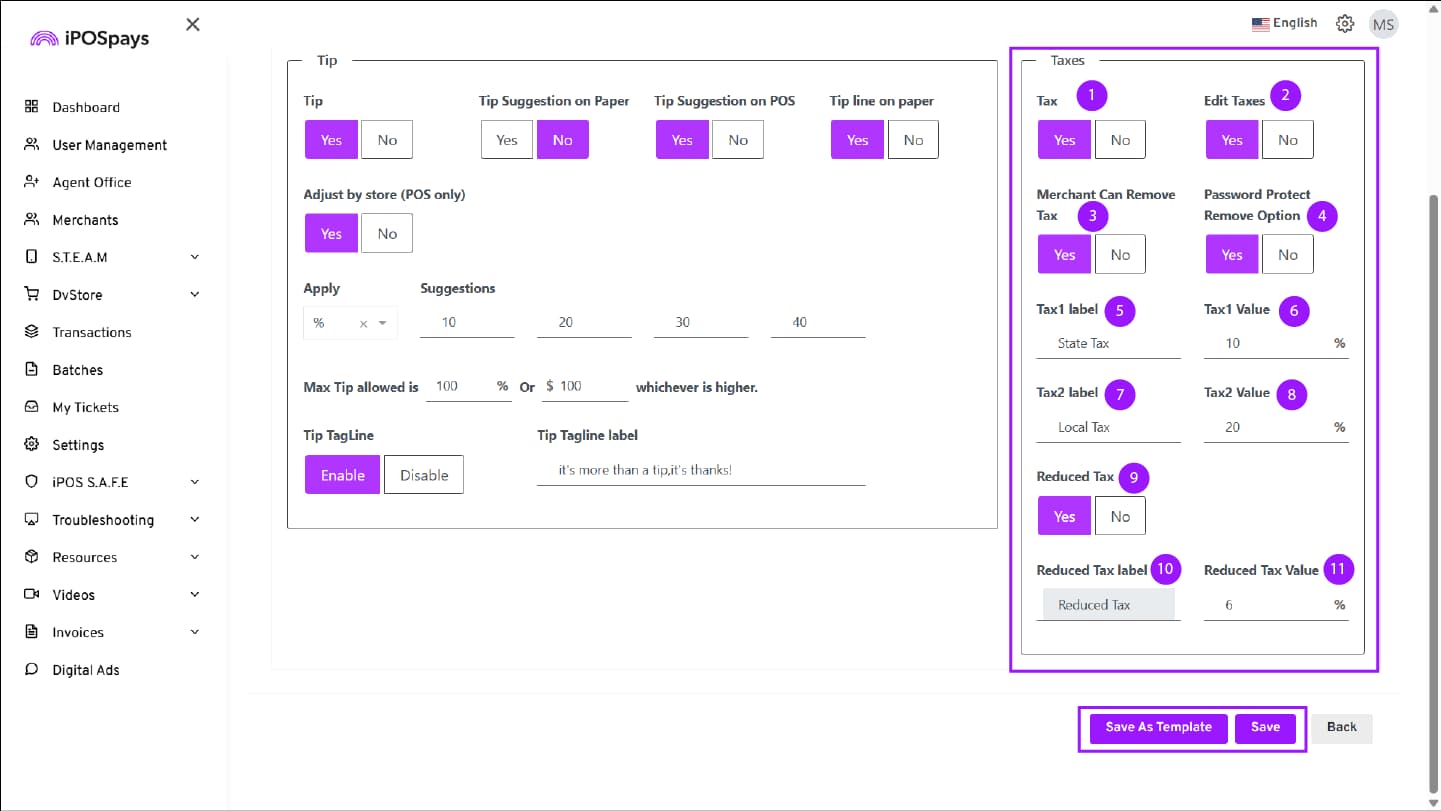
Step 5: Save and Update Terminal
- Click Save to apply the current parameter configurations directly to the selected TPN, or select Save as Template to store the configuration as a reusable template.
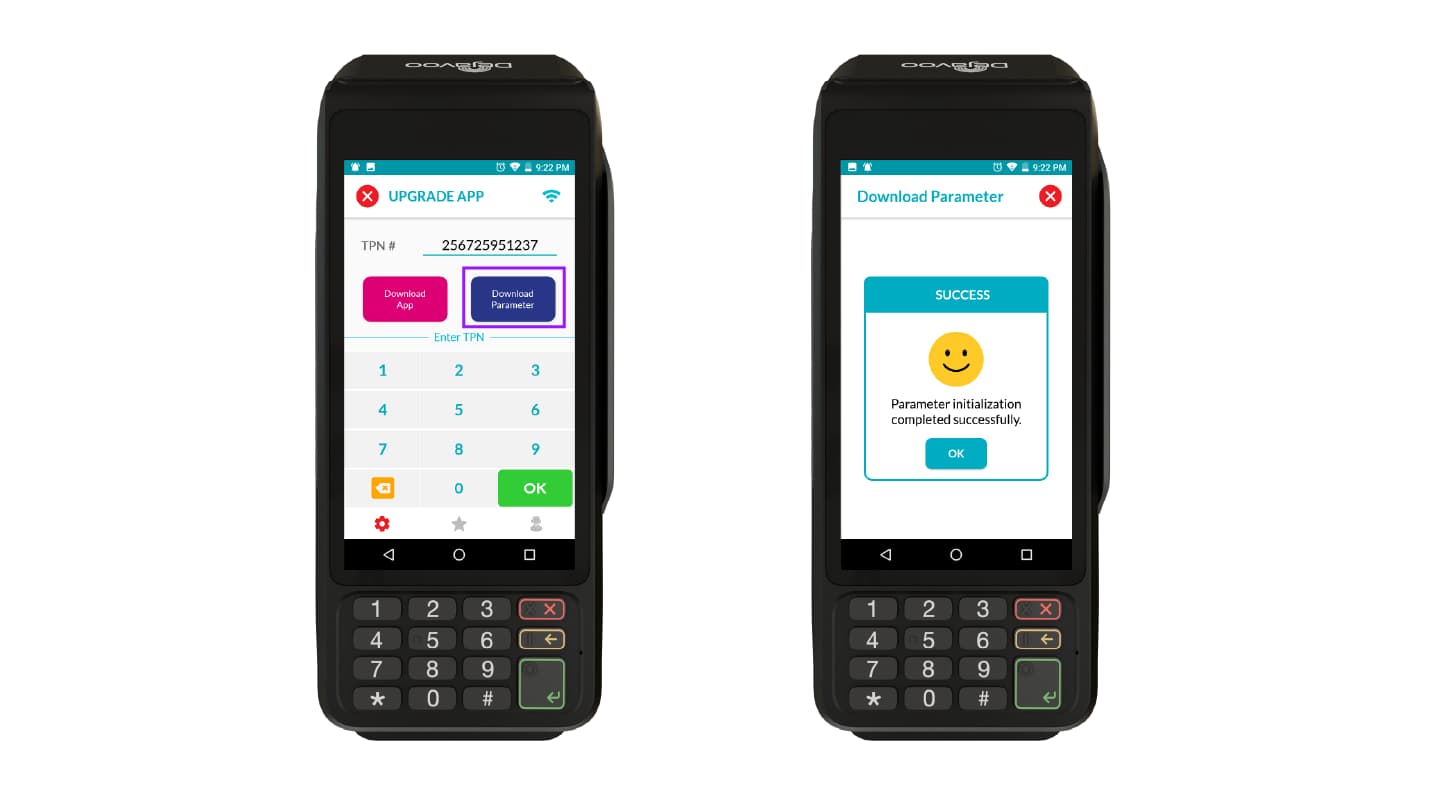
Download Parameter and Update Terminal
-
Enter the TPN on the terminal.
-
Perform a parameter update on the device by clicking Download Parameter.
-
A SUCCESS prompt will appear on the device.
-
Tap OK to proceed.
-
Changes take effect after the update is completed.
Apply and Edit Taxes on the Payment Terminal (Merchant View)
Merchants can apply and edit taxes during a sale directly on the payment terminal.
Step 1: Start a Sale
-
From the terminal Home Screen, start a Sale.
-
Enter the transaction amount.
-
Add tips if needed, then proceed with the transaction.
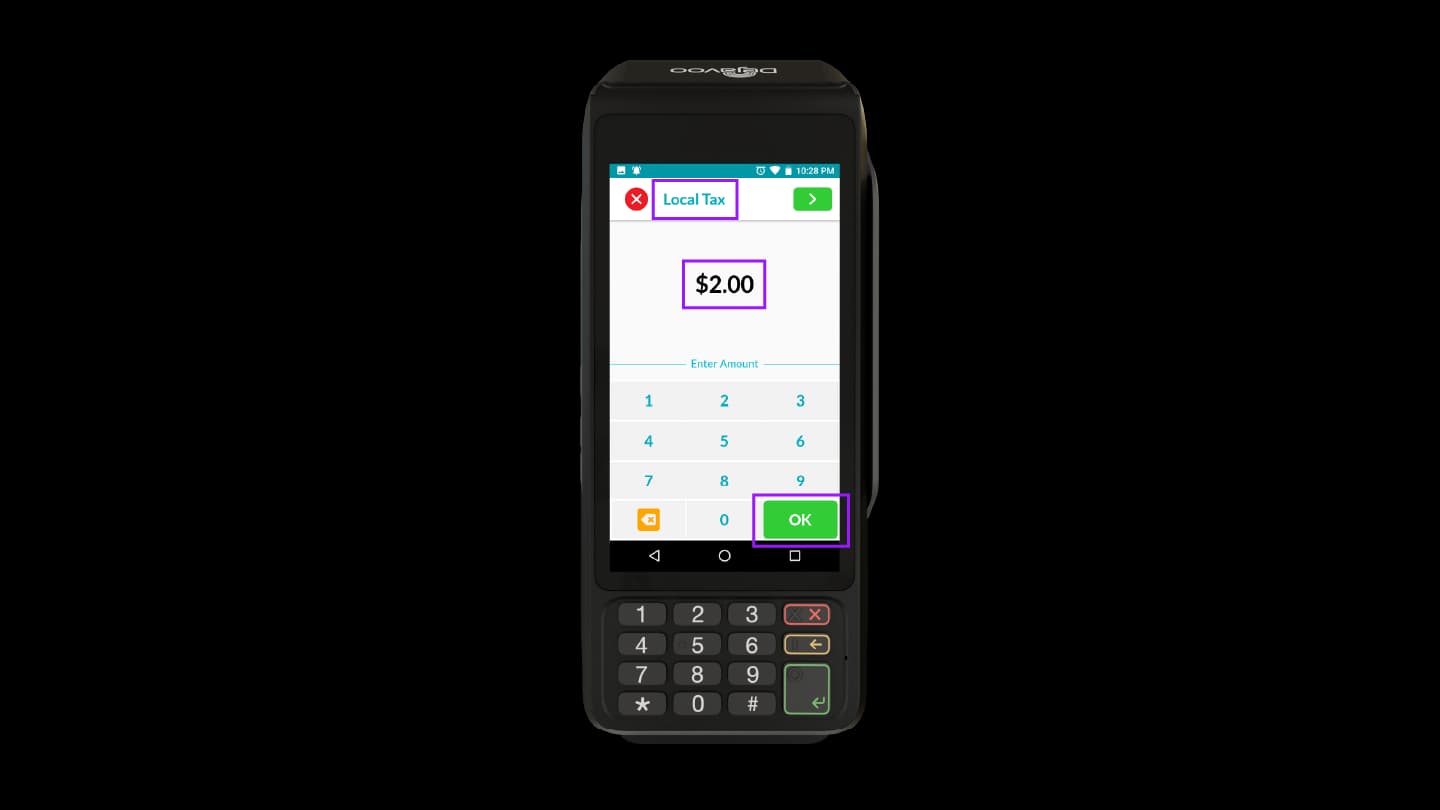
Step 2: Review Tax Breakdown
On the Breakdown screen, the following tax components are displayed (if enabled):
-
Tip
-
Tax1 (e.g., State Tax)
-
Tax2 (e.g., Local Tax)
-
Reduced Tax (if configured)
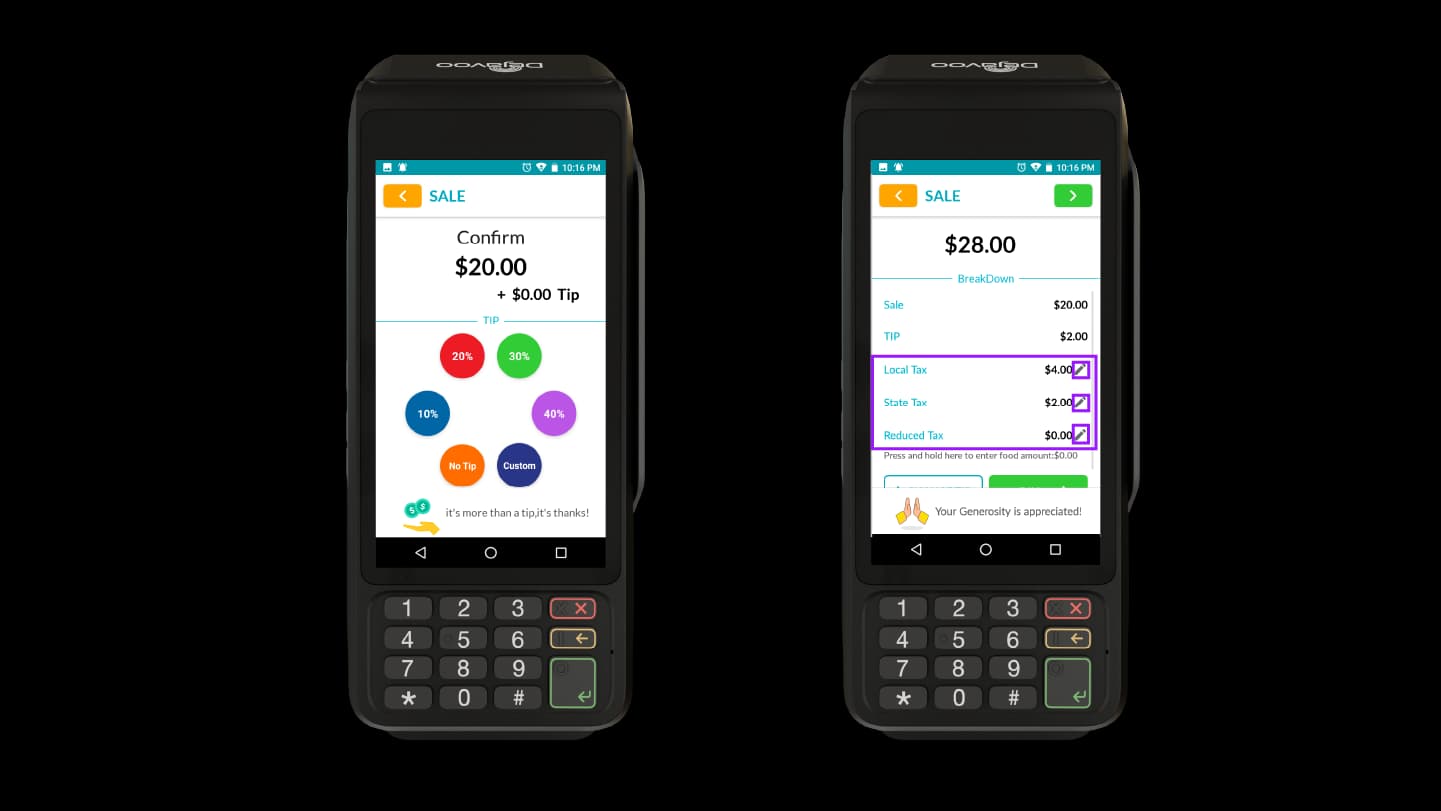
Step 3: Modify Tax Amounts (If Enabled)
Tap the Edit (✏️) icon next to the applicable tax field.
After tapping the edit icon:
-
Enter the tax amount using the on-screen keypad.
-
Tap OK to save and apply the updated tax amount.
This allows merchants to adjust the tax value for the current transaction manually.
Step 4: Complete the Transaction
-
Review the updated total amount.
-
Proceed with the transaction.
Configuring the Tax for Merchants Using Register Lite
Taxes for merchants using Register Lite must be configured from the Inventory module under the Merchant Login. Tax settings configured in the ISO account or Edit Parameters do not apply to Register Lite transactions.
Step 1: Log in to the Merchant Portal
-
Log in to the iPOSpays Portal using a Merchant account.
-
Click Inventory from the left navigation menu.
-
Select the appropriate Store from the drop-down (if multiple stores are available).
Step 2: Access Tax Settings
-
Click the List View icon.
-
Select Settings.
-
Click Taxes.

Step 3: Configure Tax Details
-
Select the Taxes tab
-
Enter a custom Tax Name.
-
Enter the Tax Percentage.
-
Select the Tax Type:
— State Tax, or
— Local Tax
-
To add tax:
— Click the ( + ) icon.
— Configure the second tax (for example, one State Tax and one Local Tax).
Step 4: Save Tax Configuration
-
Click Save to apply the tax settings.
-
The configured taxes will now be available for selection when adding or editing items in Register Lite inventory
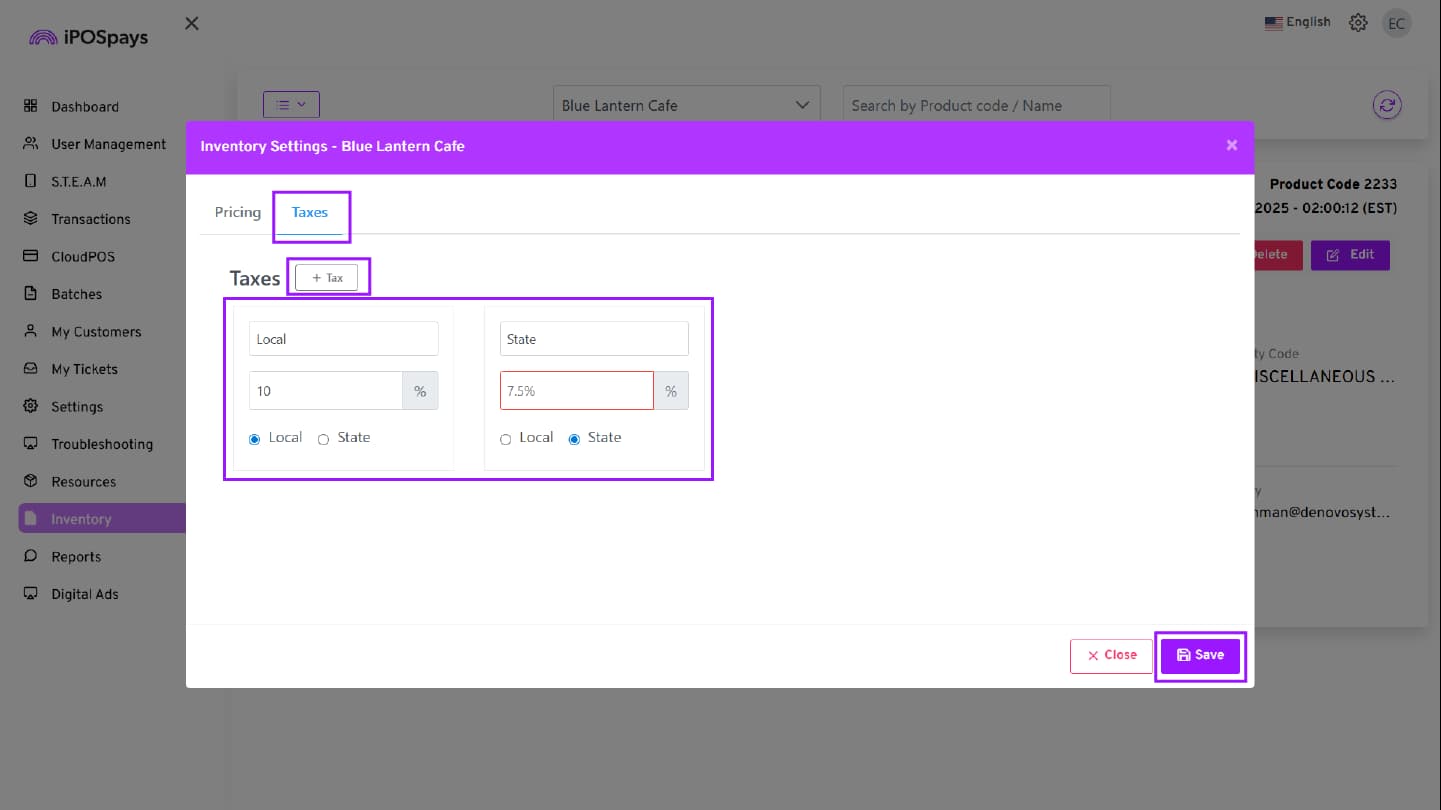
Taxes configured here apply only to Register Lite and CloudPOS Itemized Billing, and tax selection is performed at the item level when products are added to inventory. Any tax configured from the payment terminal will automatically sync back to the iPOSpays Portal.
How Taxes Are Applied on the Payment Terminal Using Register Lite
Once the ISO enables Register Lite and inventory (including taxes) is configured in the Merchant Portal, merchants can access Register Lite directly from the payment terminal.
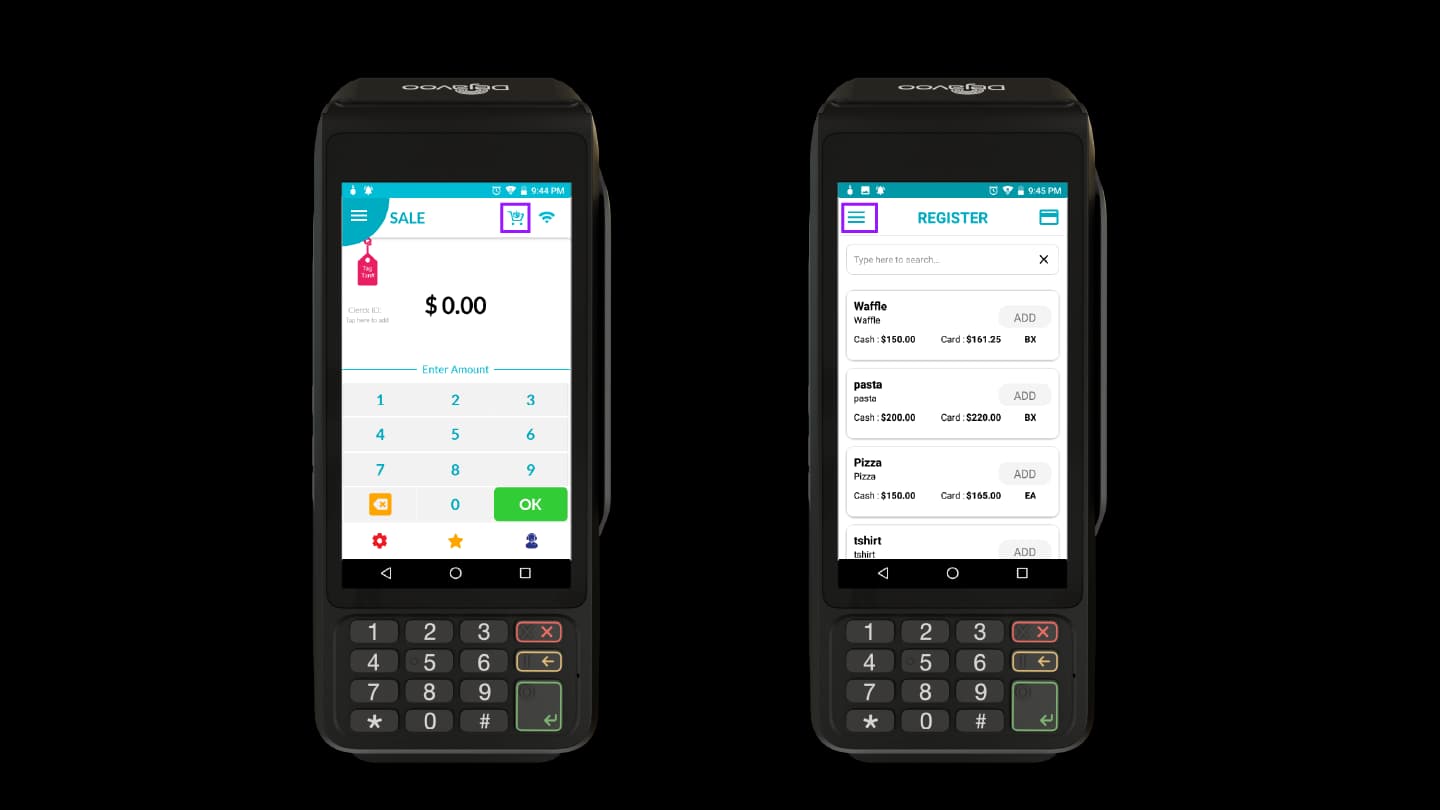
Step 1: Launch Register Lite
-
On the terminal’s payment screen, tap the Cart icon. Register Lite opens and displays the available inventory items.
-
Tap the Menu icon in REGISTER.
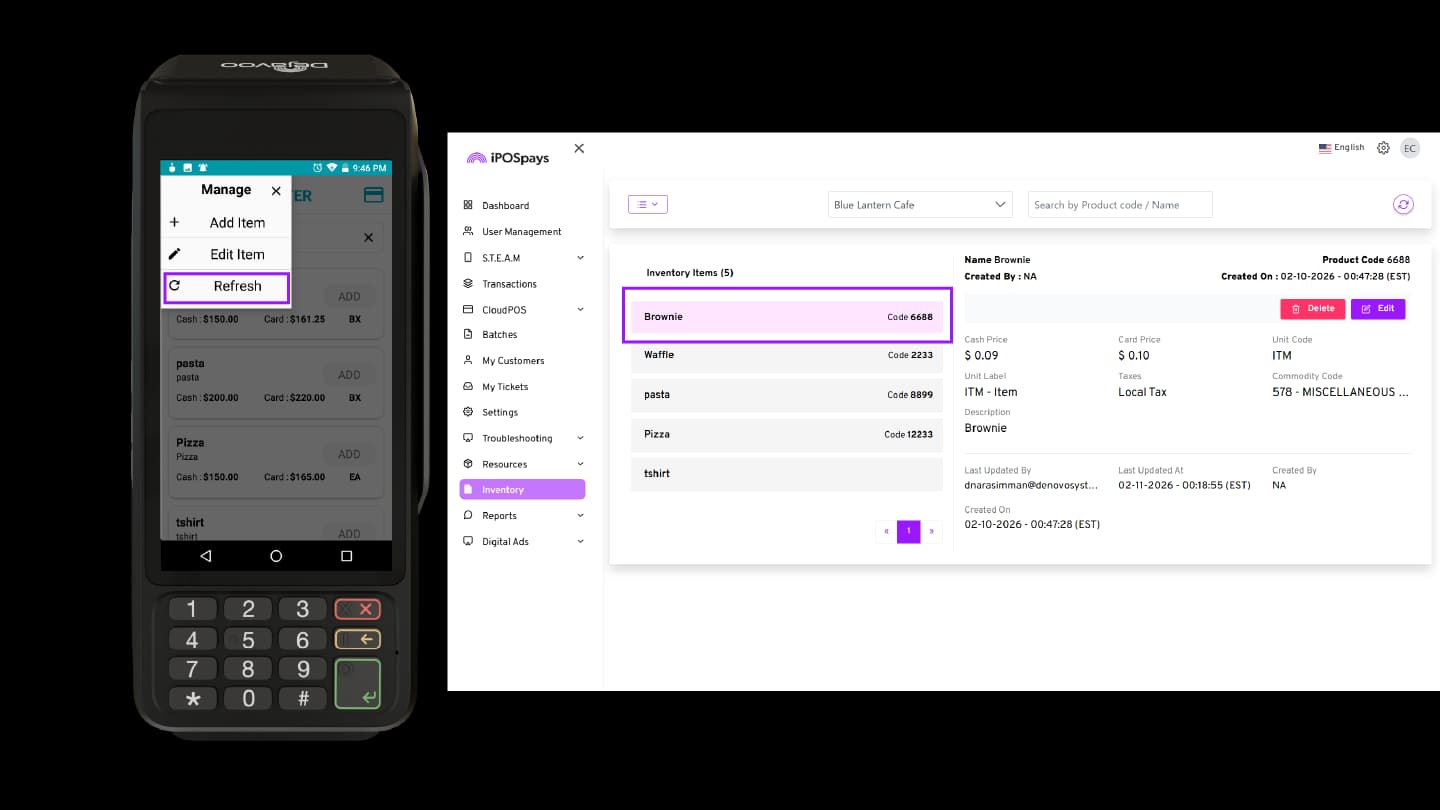
Step 2: Managing Item Taxes on the Terminal
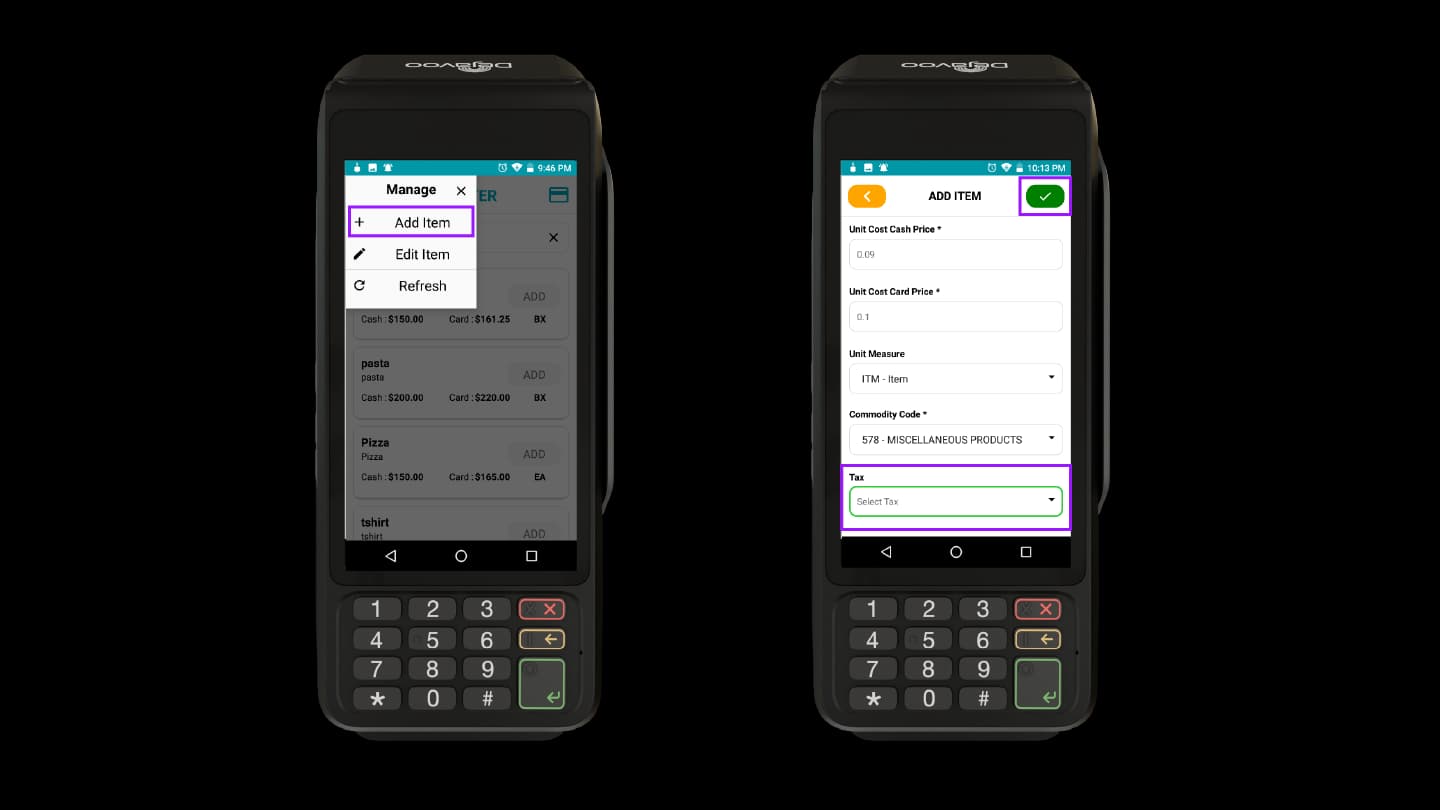
Once you tap the Menu icon, the following options will be available:
Add Item
-
You can add a product directly from the terminal. Click Add Item to open the Add Item screen, then enter all the product details, including the applicable tax.
-
Assign the applicable tax by selecting it from the Tax dropdown while creating the item.
Refresh
-
Click Refresh to sync products and updates from the iPOSpays Portal.
-
Reflect newly added or updated items, including tax changes, on the terminal.
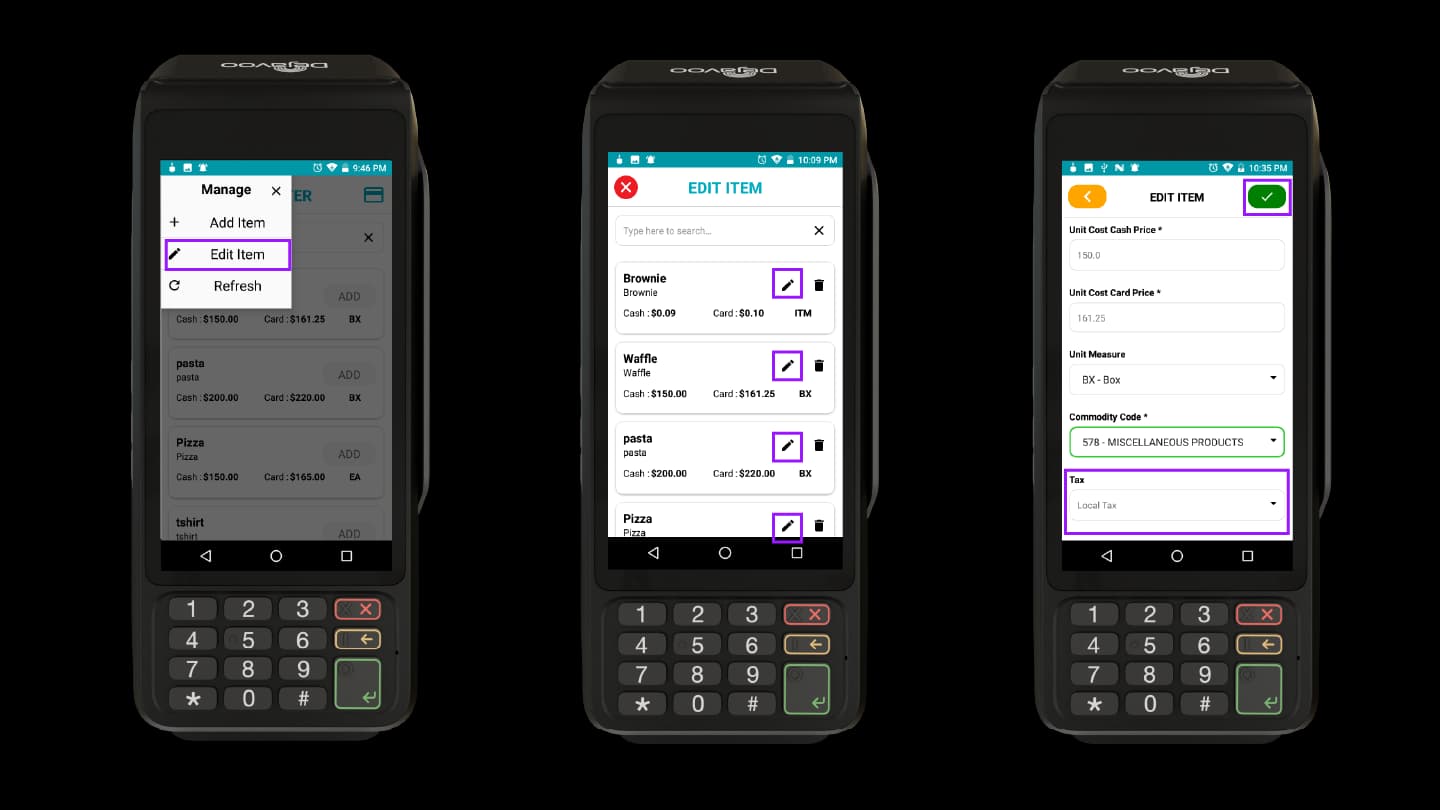
Edit Item
-
Click Edit to modify existing item details from the terminal.
-
Once you select the Edit option, the Edit Item screen will open. Click the Edit icon next to the required product.
-
Update or change the tax assigned to an item as required
Once taxes are applied or modified on the payment terminal, proceed with the transaction process.
Refer to the Register Lite for the complete process of setting up and using Register Lite on the terminal.
Inventory items and tax settings sync automatically between the Merchant Portal and the terminal after a refresh. Register Lite is available on Dejavoo terminals and Tap to Pay on iPhone via iPOSgo! (iOS).
How Taxes Are Reflected in CloudPOS Transactions
When tax is enabled for the TPN, it will automatically reflect in CloudPOS transactions, such as:
-
Quick Pay
-
Itemized Billing
The tax amount will appear in the transaction breakdown.
Refer to the User Guide to Merchant CloudPOS Transactions for detailed information
How Taxes Are Reflected in Generic Hosted Payment Page (GHPP)
If taxes are enabled for the merchant, the tax amount will appear on the payment page breakdown when the customer enters the transaction amount.
Customers can expand the Break Up section to view the detailed breakdown of the transaction amount, including applicable taxes and fees.
Refer to the Generate Payment Form on iPOSpays for detailed information on GHPP payment processing.