How to Configure and Manage Receipts and E-Receipts in iPOSpays
Receipts and e-receipts in iPOSpays are generated for all transactions and can be viewed, downloaded, printed, or shared.
Supported Channels
- POS
- CloudPOS
- iPOSgo! (iOS & Android)
- GHPP
How to Enable and Configure Receipt Settings on iPOSpays (ISO & Merchant)
Both ISO and Merchant users follow the same steps to enable and configure receipt settings.
Steps to Enable and Configure Receipt Settings
Step 1: Log in to the iPOSpays Portal
Log in to the iPOSpays Portal using your ISO or Merchant credentials.
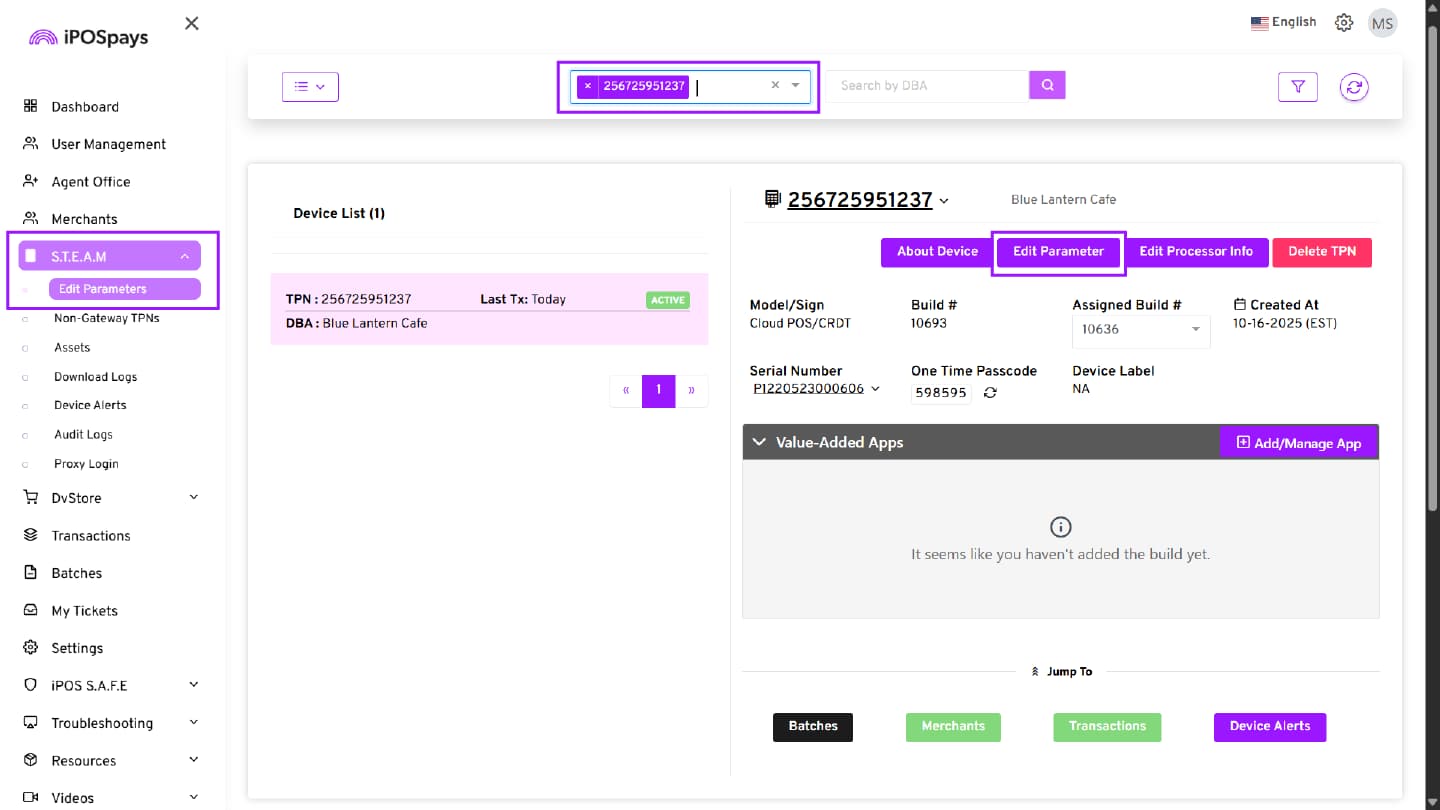
Step 2: Navigate to Terminal Settings
- Click S.T.E.A.M from the left menu
- Select Edit Parameters
Step 3: Search and Select the Terminal Profile Number (TPN)
- Use the search box to find the required TPN
- Select the TPN
- Click Edit Parameter
Step 4: Navigate to Receipt Tab
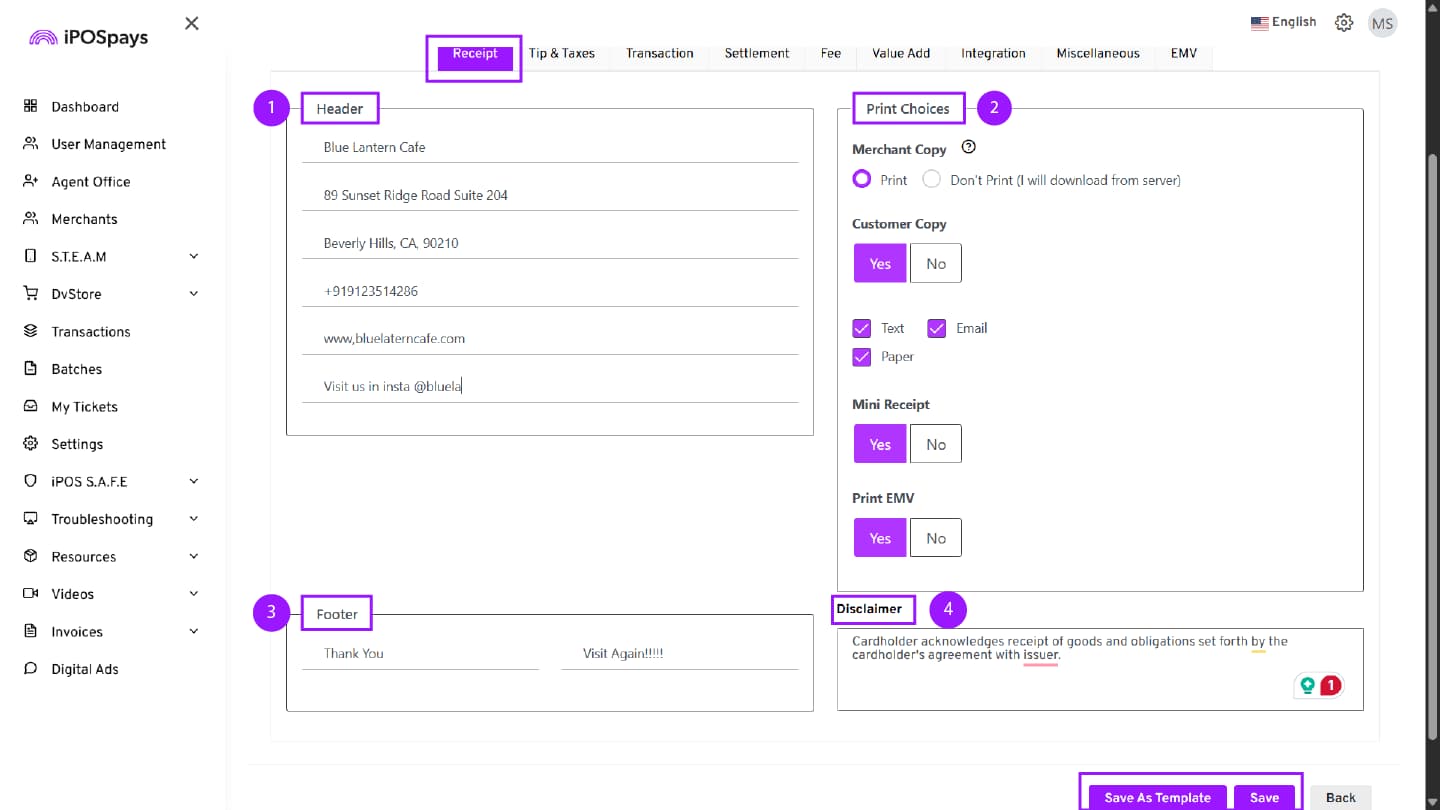
Click on the Receipt tab and configure the required settings.
Receipt Configuration Options
1. Header
The Header section is used to configure the business details displayed at the top of the receipt.
Header 1 to Header 4 (Required Fields)
- These fields are mandatory
- Each header line supports up to 24 alphanumeric characters
- Typically used for:
- Business Name
- Address Line 1
- Address Line 2
- City, State, ZIP / Contact details
Header 5 & Header 6 (Optional Fields)
- Additional optional lines for extra information
- Can be used for:
- Website
- Tax ID
- Custom message
2. Print Choices
1. Merchant Copy Controls whether the merchant receipt is printed automatically.
- Print – Prints the merchant copy from the terminal
- Don’t Print (I will download from server) – Skips printing; receipt can be accessed digitally
2. Customer Copy Controls whether a customer receipt is generated.
- Yes – Enables customer receipt
- No – Disables customer receipt
3. Customer Receipt Delivery Options
- Text – Sends receipt via SMS
- Email – Sends receipt via email
- Paper – Prints physical receipt
Multiple options can be selected based on business preference.
4. Customer copy print confirmation This parameter will take effect if print is the only option allowed for customer copy.
- Yes – Enables Customer copy print confirmation
- No – Disables Customer copy print confirmation
5. Mini Receipt Mini receipts contain all the transaction details just like a regular receipt, but are smaller in size, contributing to paper savings.
- Yes – Enables compact (short-format) receipt printing
- No – Prints a regular-size receipt
6. Print EMV Controls whether EMV (chip card transaction details) are printed on the receipt.
- Yes – Prints EMV-related details (such as chip data and verification information) on the receipt
- No – Does not print EMV details on the receipt
3. Footer
Allows adding custom messages at the bottom of the receipt.
Footer Fields 1 & 2 Enter custom notes such as:
- Thank you message
- Return policy
- Promotional text
4. Disclaimer
Defines the legal or acknowledgment message printed on the receipt.
Example:
“Cardholder acknowledges receipt of goods and agrees to the issuer’s terms.”
This ensures compliance and provides transaction acknowledgment.
Receipt printing is supported either through built-in printers on select terminals (such as P1, P3, P8, P18) or via external printers connected to the terminal.
Step 5: Save and Update Terminal
After configuring the parameters, you have two options:
- Save – Apply the current parameter configurations directly to the selected TPN.
- Save as Template – Save the current parameter configurations as a reusable template.
How to Access Receipts in POS
Step 1: Complete a Transaction
Process a transaction on the POS device.
Step 2: View Receipt Options
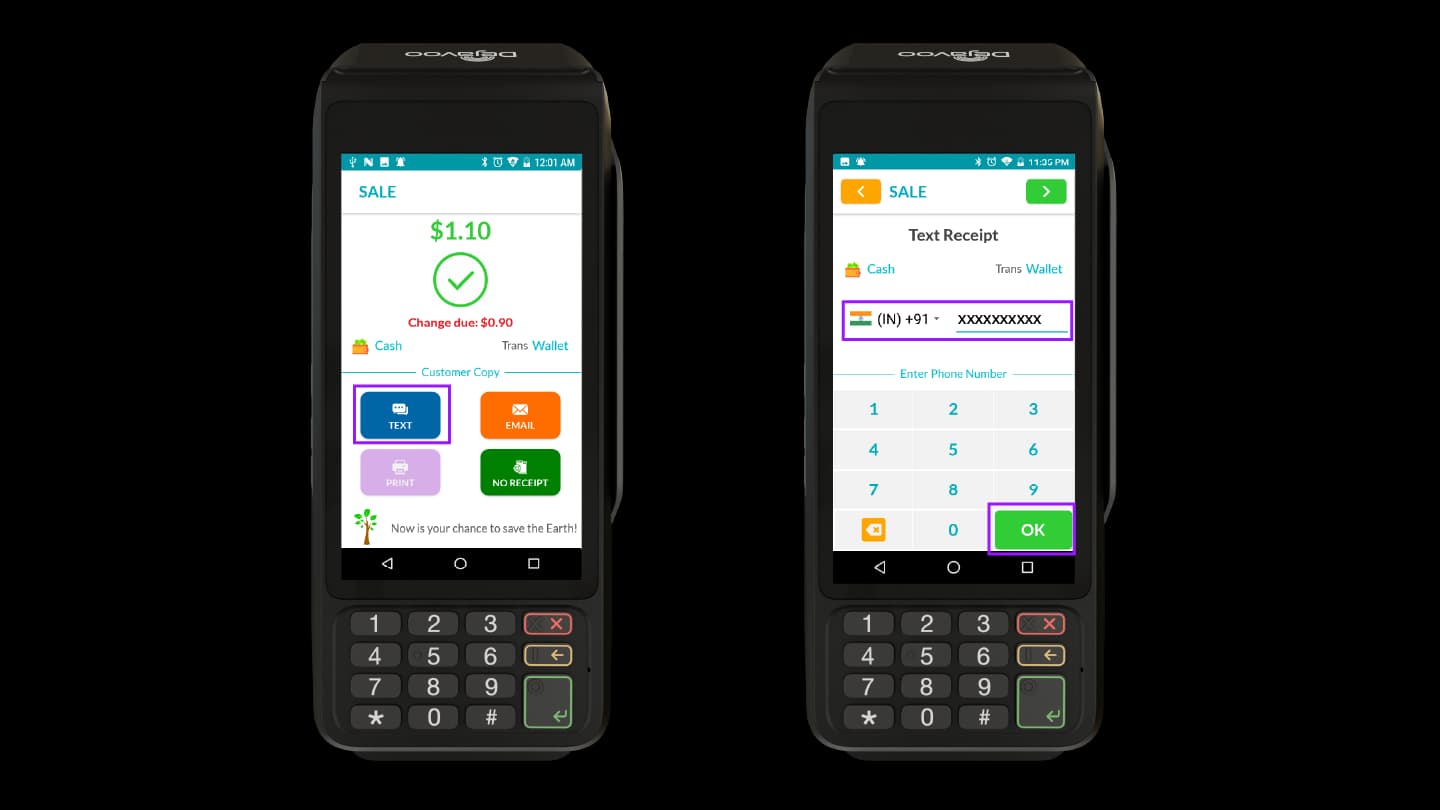
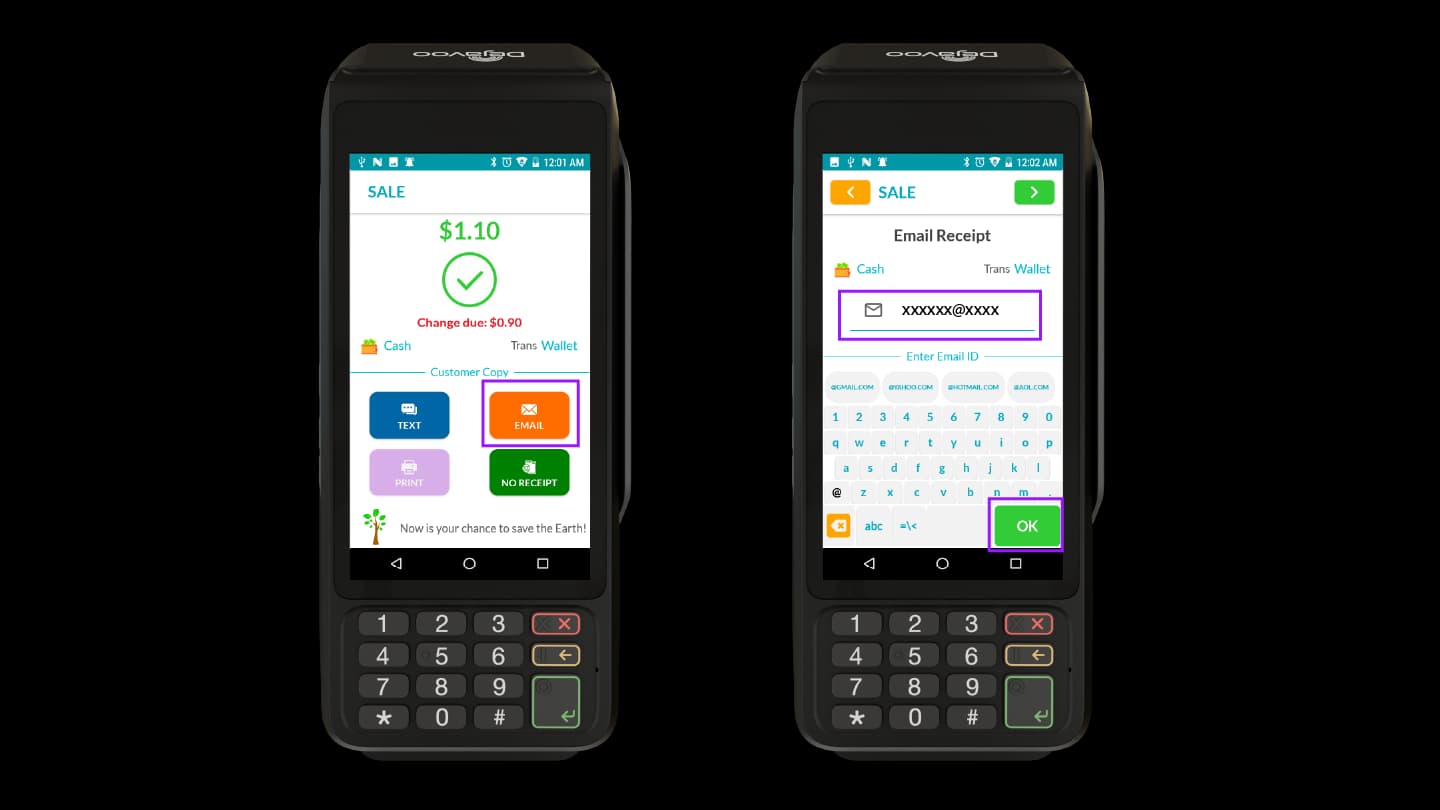
After successful payment:
- A Merchant Copy is automatically printed from the terminal as a paper receipt (if enabled).
- This printed receipt includes transaction details such as date, time, transaction ID, amount, tip (if enabled), and total.
- The following delivery options are available for the Customer Copy:
- Text (if enabled)
- Email (if enabled)
- Print (if enabled)
- No Receipt
Text Receipt
Step 3: Enter Phone Number
- Select TEXT from the receipt options
- The Text Receipt screen appears
- Choose the Country code
- Enter the customer’s phone number
Step 4: Confirm and Send
- Tap OK
- The receipt will be sent via SMS to the entered number
Email Receipt
Step 5: Enter Email Address
- Select EMAIL from the receipt options
- The Email Receipt screen appears
- Enter the customer’s email address
Step 6: Confirm and Send
- Tap the OK button
- The receipt will be sent to the provided email address
Paper Receipt (Print)
Step 7: Select Print Option
- Select PRINT from the receipt options
- The terminal will process the print request
Step 8: Receipt Printed
The customer copy is printed directly from the terminal.
Re-Print Receipt
The Re-Print feature allows merchants to access and resend receipts for card transactions. It supports multiple delivery options.
Steps to Re-Print Receipts
Step 1: Access Re-Print Option
- Tap the Favorites icon on the terminal screen
- Select the Re-Print Receipt option

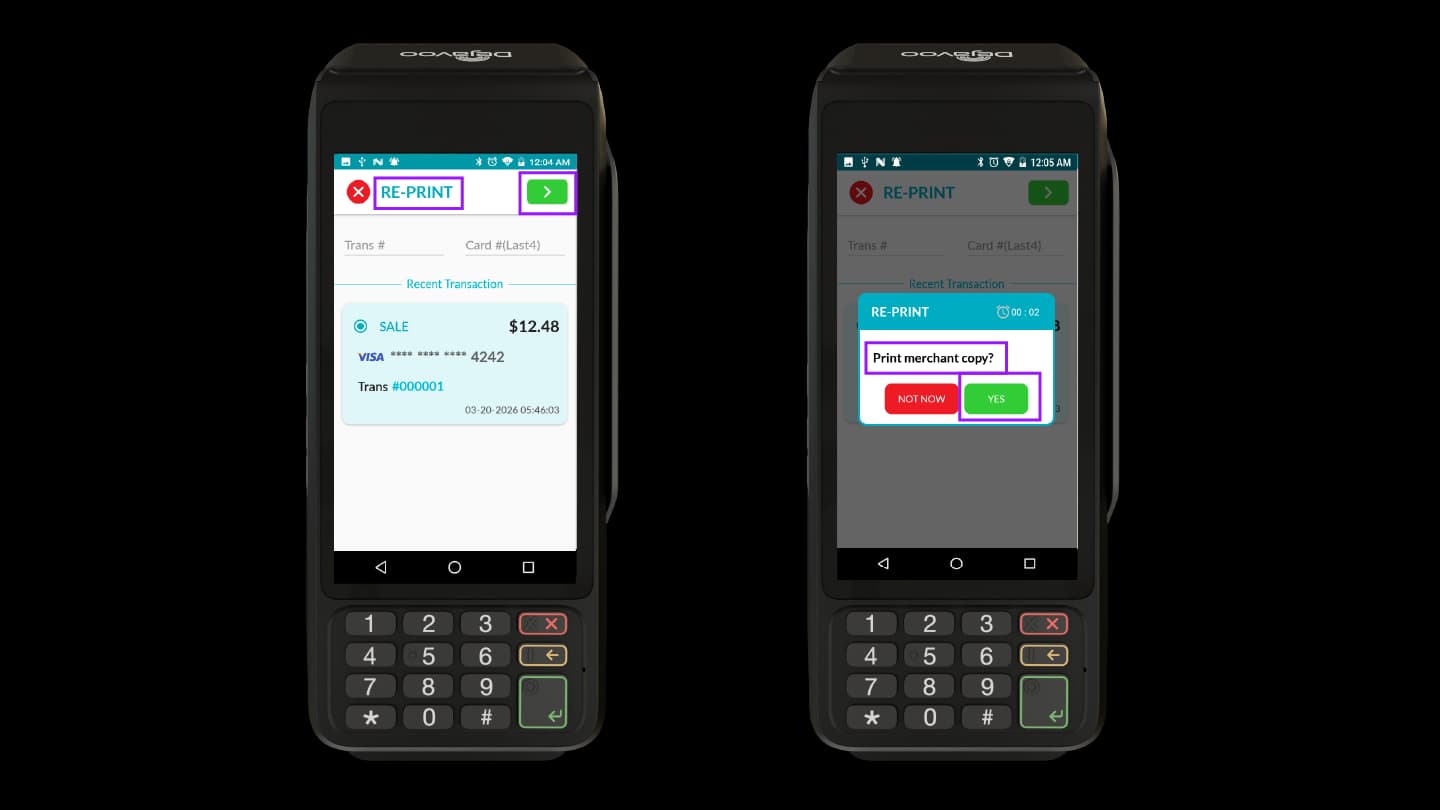
Step 2: View Recent Transactions
The RE-PRINT screen appears, showing recent transactions. You can:
- View the latest Card transactions
- Search using Transaction Number
- Search using Card Last 4 Digits
Step 3: Select Transaction
- Choose the required transaction
- Tap the green arrow (>) to proceed
Step 4: Select Print Option
The system prompts “Print merchant copy?”
-
YES – Prints the Merchant receipt
-
NOT NOW – Skips printing and returns to the Customer Copy screen
Step 5: Choose Receipt Option
- Select NOT NOW to return to the Customer Copy screen
- Select one of the following options:
- TEXT
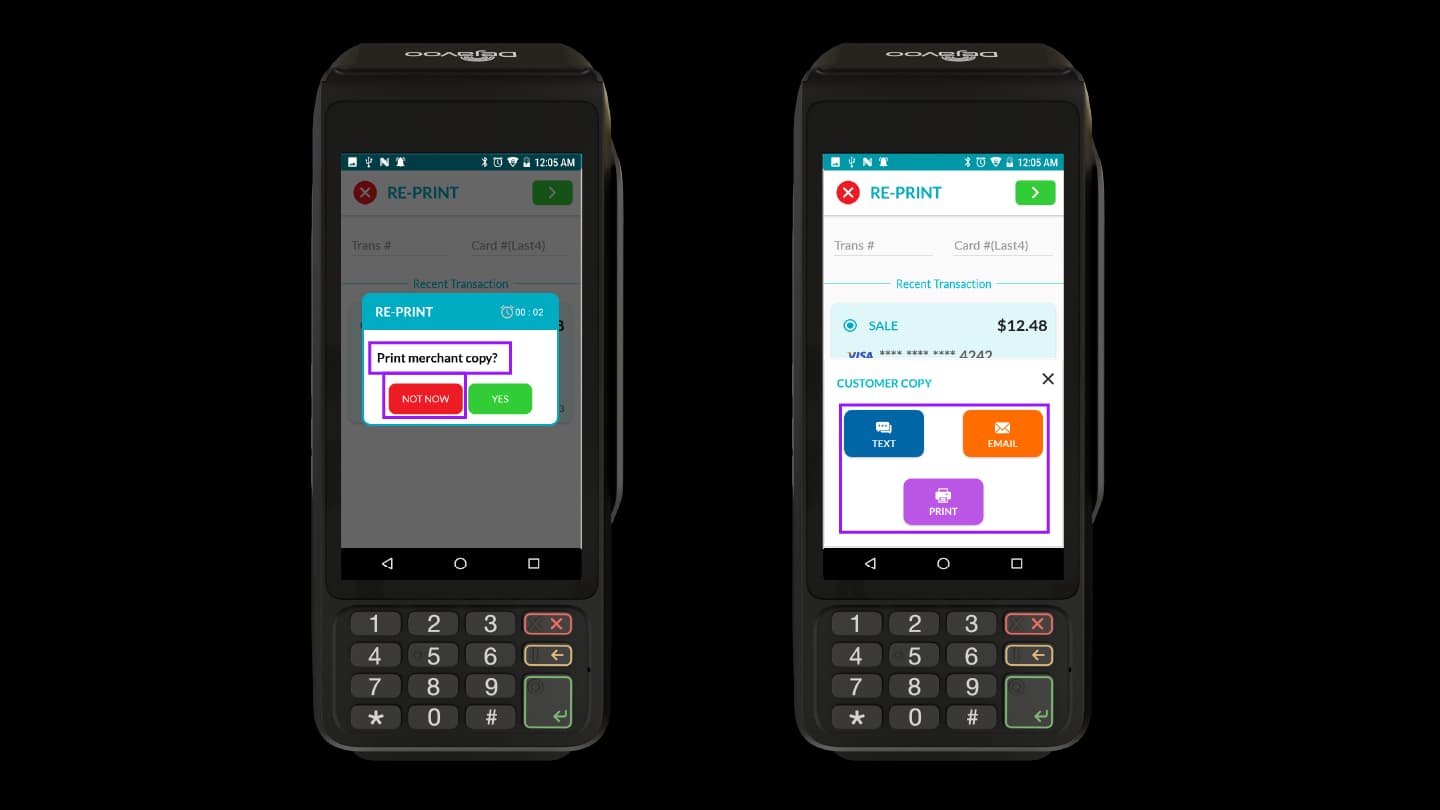
Step 6: Complete Re-Print
Follow the same steps (Step 3 to Step 8) described in How to Access Receipts in POS. The receipt will be sent or printed based on the selected option.
How to Access Receipts in CloudPOS
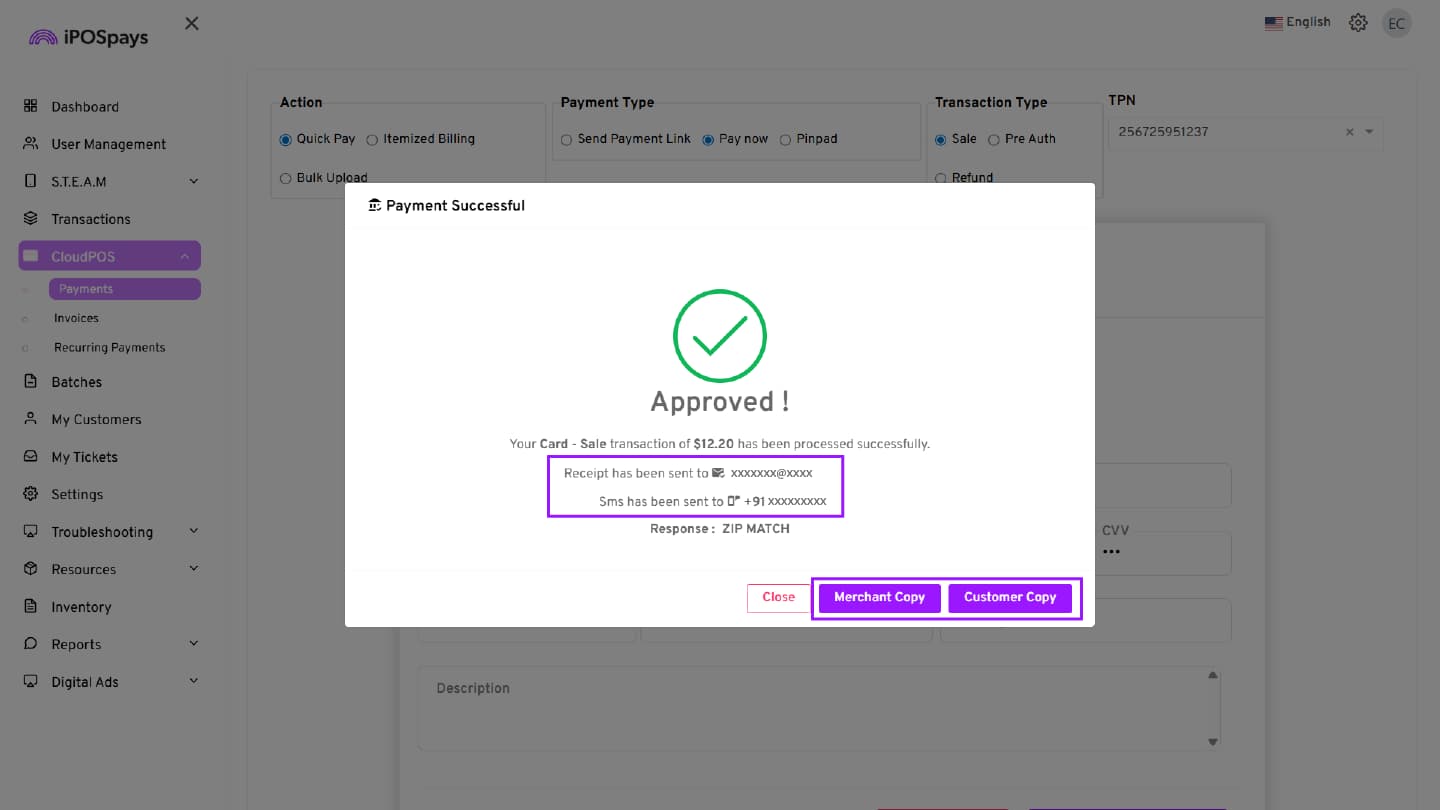
Once the transaction is completed in CloudPOS (Pinpad and Pay Now), a confirmation screen is displayed where the merchant can view and manage receipts:
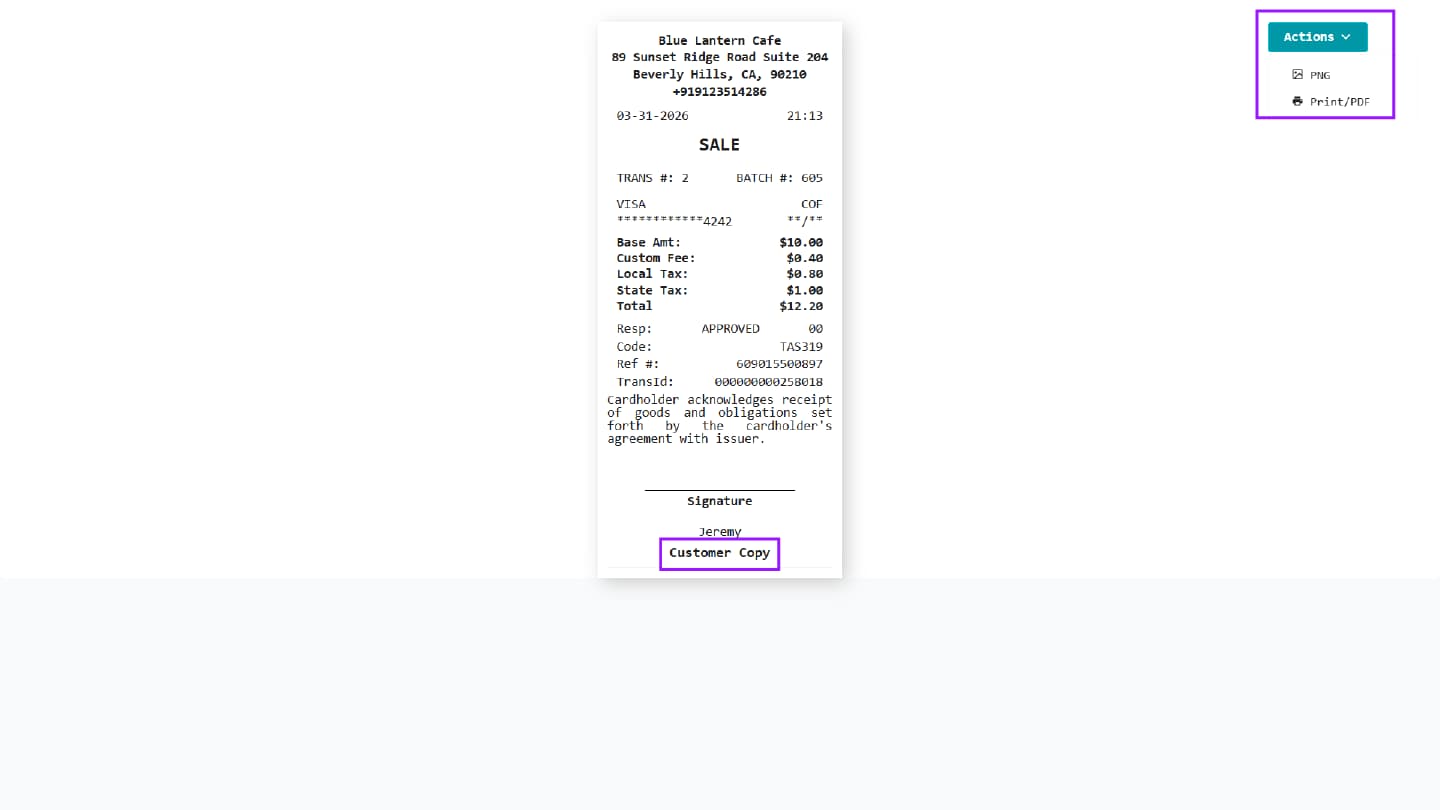
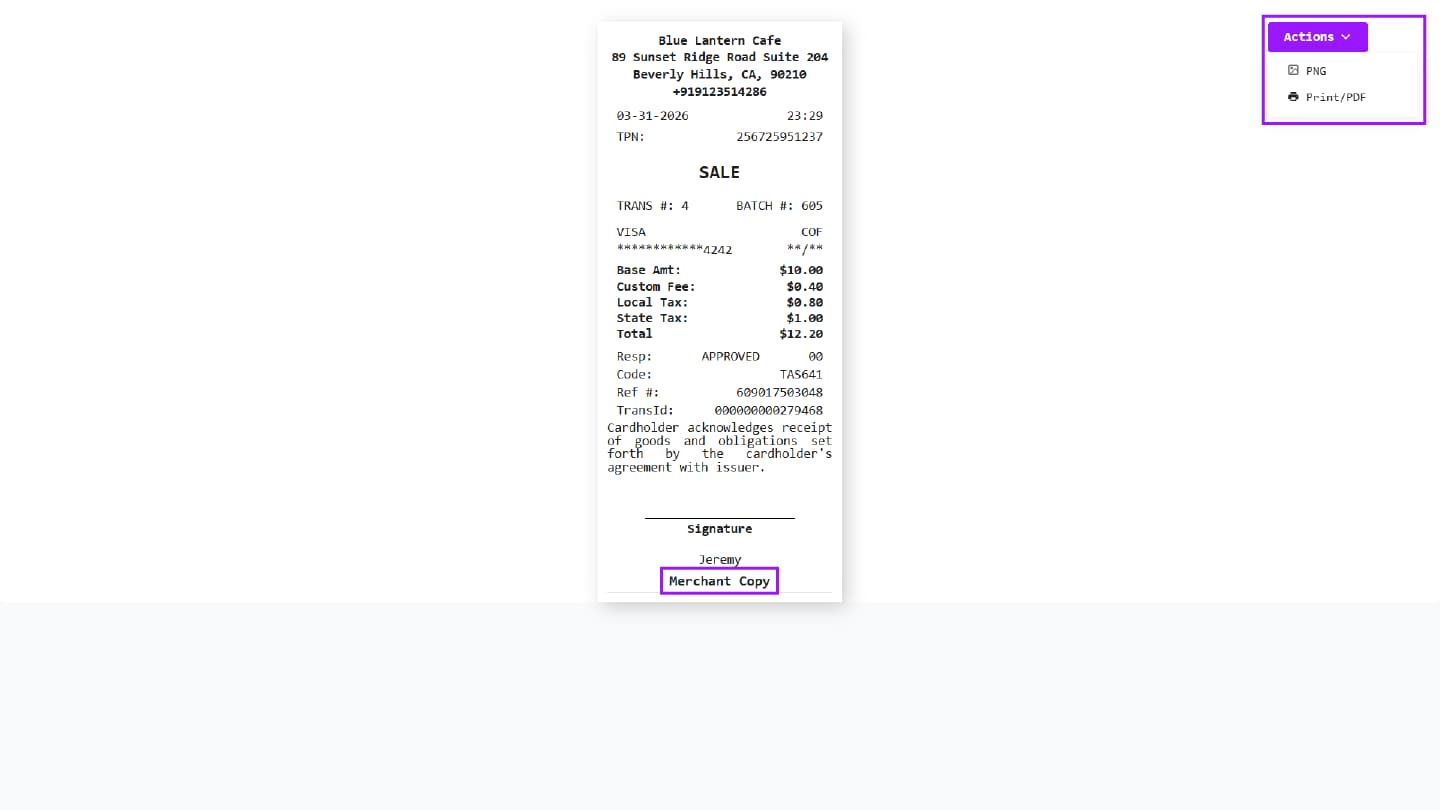
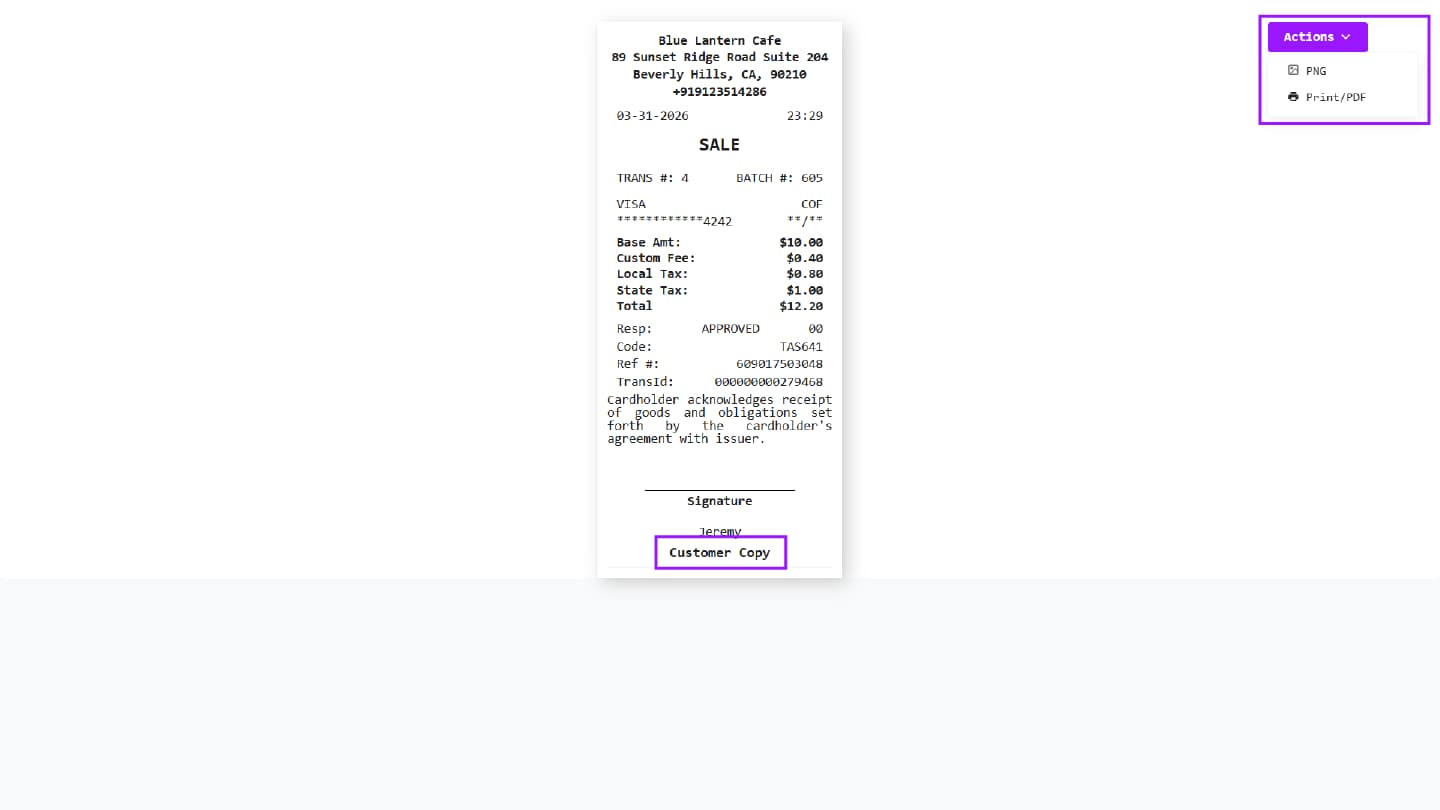
- Merchant Copy – Displays complete transaction details, including fees, taxes, and the processor’s response, for merchant reference.
- Customer Copy – Displays a customer-facing receipt with a transaction summary and masked payment details for customer reference.
Click the Actions button to either download the receipt as a PNG file or print it using a connected printer.
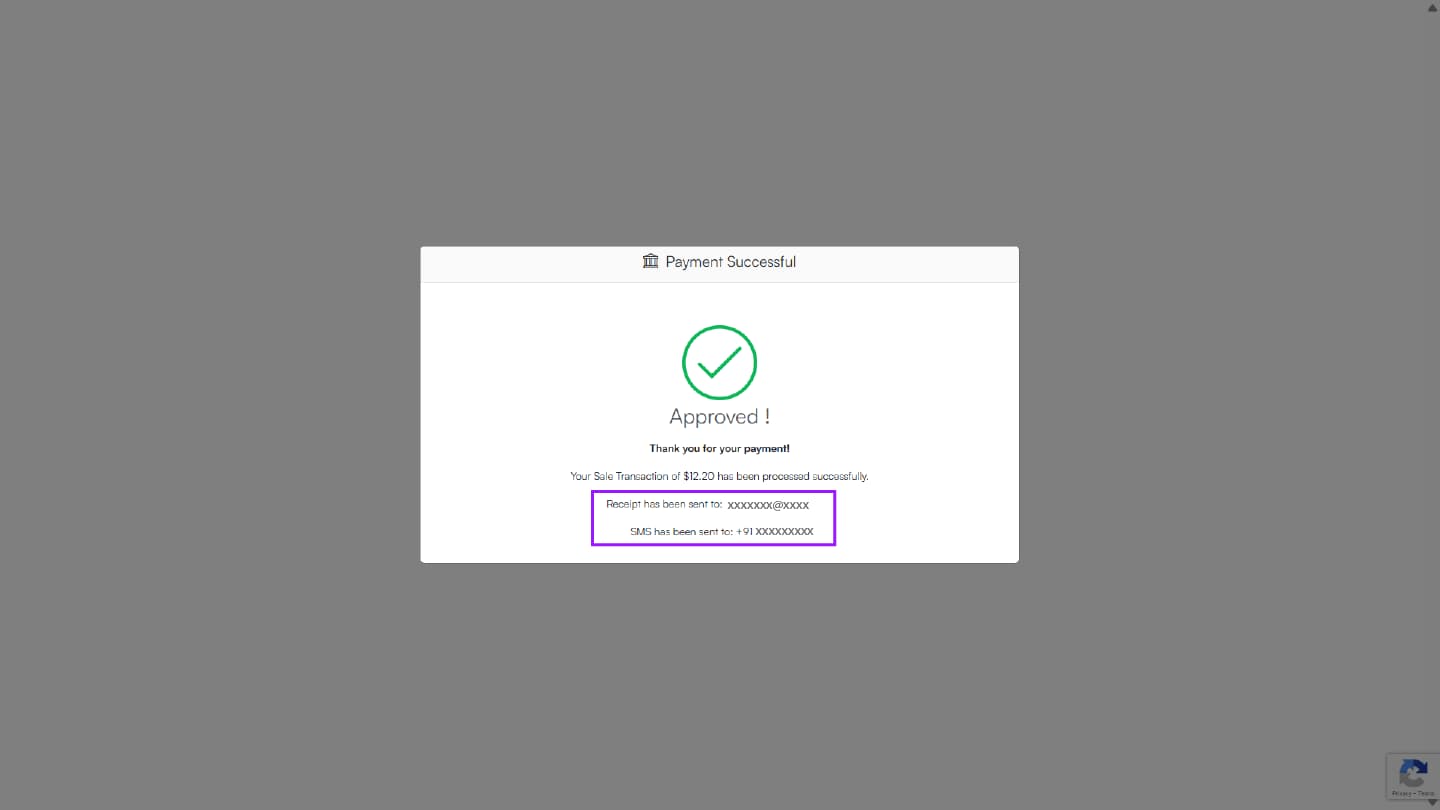
For customers, the receipt is sent to the email address and phone number entered during the transaction.
Send Payment Link (HPP)
For Send Payment Link, once the customer completes the payment:
- The Customer Copy is sent to the email address and mobile number entered during the transaction.
- The Merchant Copy can be accessed in the iPOSpays portal.
How to Access Receipts in iPOSgo! (iOS & Android)
Step 1: Complete a Transaction
Complete a transaction in iPOSgo!
Step 2: View Receipt Options
After a successful payment, the receipt screen is displayed with the following options (based on configuration):
- SMS
- No Receipt
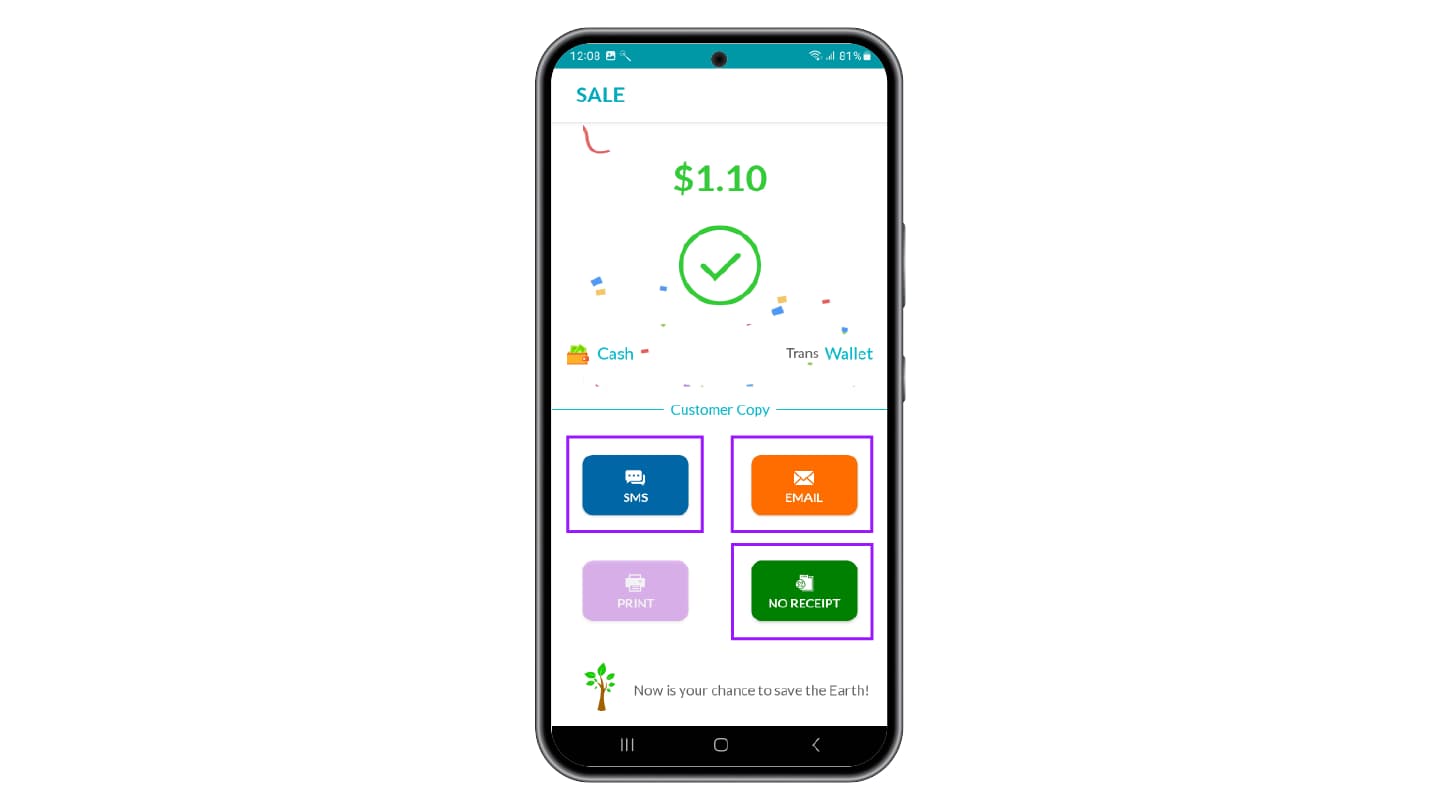
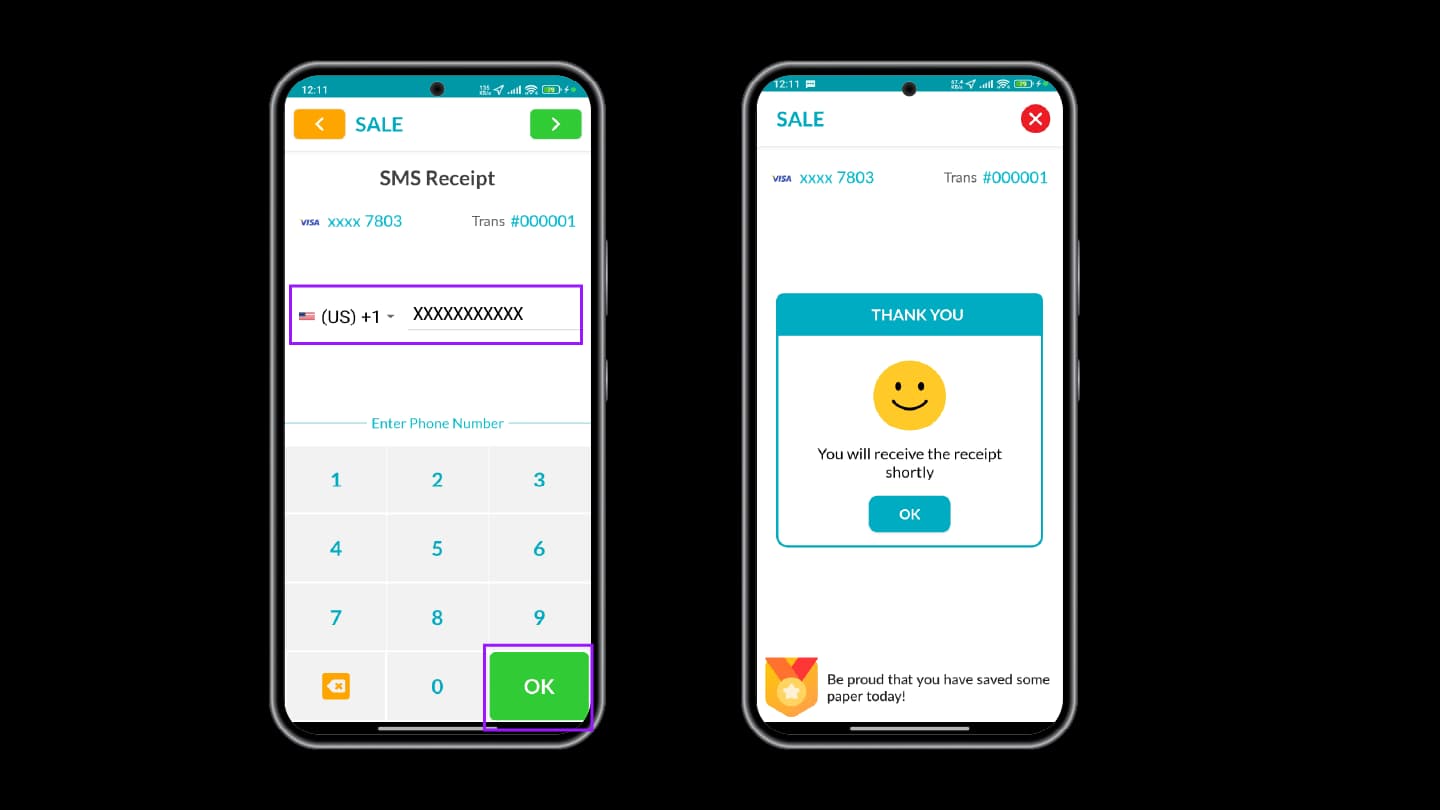
Send Receipt via Text
Step 3: Enter Phone Number
- Select SMS from the receipt options
- The SMS Receipt screen appears
- Choose the Country Code
- Enter the customer’s phone number
Step 4: Confirm and Send
- Tap OK
- The receipt will be sent via SMS to the entered number
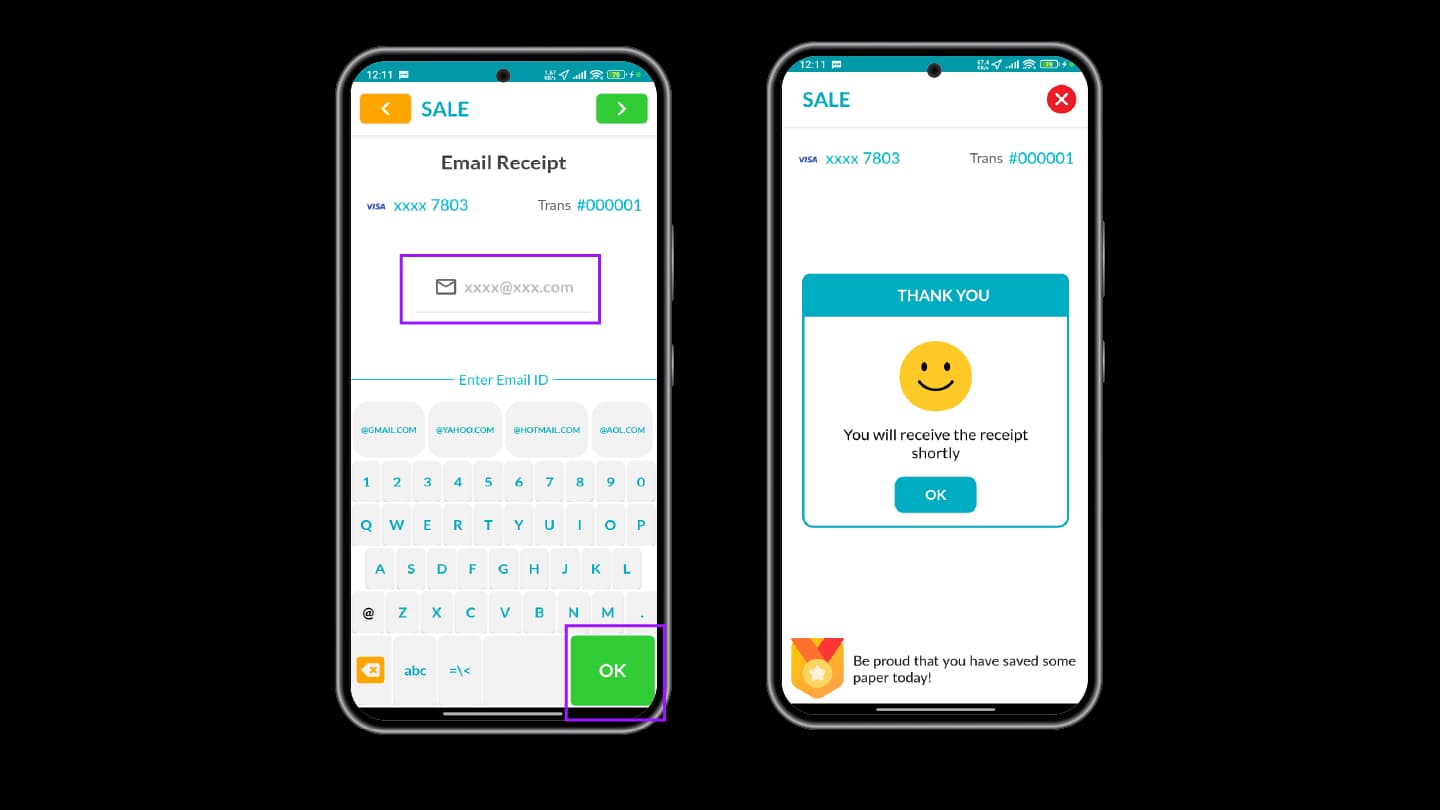
Send Receipt via Email
Step 5: Enter Email Address
- Select Email from the receipt options
- The Email Receipt screen appears
- Enter the customer’s email address
Step 6: Confirm and Send
- Tap OK
- The receipt will be sent to the provided email address
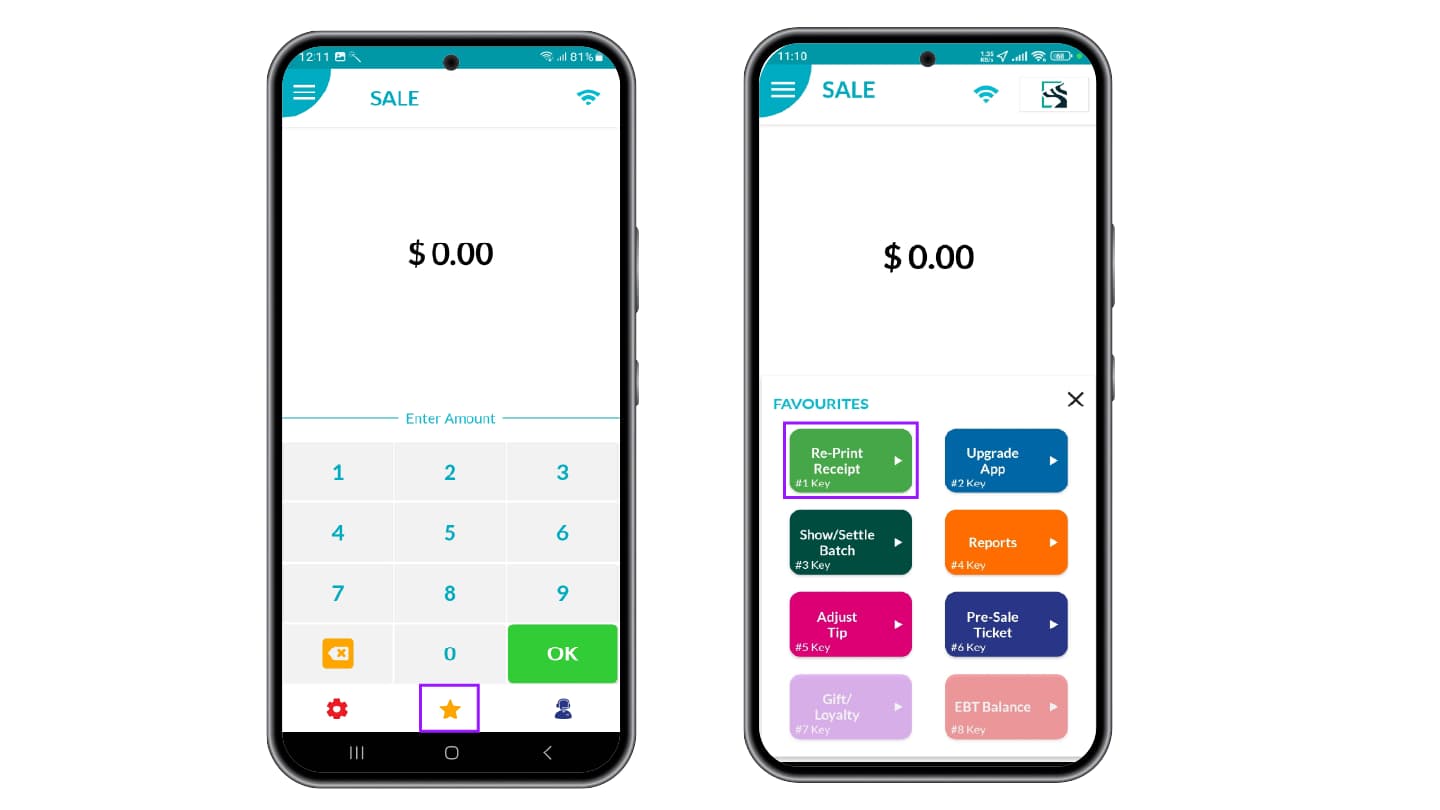
Steps to Re-Print Receipts
The Re-Print feature allows merchants to access and resend receipts for card transactions.
Step 1: Access Re-Print Option
- Select the Favorites icon on the terminal screen
- Select the Re-Print Receipt option
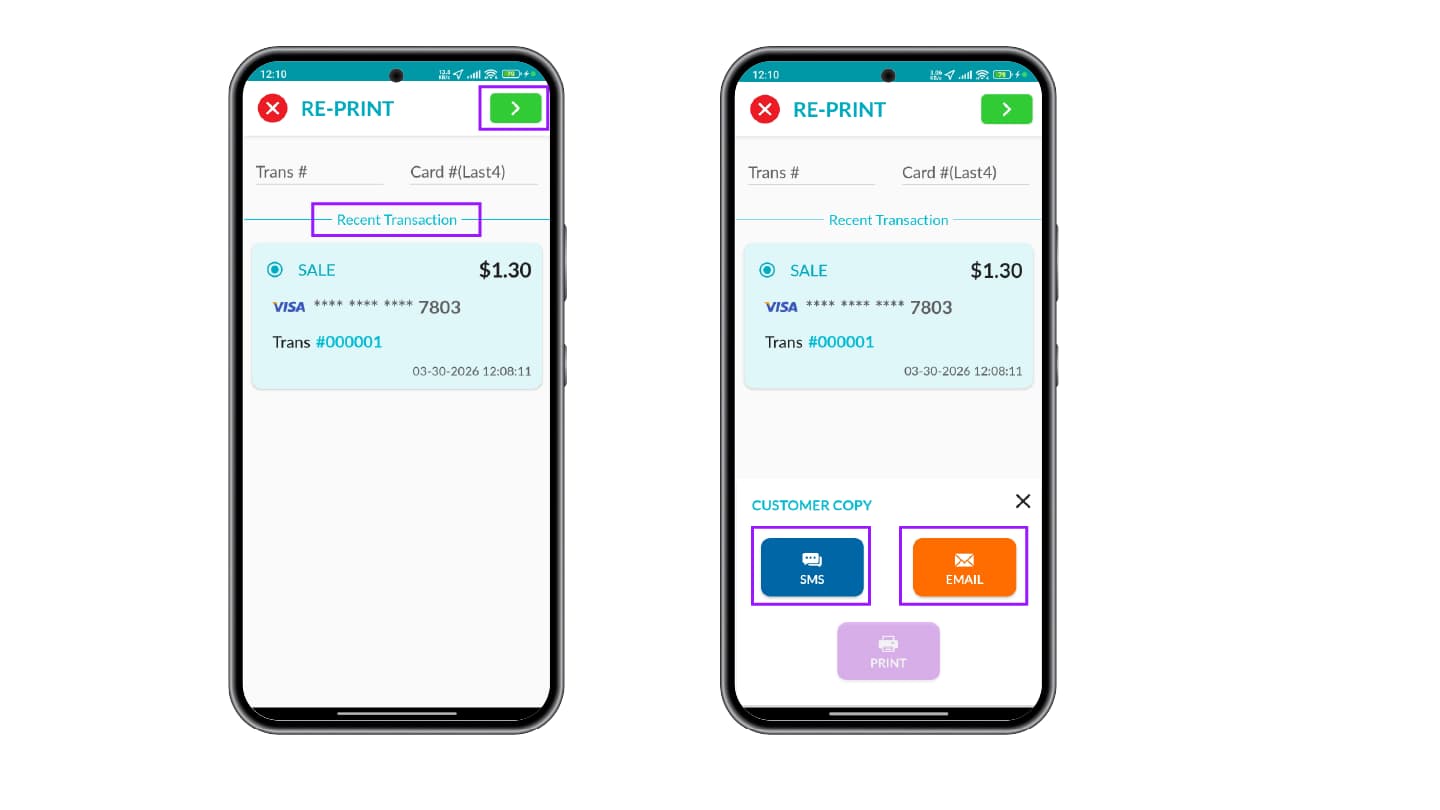
Step 2: View Recent Transactions
The screen displays recent card transactions. You can:
- View the latest transaction
- Search using Transaction Number
- Search using Card Last 4 Digits
Step 3: Select Transaction
- Choose the required transaction
- Tap the green arrow (>) to proceed
Step 4: Choose Receipt Option
The Customer Copy screen appears. Select one of the following options:
- SMS
Step 5: Complete Re-Print
Follow the same steps (Step 3 to Step 6) described in How to Access Receipts in iPOSgo! (iOS and Android). The receipt will be sent or printed based on the selected option.
How to Access Receipts in GHPP
Receipts can be accessed from the iPOSpays portal under the Transactions section. The Customer Copy is sent to the email address entered during the transaction.
Refer to View Receipt for GHPP Transactions in the Generate Payment Form on iPOSpays document for more details.
View Receipts for All Transactions from the Portal (Merchants and ISOs)
Merchants and ISOs can view receipts for transactions across all platforms in the iPOSpays Portal.
Steps to View Receipts
Step 1: Access from Portal
- Log in to the iPOSpays Portal using ISO or Merchant credentials
- Navigate to Transactions
- Search for the TPN and select the transaction you want to view the receipt for
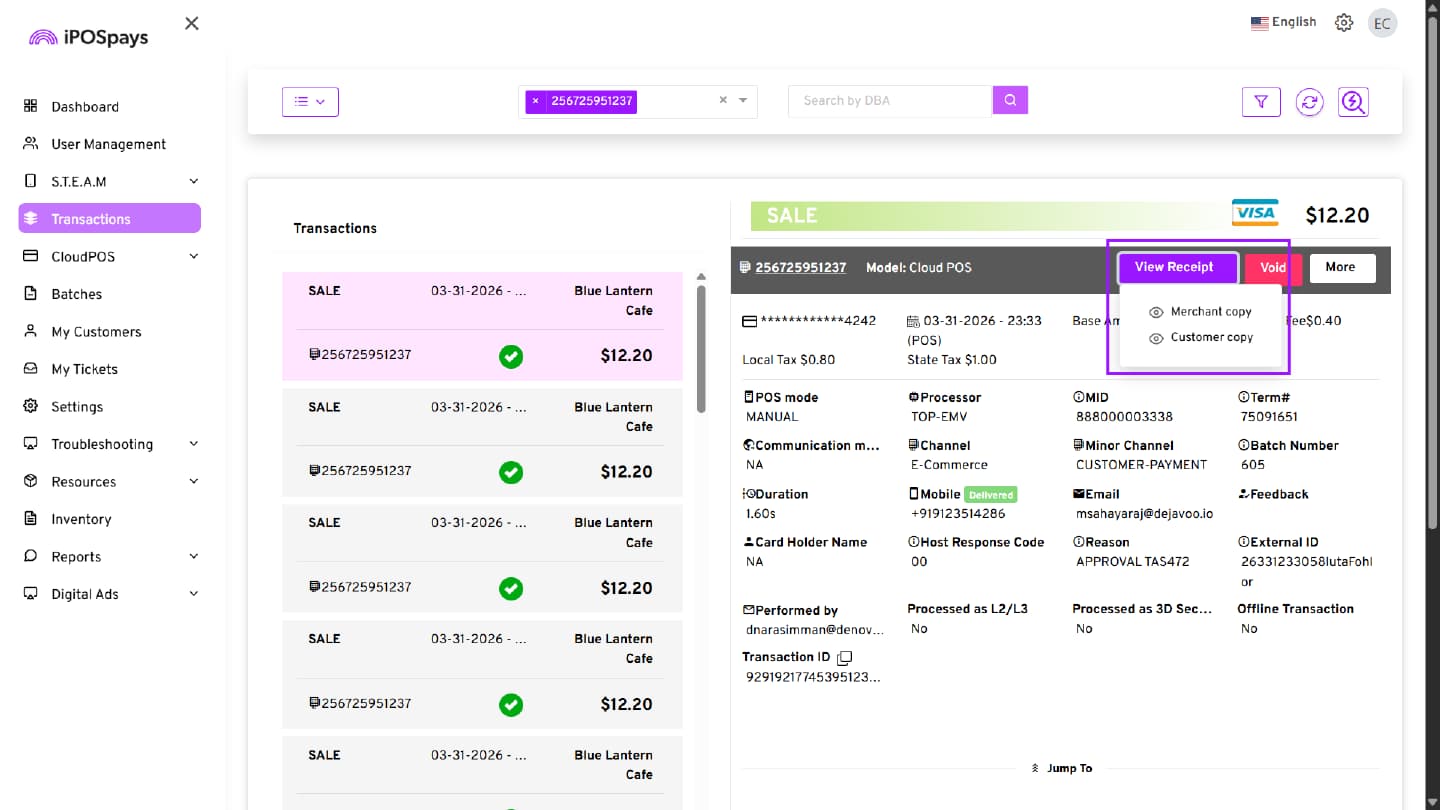
Step 2: Open Receipt Options
- Click View Receipt on the right panel for the selected transaction
- Two options will be displayed:
- Merchant Copy
- Customer Copy
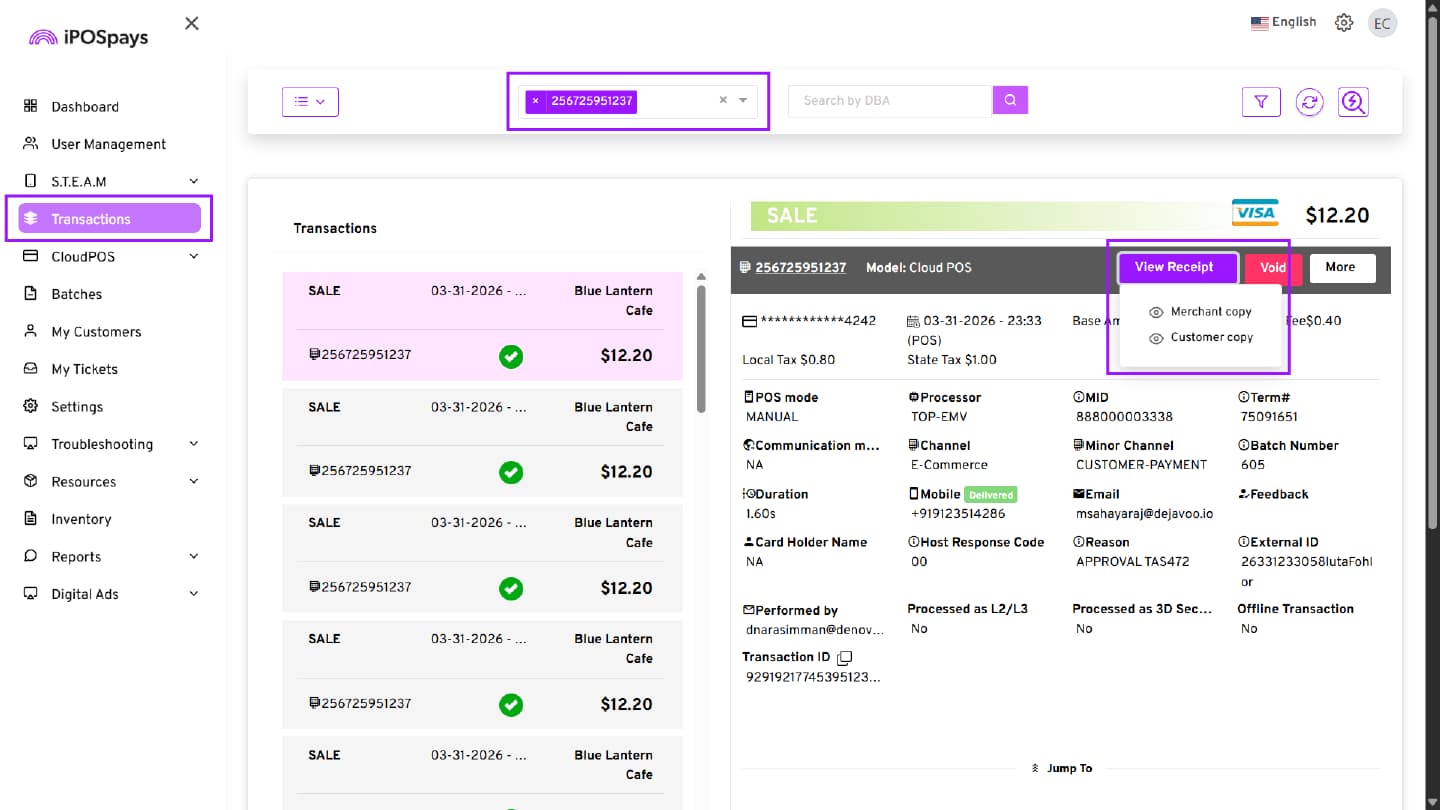
Step 3: Select Receipt Type
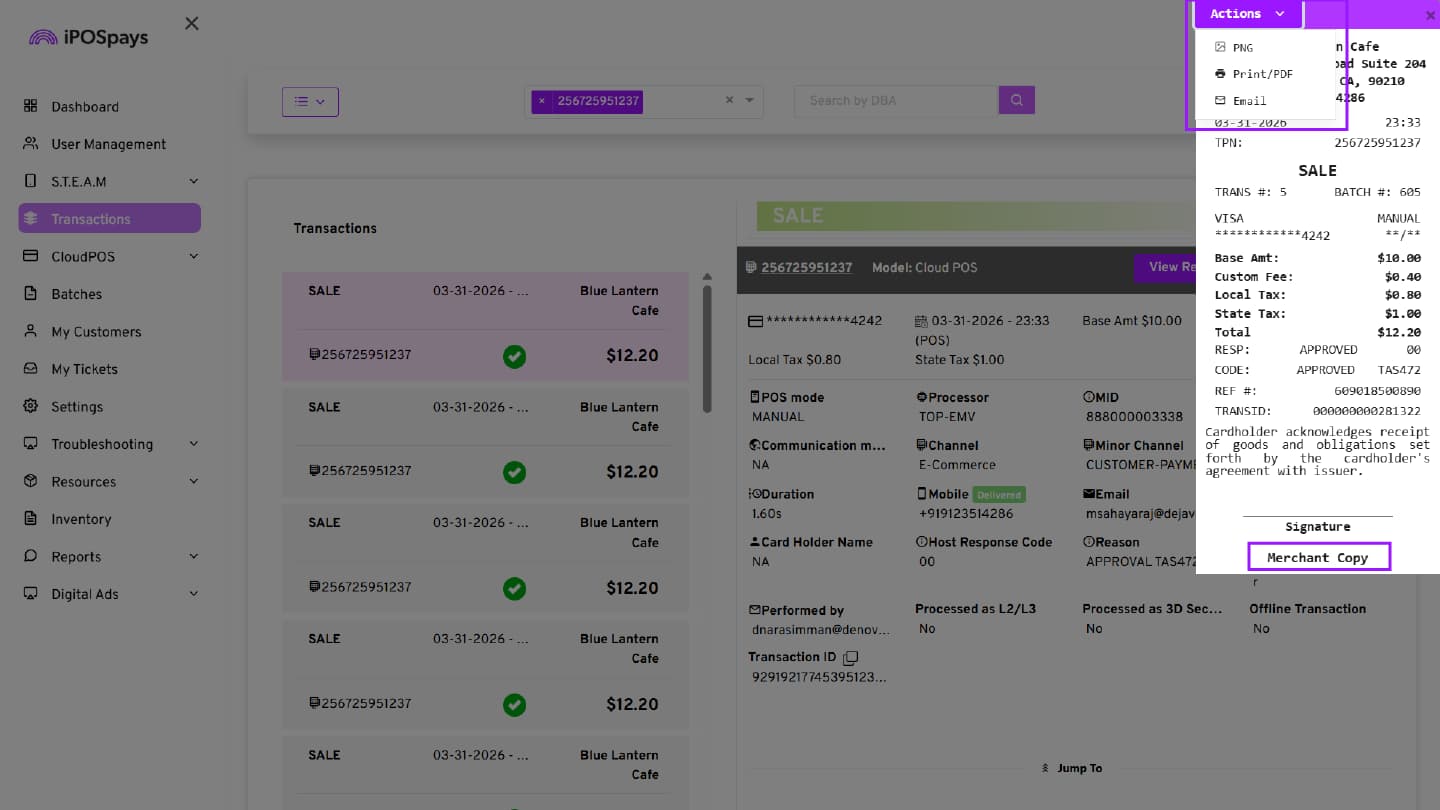
Click Merchant Copy or Customer Copy to view the respective receipt. The selected receipt will open displaying:
- Merchant Copy – Displays complete transaction details, including amount, fees, taxes, and processor response for merchant reference.
- Customer Copy – Displays customer-facing receipt with transaction summary and masked card details for customer reference.
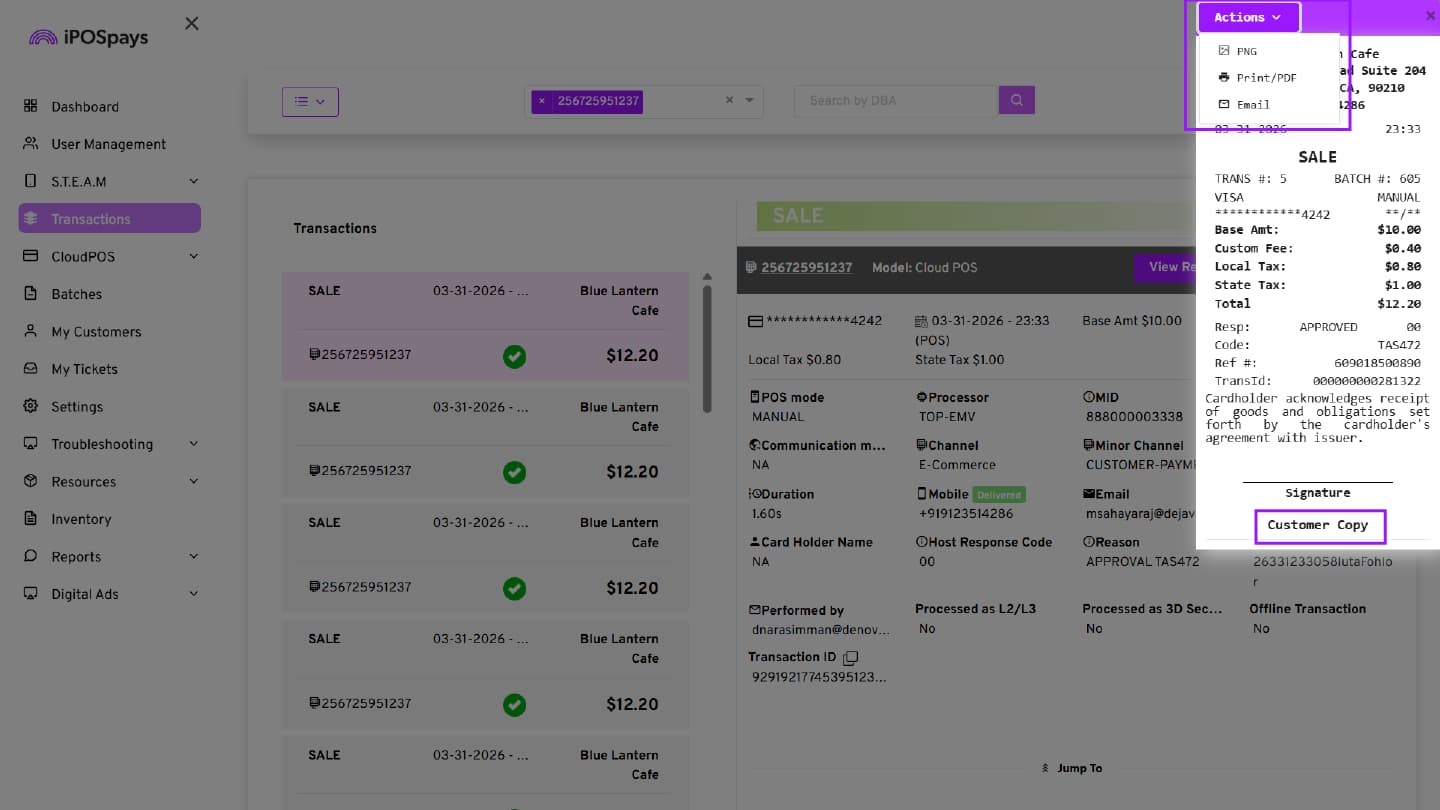
Step 4: Use Receipt Actions
Click the Actions button on the receipt screen. The following options will be available:
- PNG – Download the receipt as an image
- Print / PDF – Print or save the receipt as a PDF
- Email – Send the receipt to an email address
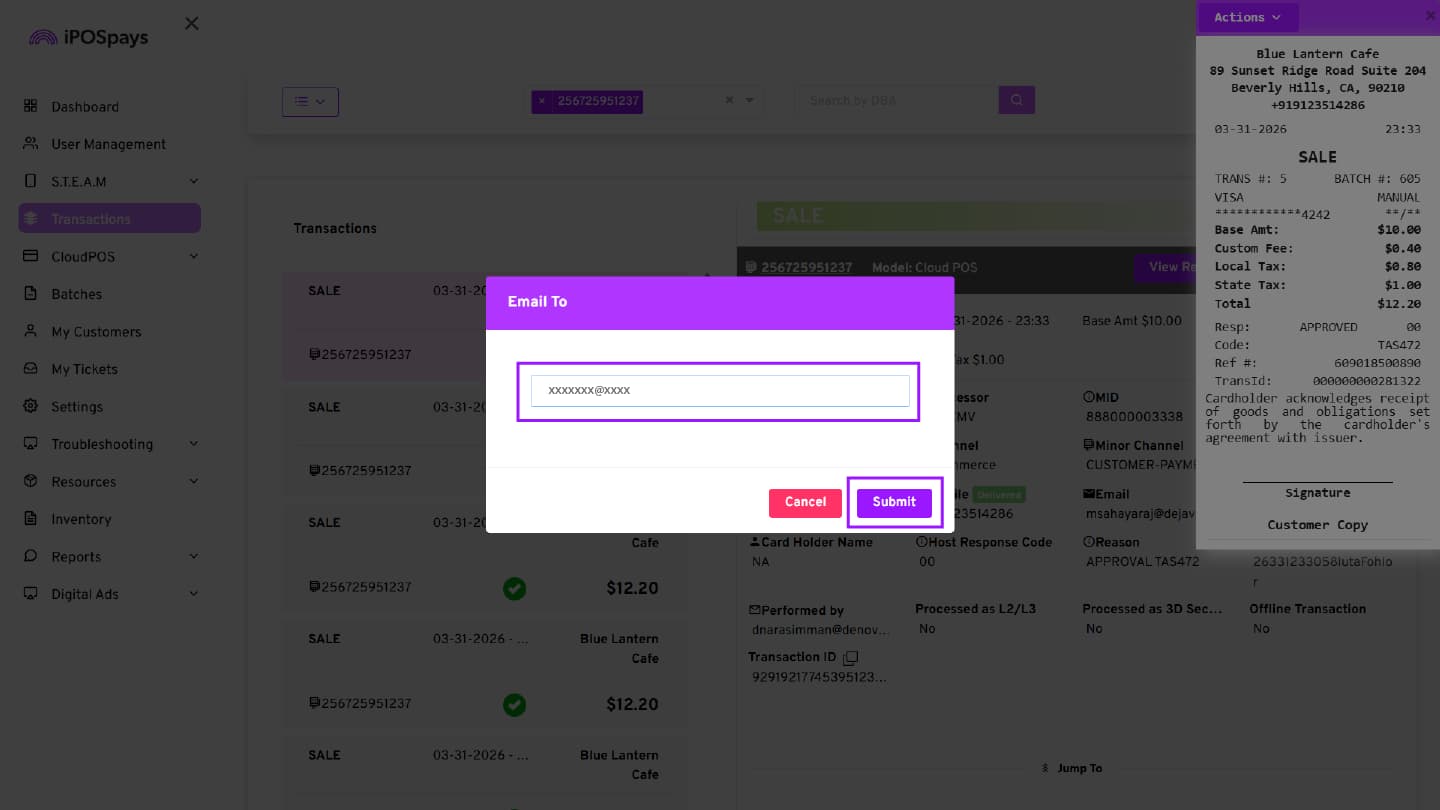
Email Receipt
When you click the Email option, an email input screen will appear. Enter the customer’s email address and click Submit to send the receipt.
View Receipts for Sale, Void Sale, and Partial Void Sale Transactions (Merchants and ISOs)
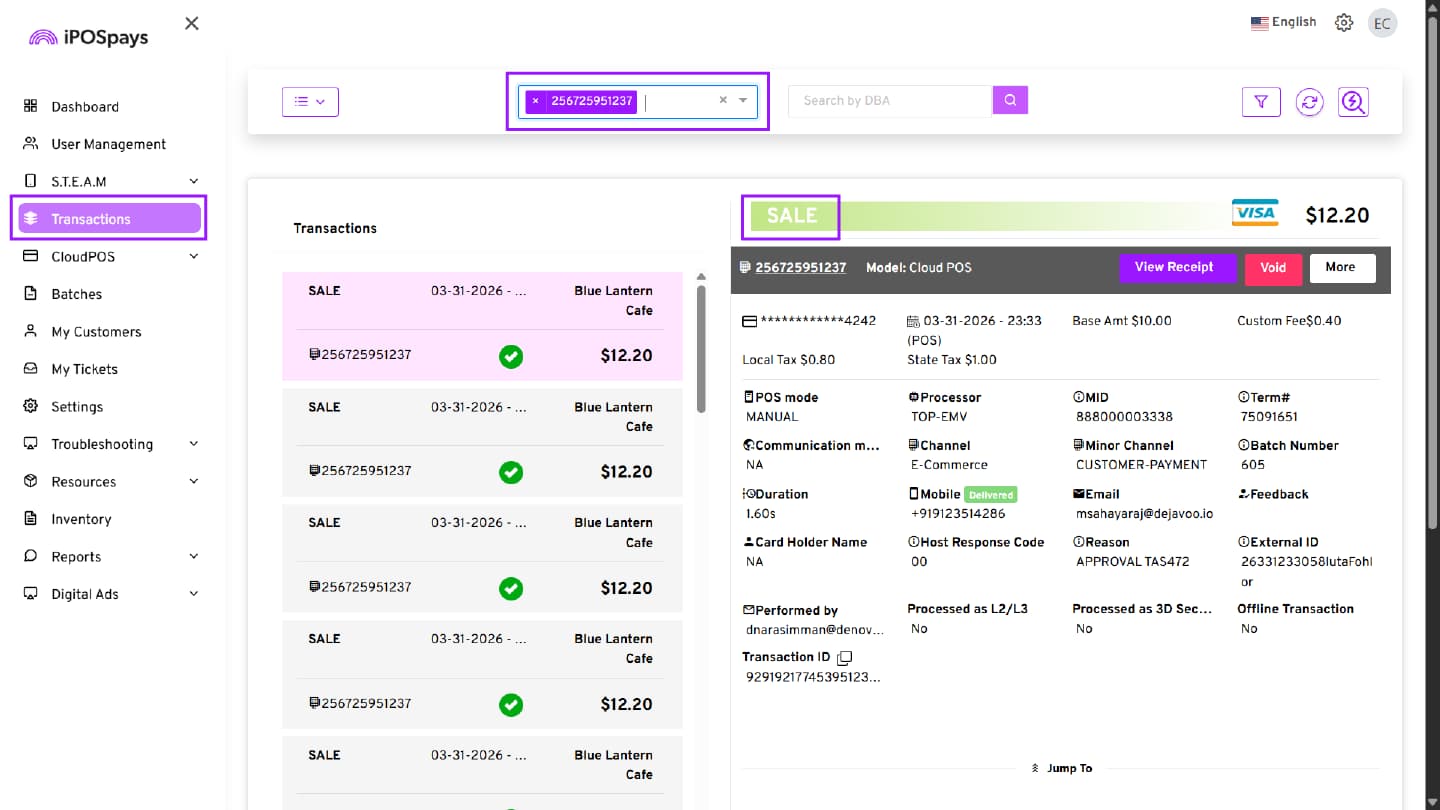
Step 5: Select the Transaction Type
Select the required transaction (SALE).
Step 6: View Receipt
- Click View Receipt
- Select Merchant Copy or Customer Copy
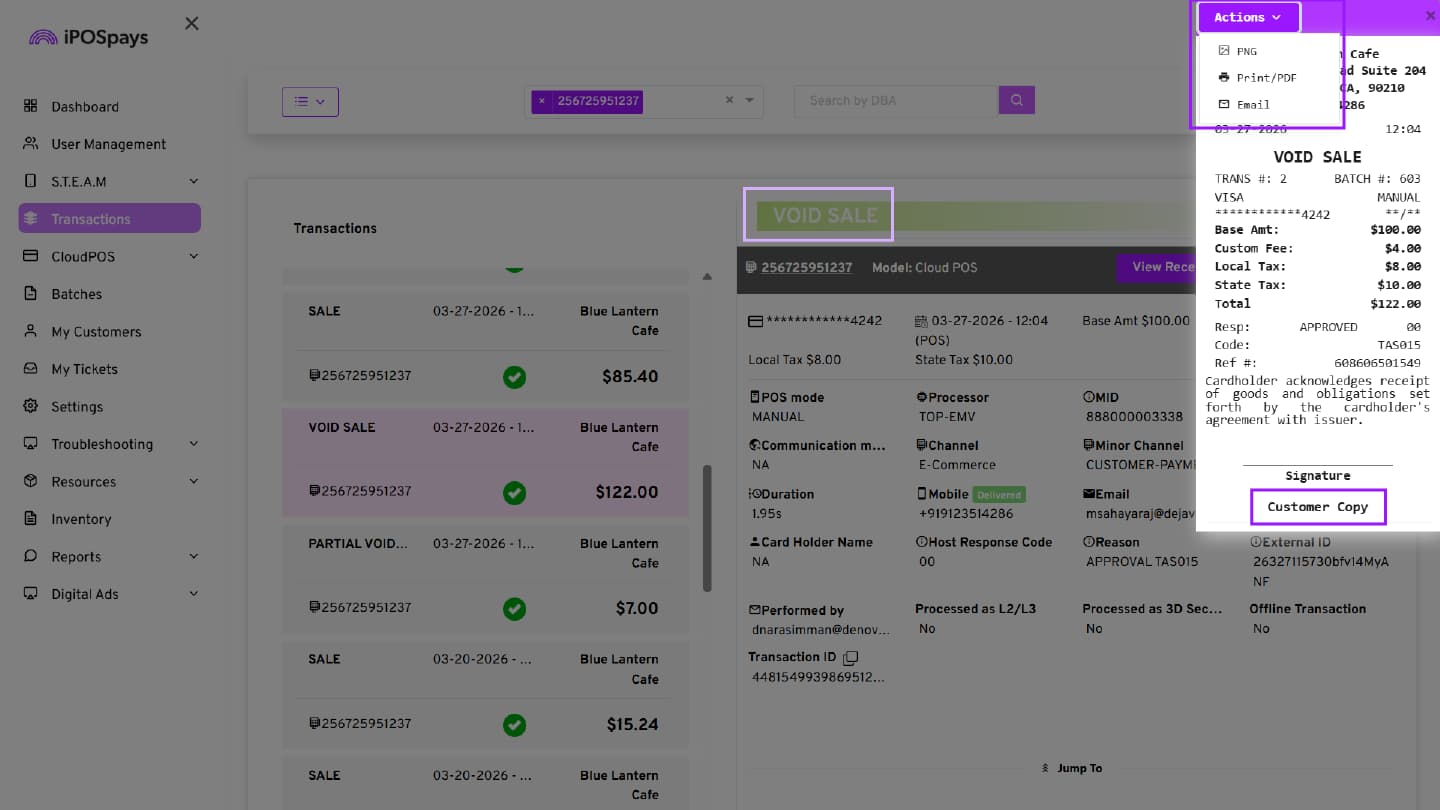
Step 7: Review Receipt Details
For Void / Refund Transactions: The receipt displays:
- Transaction type as VOID SALE / REFUND
- Base amount, fees, and taxes
- Total amount
- Transaction status (APPROVED)

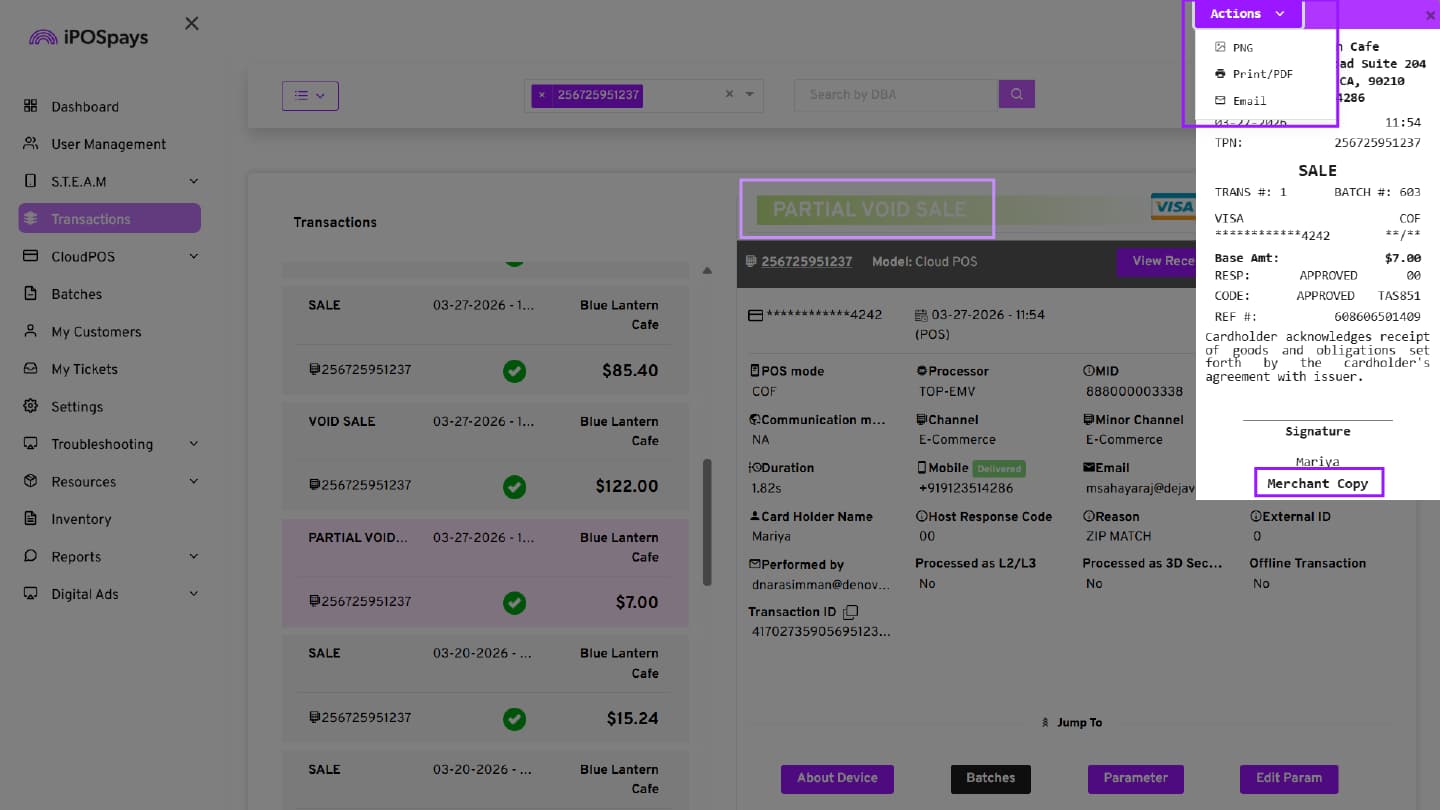
For Partial Void / Partial Refund Transactions: The receipt displays:
- Transaction type as SALE
- Base amount (partial amount only)
- Transaction status (APPROVED)
View Receipts for All Transactions (Customer Flow)
Customers can view receipts for transactions across the following platforms:
- For CloudPOS and GHPP, the receipt is automatically sent to the email address entered during the transaction.
- For POS and iPOSgo!, select the Email option on the Customer Copy screen and enter the customer’s email address to send the receipt.
Step 1: Open Receipt Email
The customer receives an email from the merchant after transaction completion.
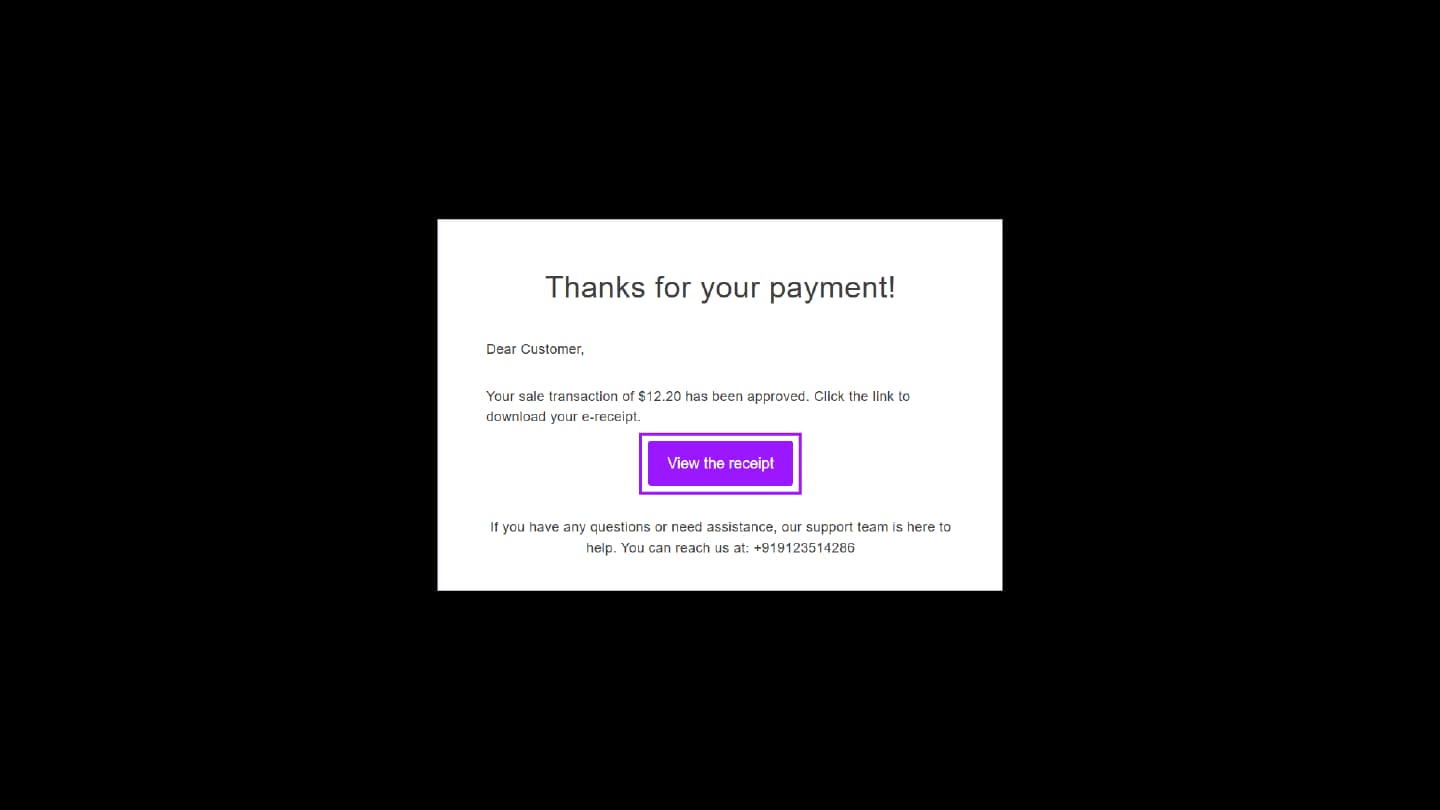
Open the email and click View the receipt.
Step 2: View Receipt
The receipt opens in a web page displaying:
- Merchant details
- Transaction date and time
- Payment method (masked card details)
- Amount, fees, and taxes
- Transaction status (APPROVED)
- Customer name
Step 3: Use Receipt Actions
Click the Actions button on the receipt screen. The following options are available:
- PNG – Download the receipt as an image
- Print / PDF – Print or save as PDF