How to Process Transactions Using DejaUP! on Payment Terminals
DejaUP! supports multiple transaction flows, allowing customers to purchase products from compatible vending machines using supported payment methods.
This document explains how to process transactions using DejaUP! on supported payment terminals. Each transaction flow provides a different customer payment experience while securely processing the payment and dispensing the selected product.
Feature Compatibility
- Supported Terminals:
- Dejavoo Q3mini
- Dejavoo Q3V
- Supported Transaction Flows:
- Tap-to-Start
- Multivend
- Select First
Prerequisites
Before processing transactions using DejaUP!, ensure that:
- The payment terminal has been configured for DejaUP!.
- The payment terminal is connected to the vending machine.
- The terminal is online and ready to accept payments.
- The vending machine is operational and stocked with products.
For setup instructions, refer to:
Tap-to-Start
The Tap-to-Start transaction flow allows customers to begin a vending transaction by first tapping or inserting their payment card on the payment terminal. The terminal pre-authorizes a predefined amount. Once approved, a balance is added to the VMC (Vending Machine Controller). The customer then selects a product, and after the product is dispensed, only the exact purchase amount is charged.
Configure the Tap-to-Start Transaction Flow
Before configuring the Tap-to-Start transaction flow, access the terminal configuration page in DejaUP!.
Step 1: Open the Terminal Configuration
- Log in to the iPOSpays Portal using your Merchant credentials.
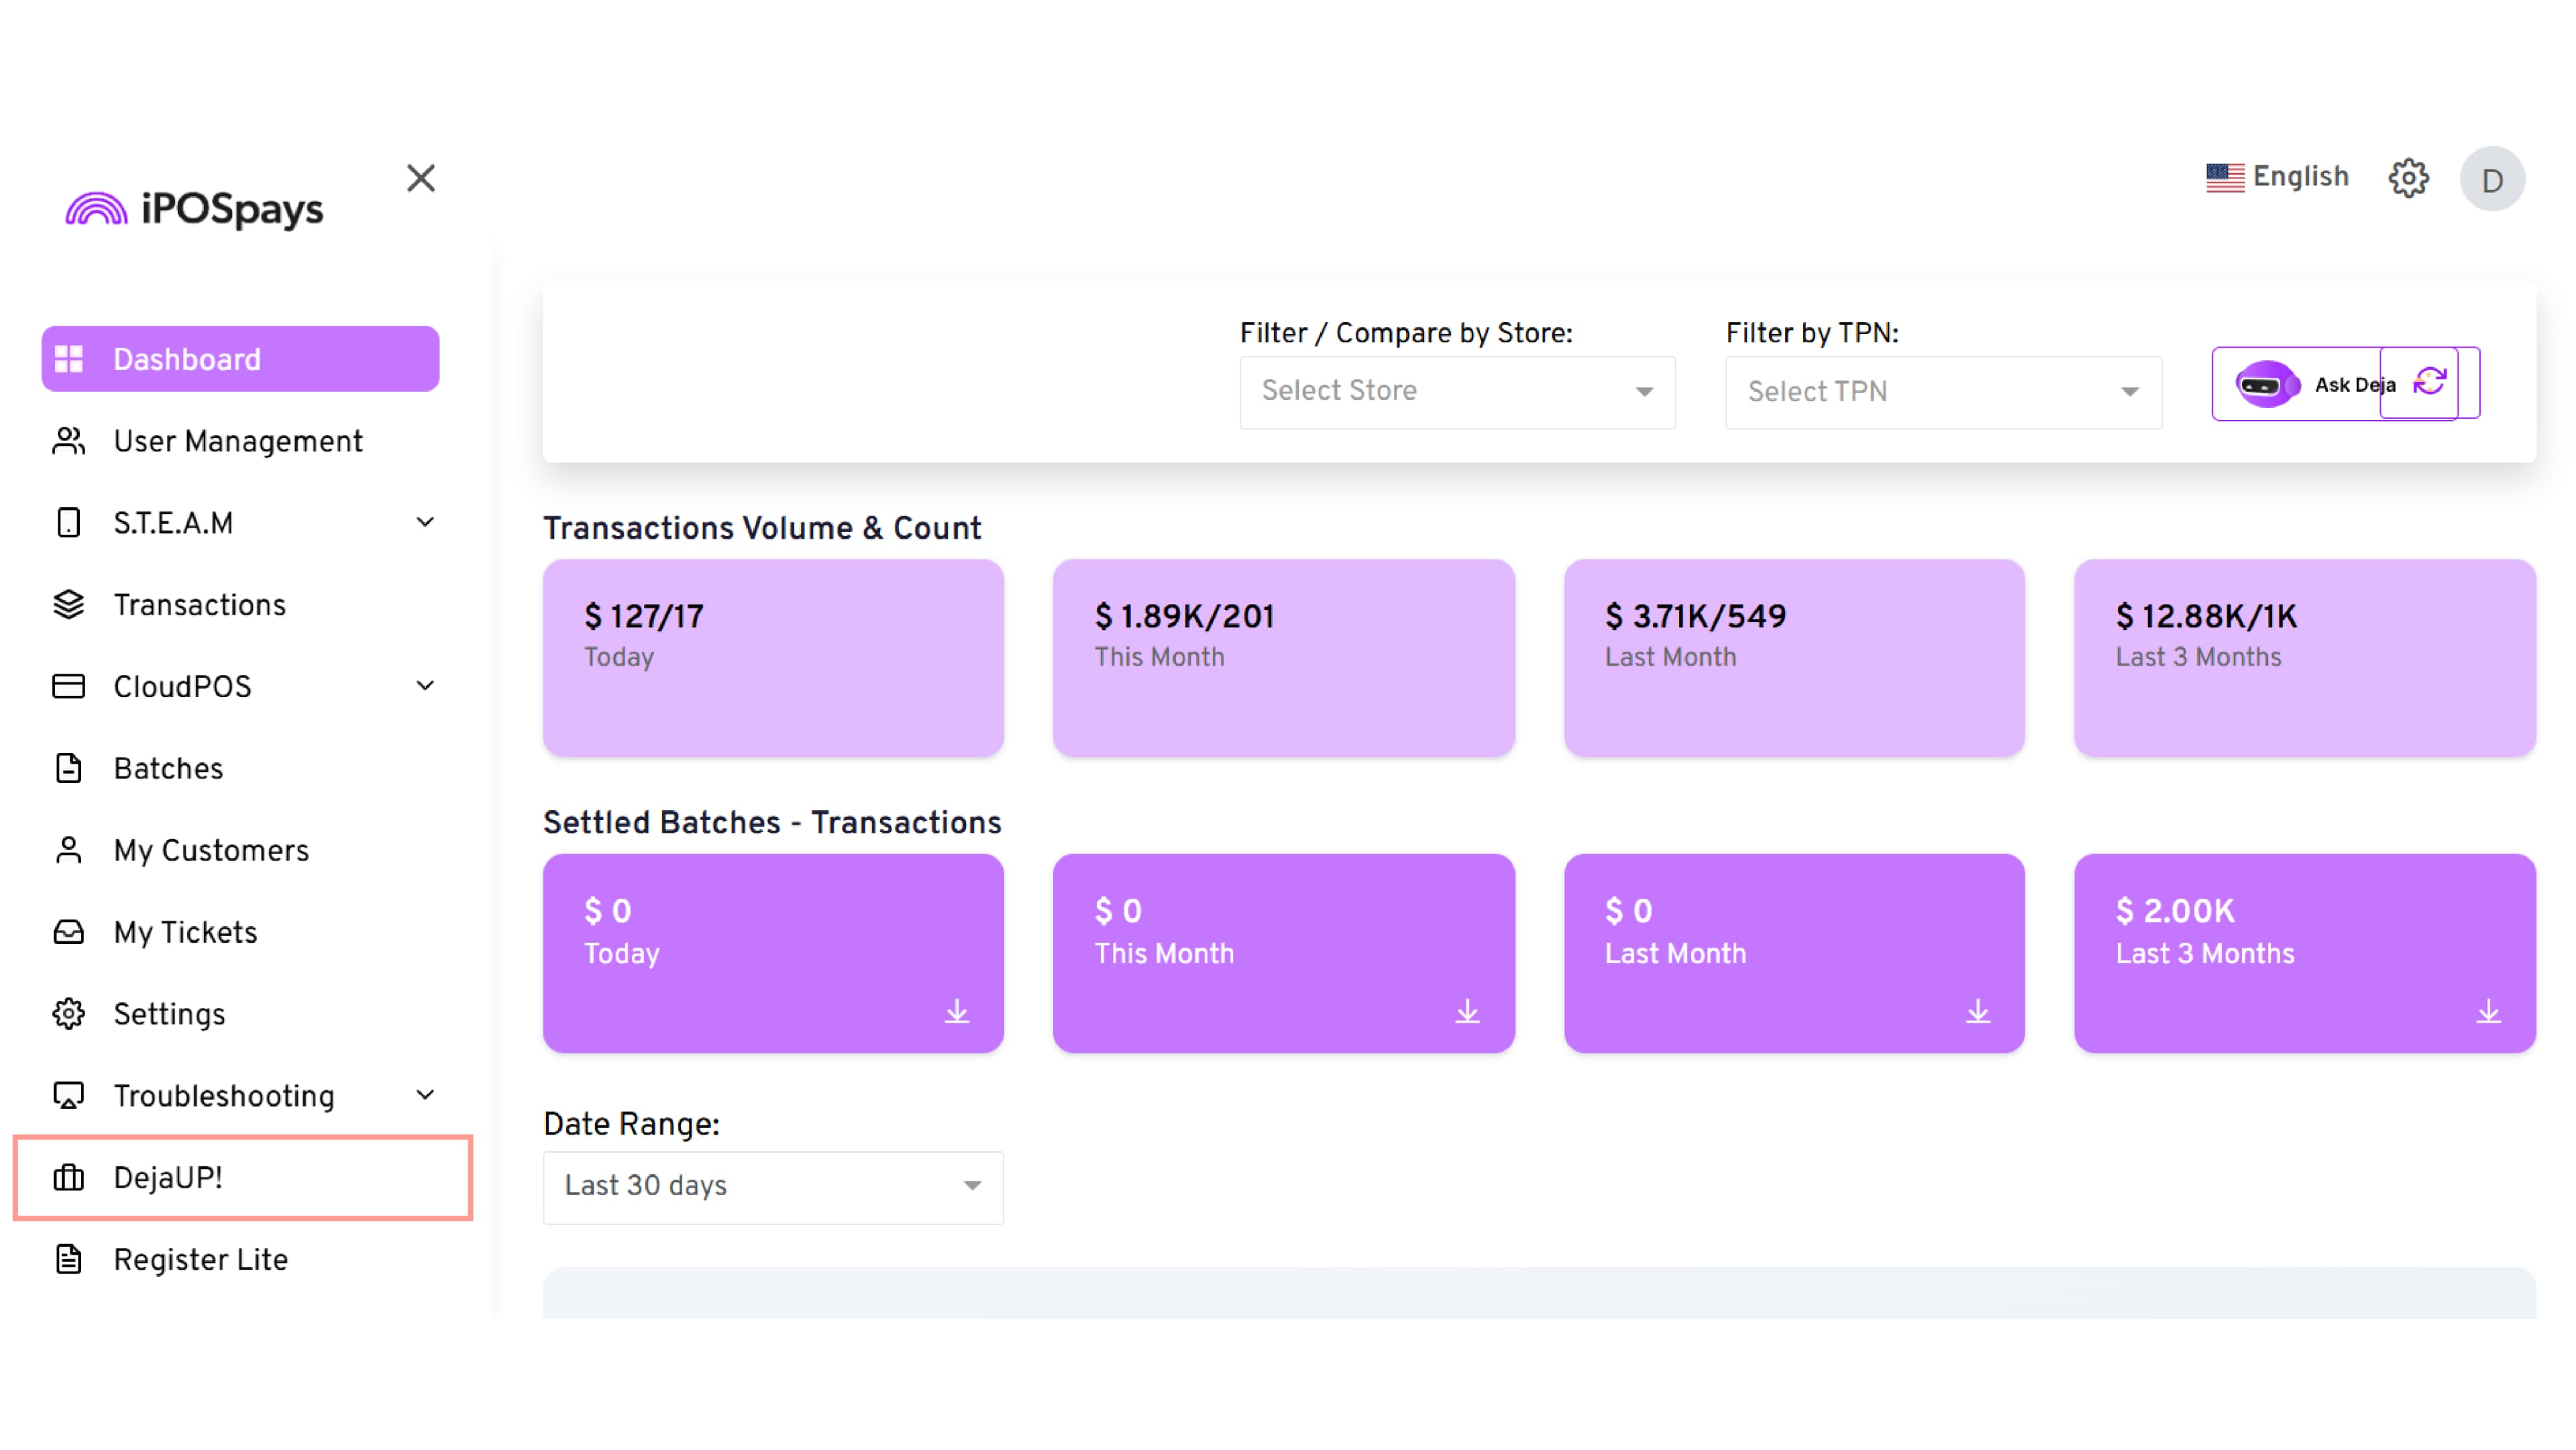
- Navigate to DejaUP!. The DejaUP! portal opens in a new browser tab.
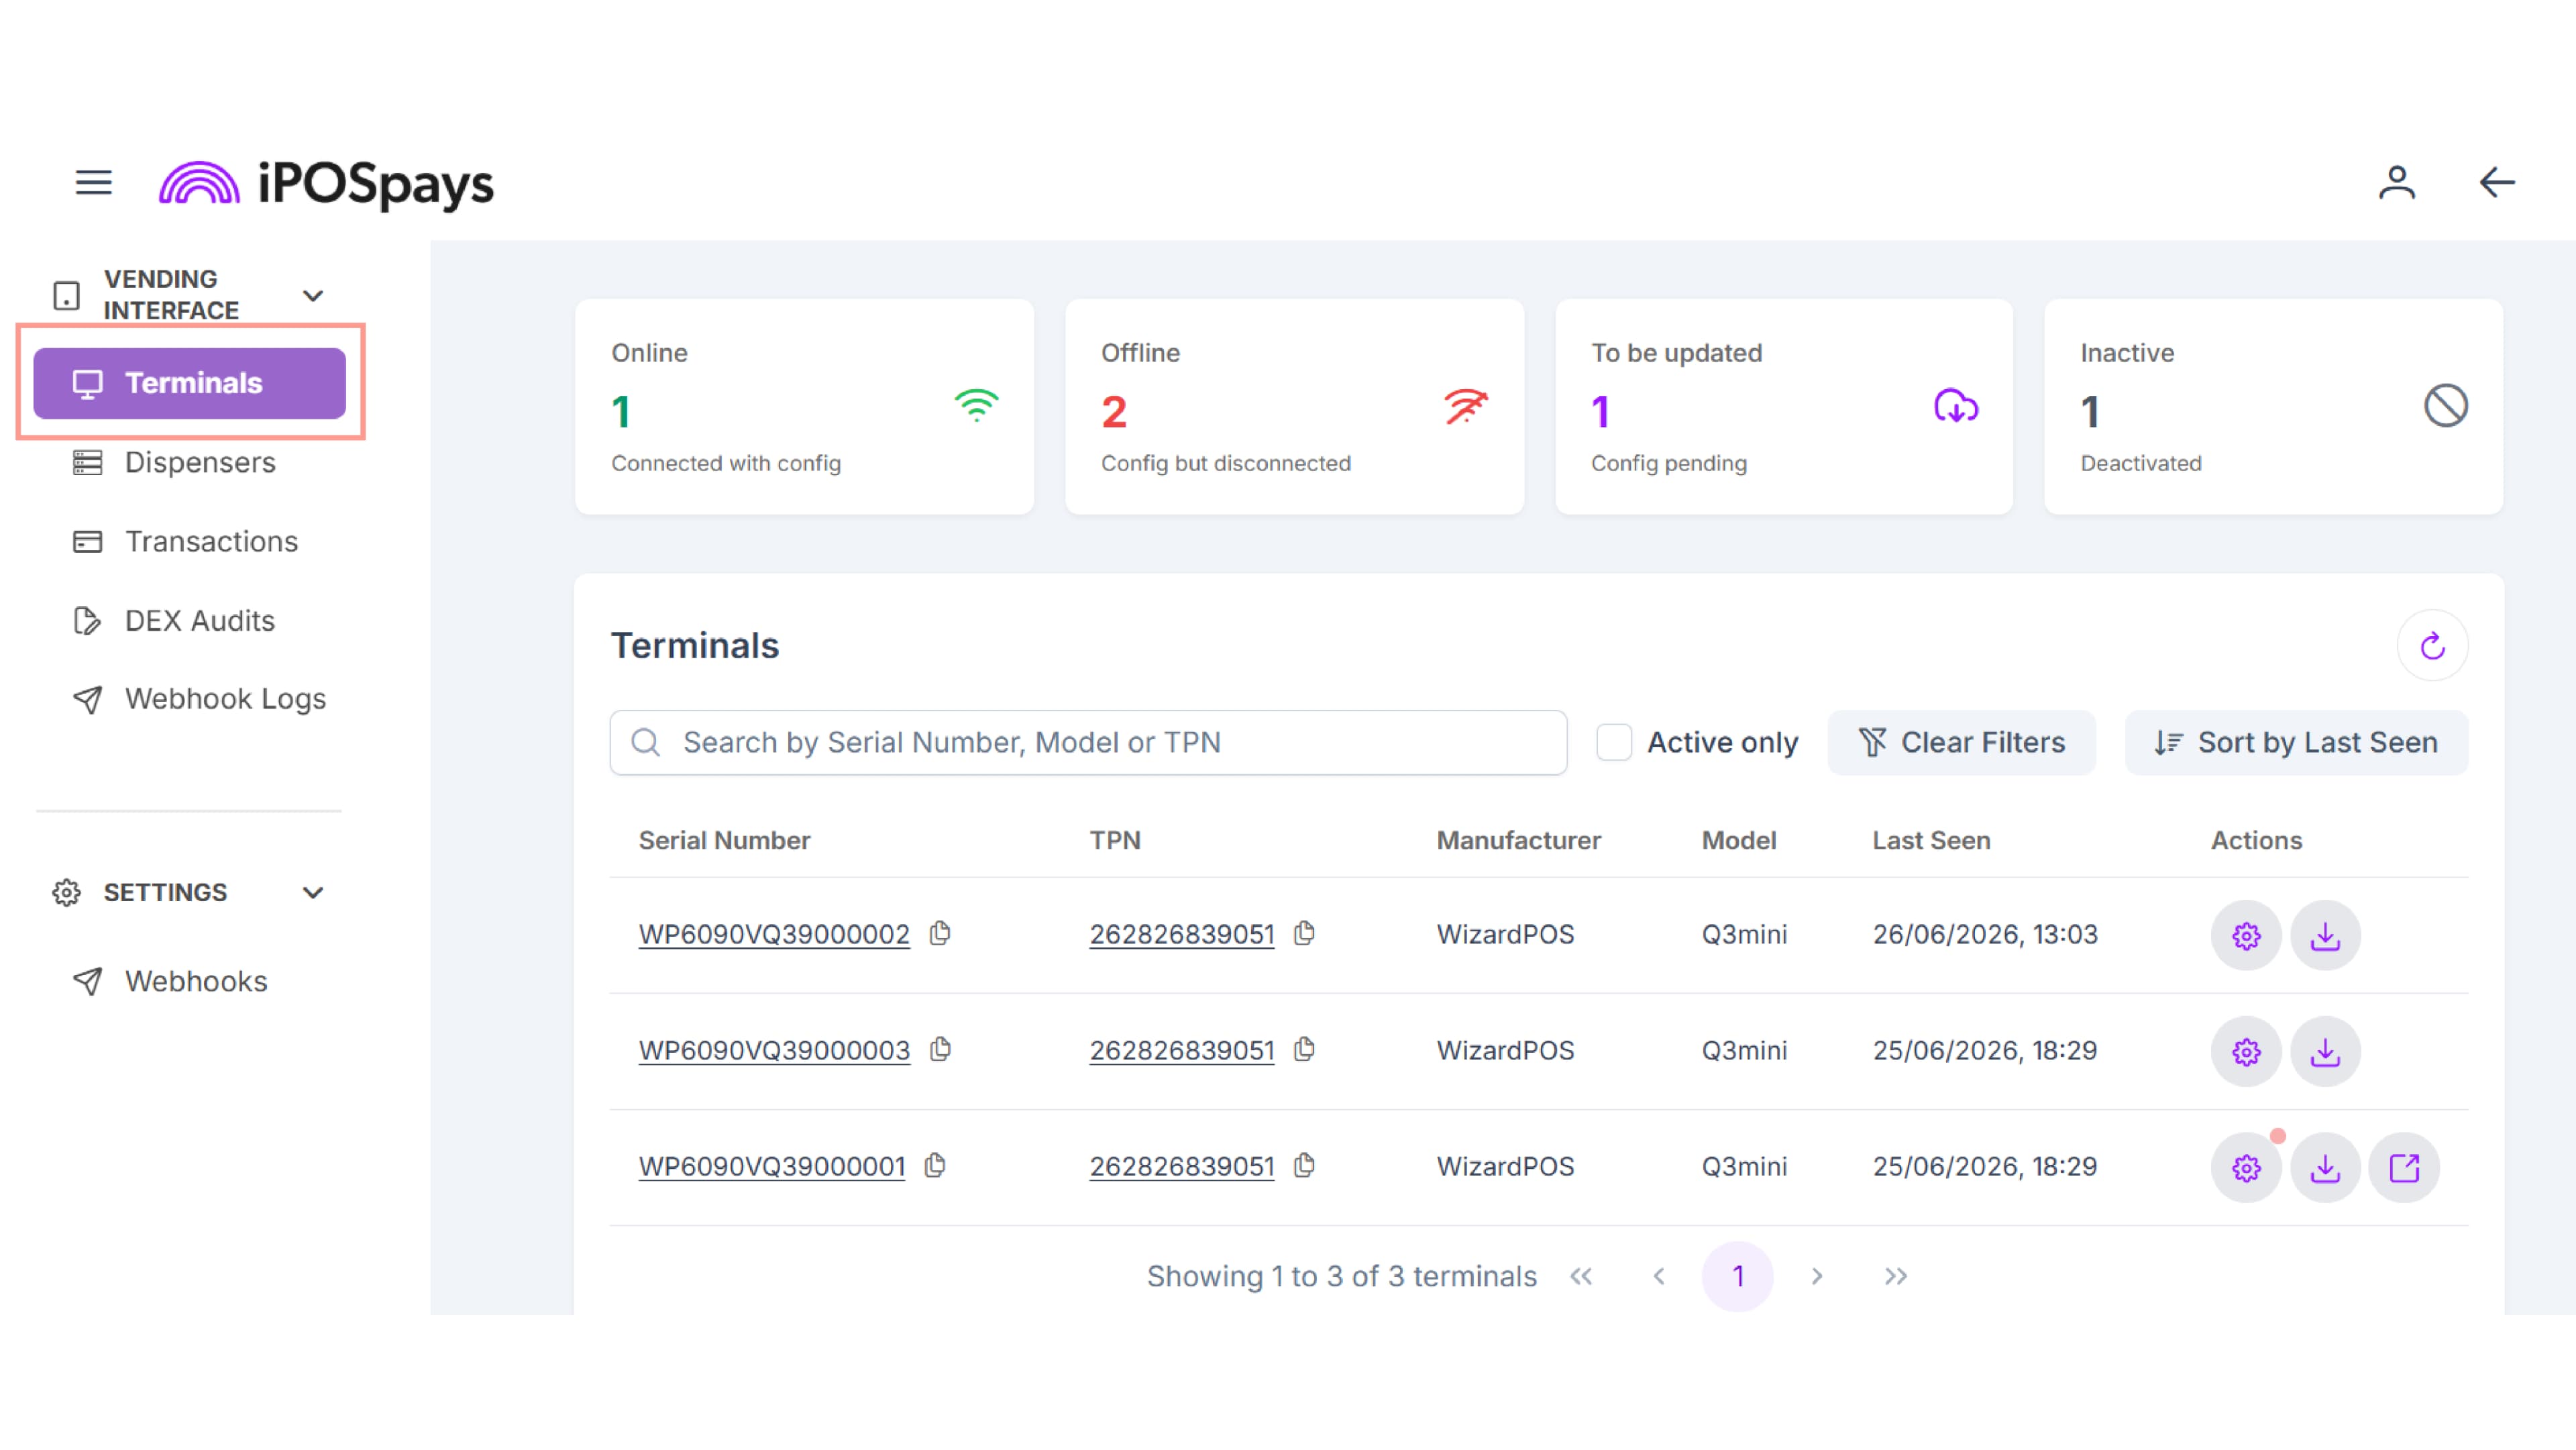
- From the left navigation panel, select Terminals.
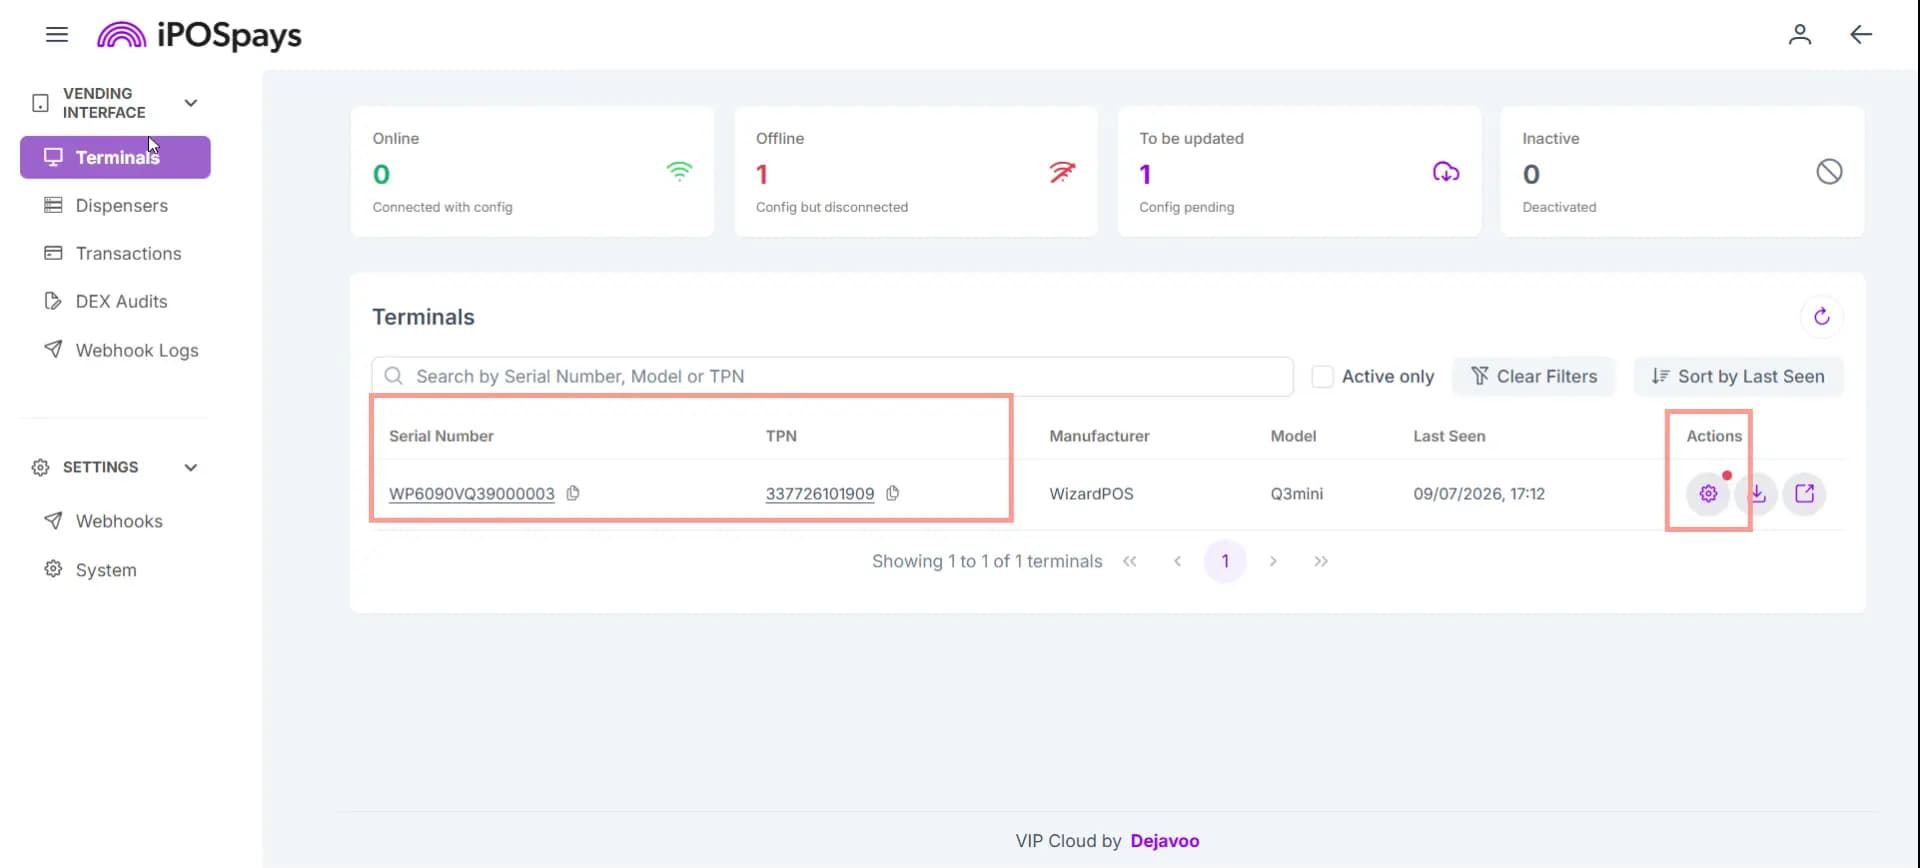
- Click the required Serial Number, TPN, or Settings icon to open the Terminal Configuration page.
- Select the Vending tab.
Step 2: Configure the Tap-to-Start Transaction Flow
- Under Vending Mode, select Tap to Start.
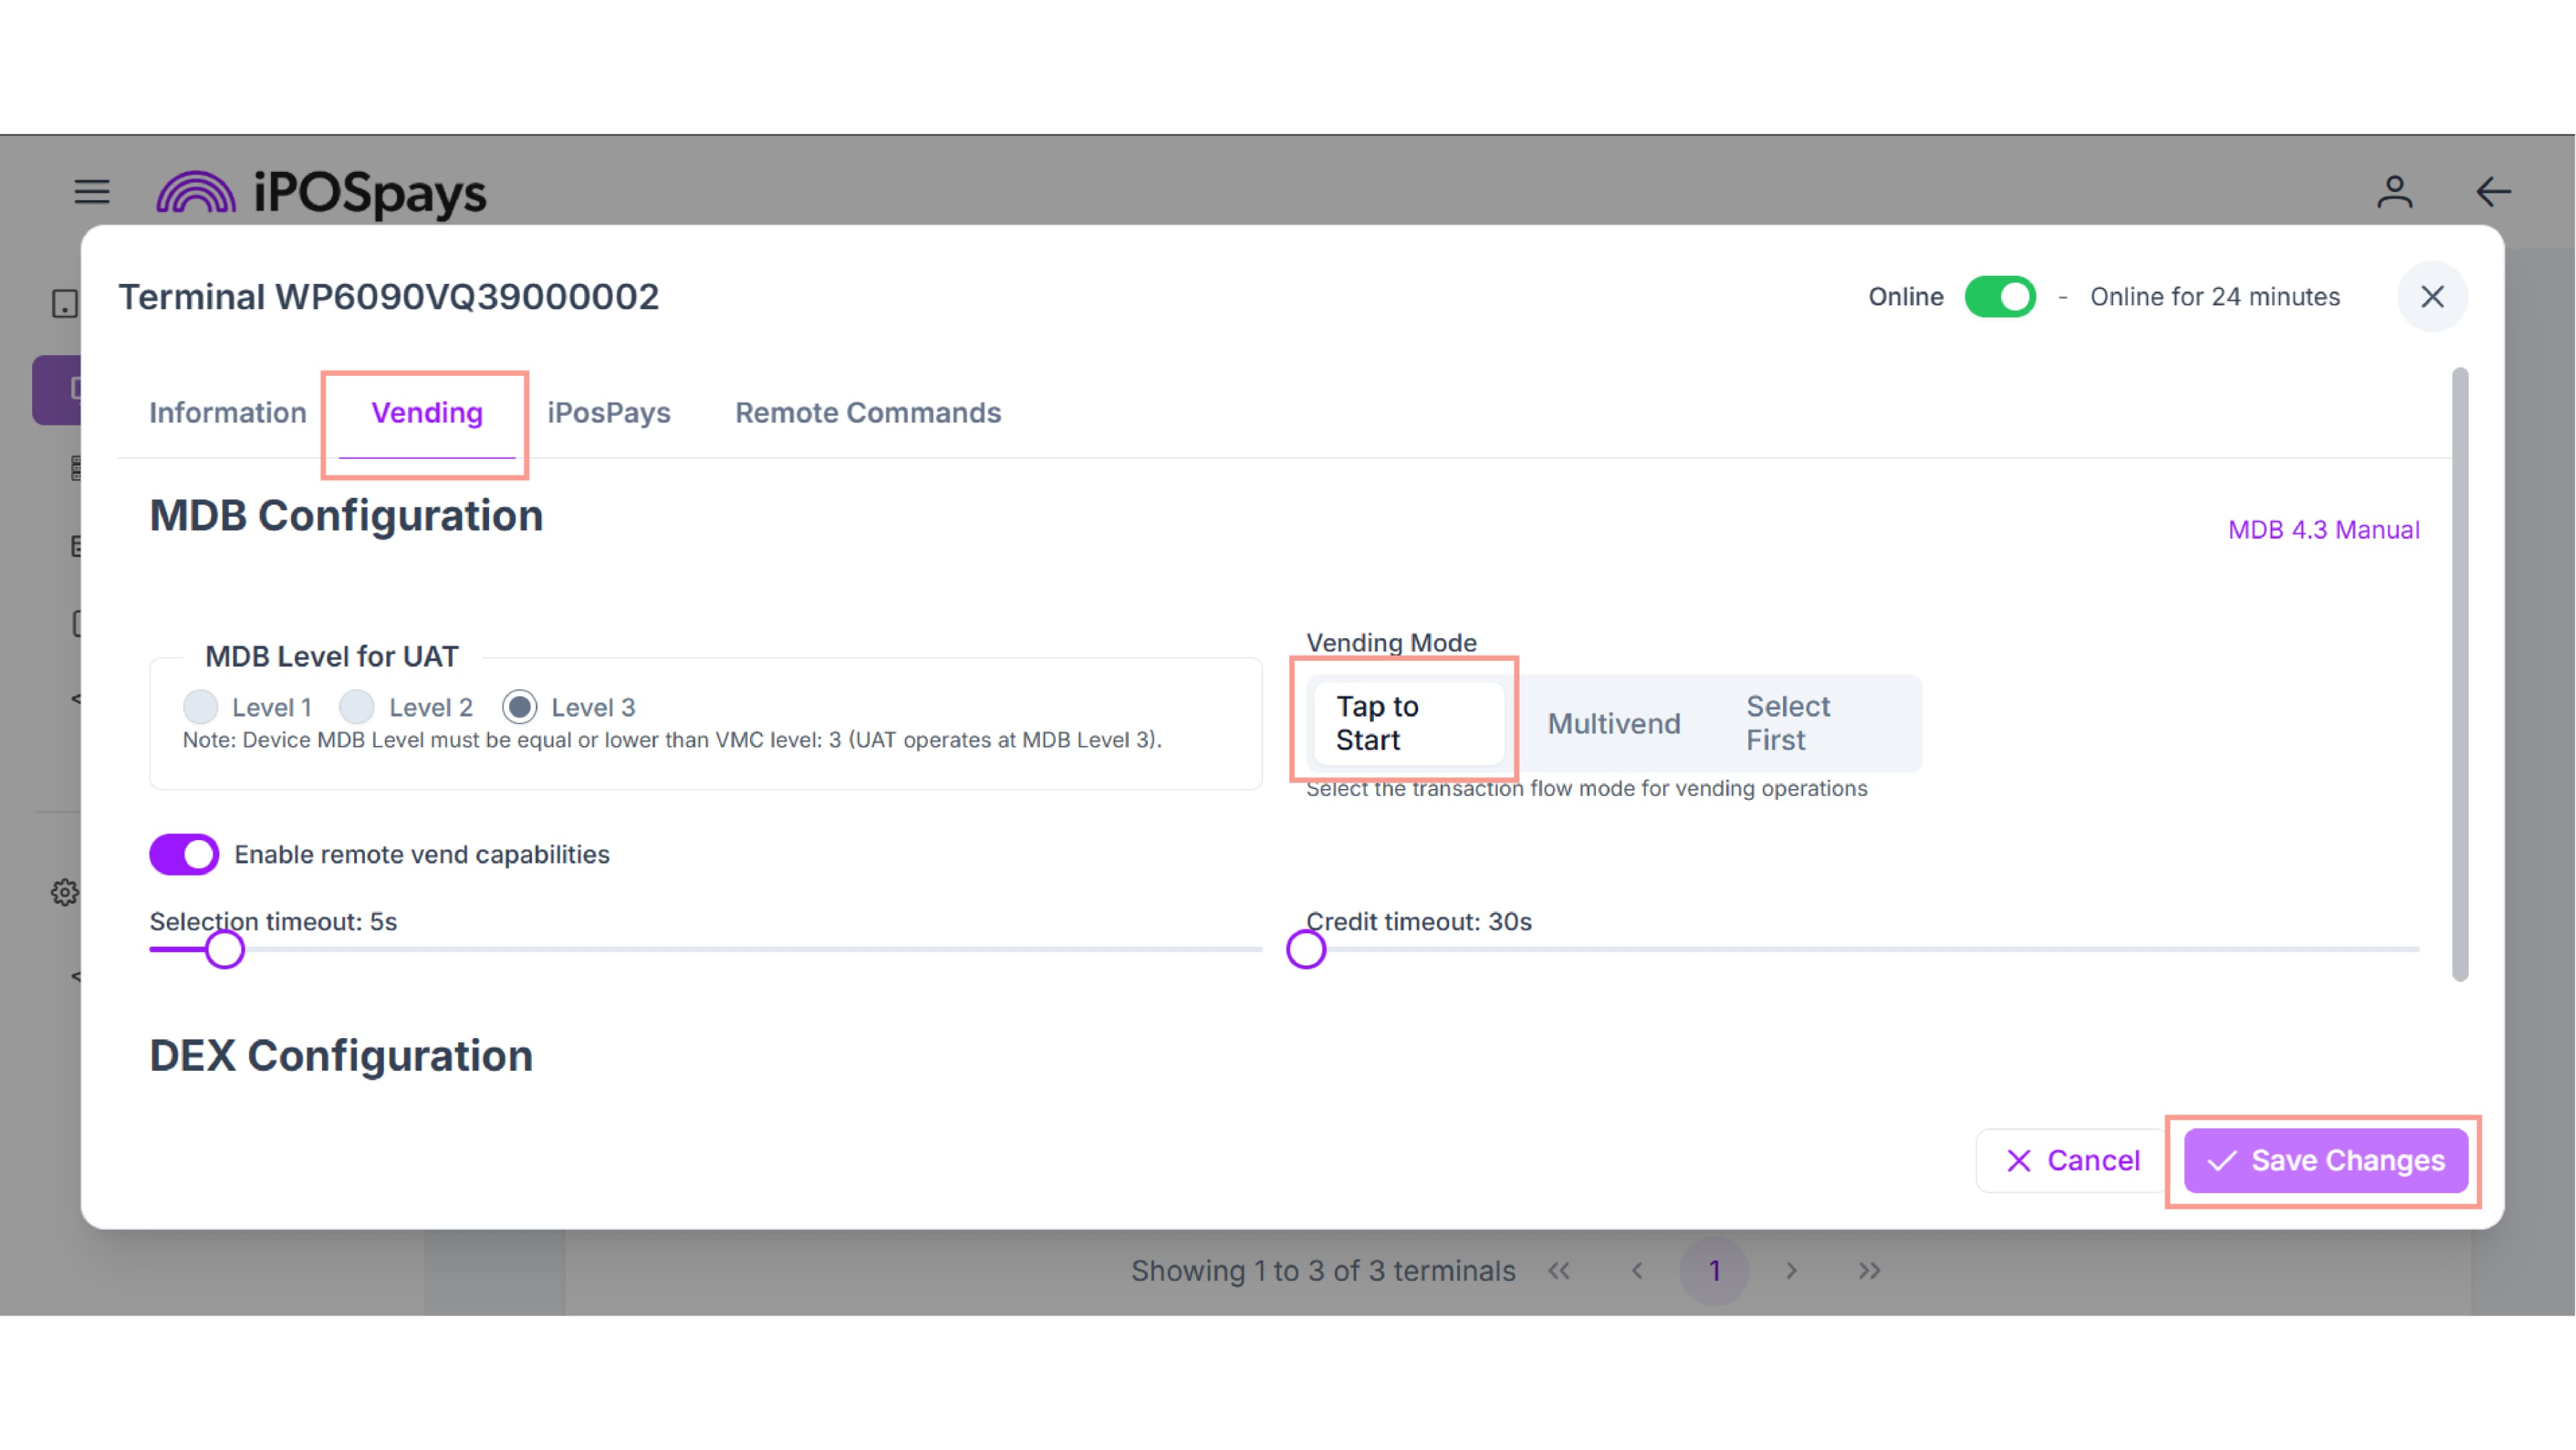
- Click Save Changes.
- When the confirmation message appears, click OK.
The following message is displayed:
Notice: You must restart the vending machine to apply the change.
After changing the vending mode, restart the vending machine so the new vending mode takes effect and DejaUP! can establish a new handshake. Depending on the vending machine, the handshake process may take a few moments to complete.
Process a Tap-to-Start Transaction
Step 1: Present the Payment Method
When the terminal displays the payment screen, tap or insert the customer’s payment card or mobile wallet.
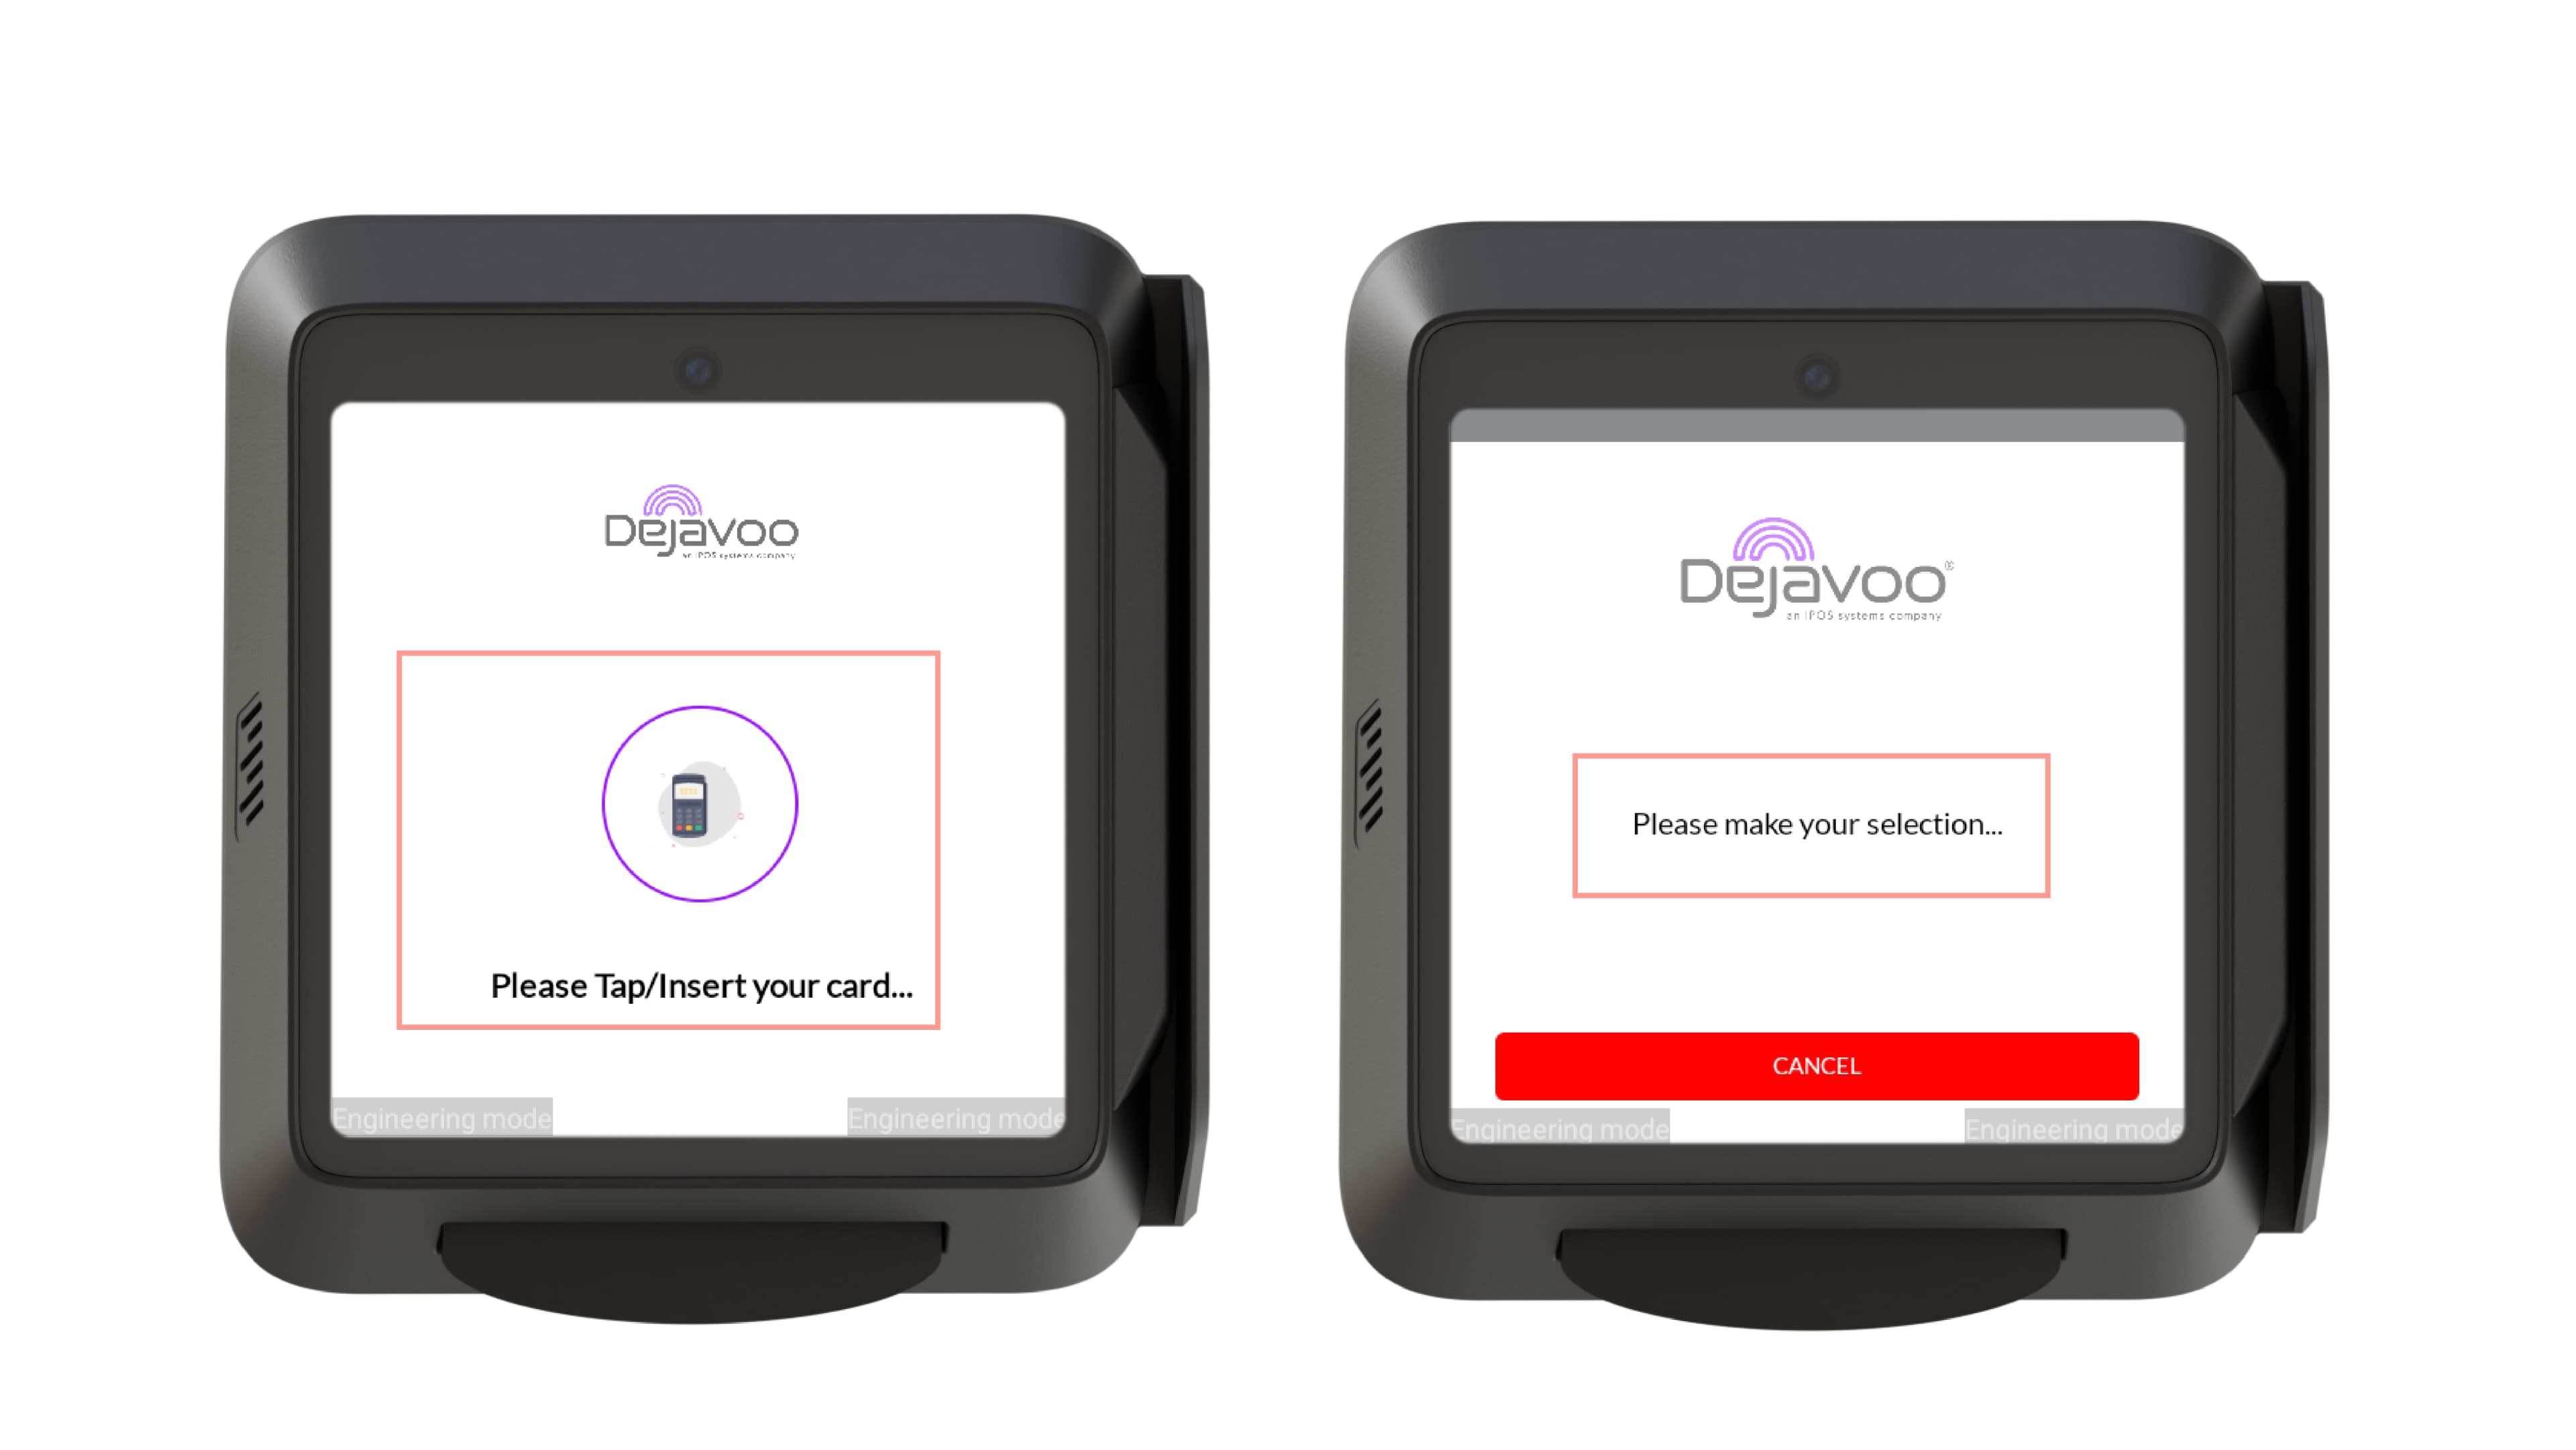
The terminal displays:
Please Tap/Insert your card…
The terminal begins processing the payment.
Step 2: Wait for Product Selection
After the payment is approved, a balance is added to the VMC.
The VMC prompts the customer to select a product, and the terminal displays a similar message.
The customer selects the desired product.
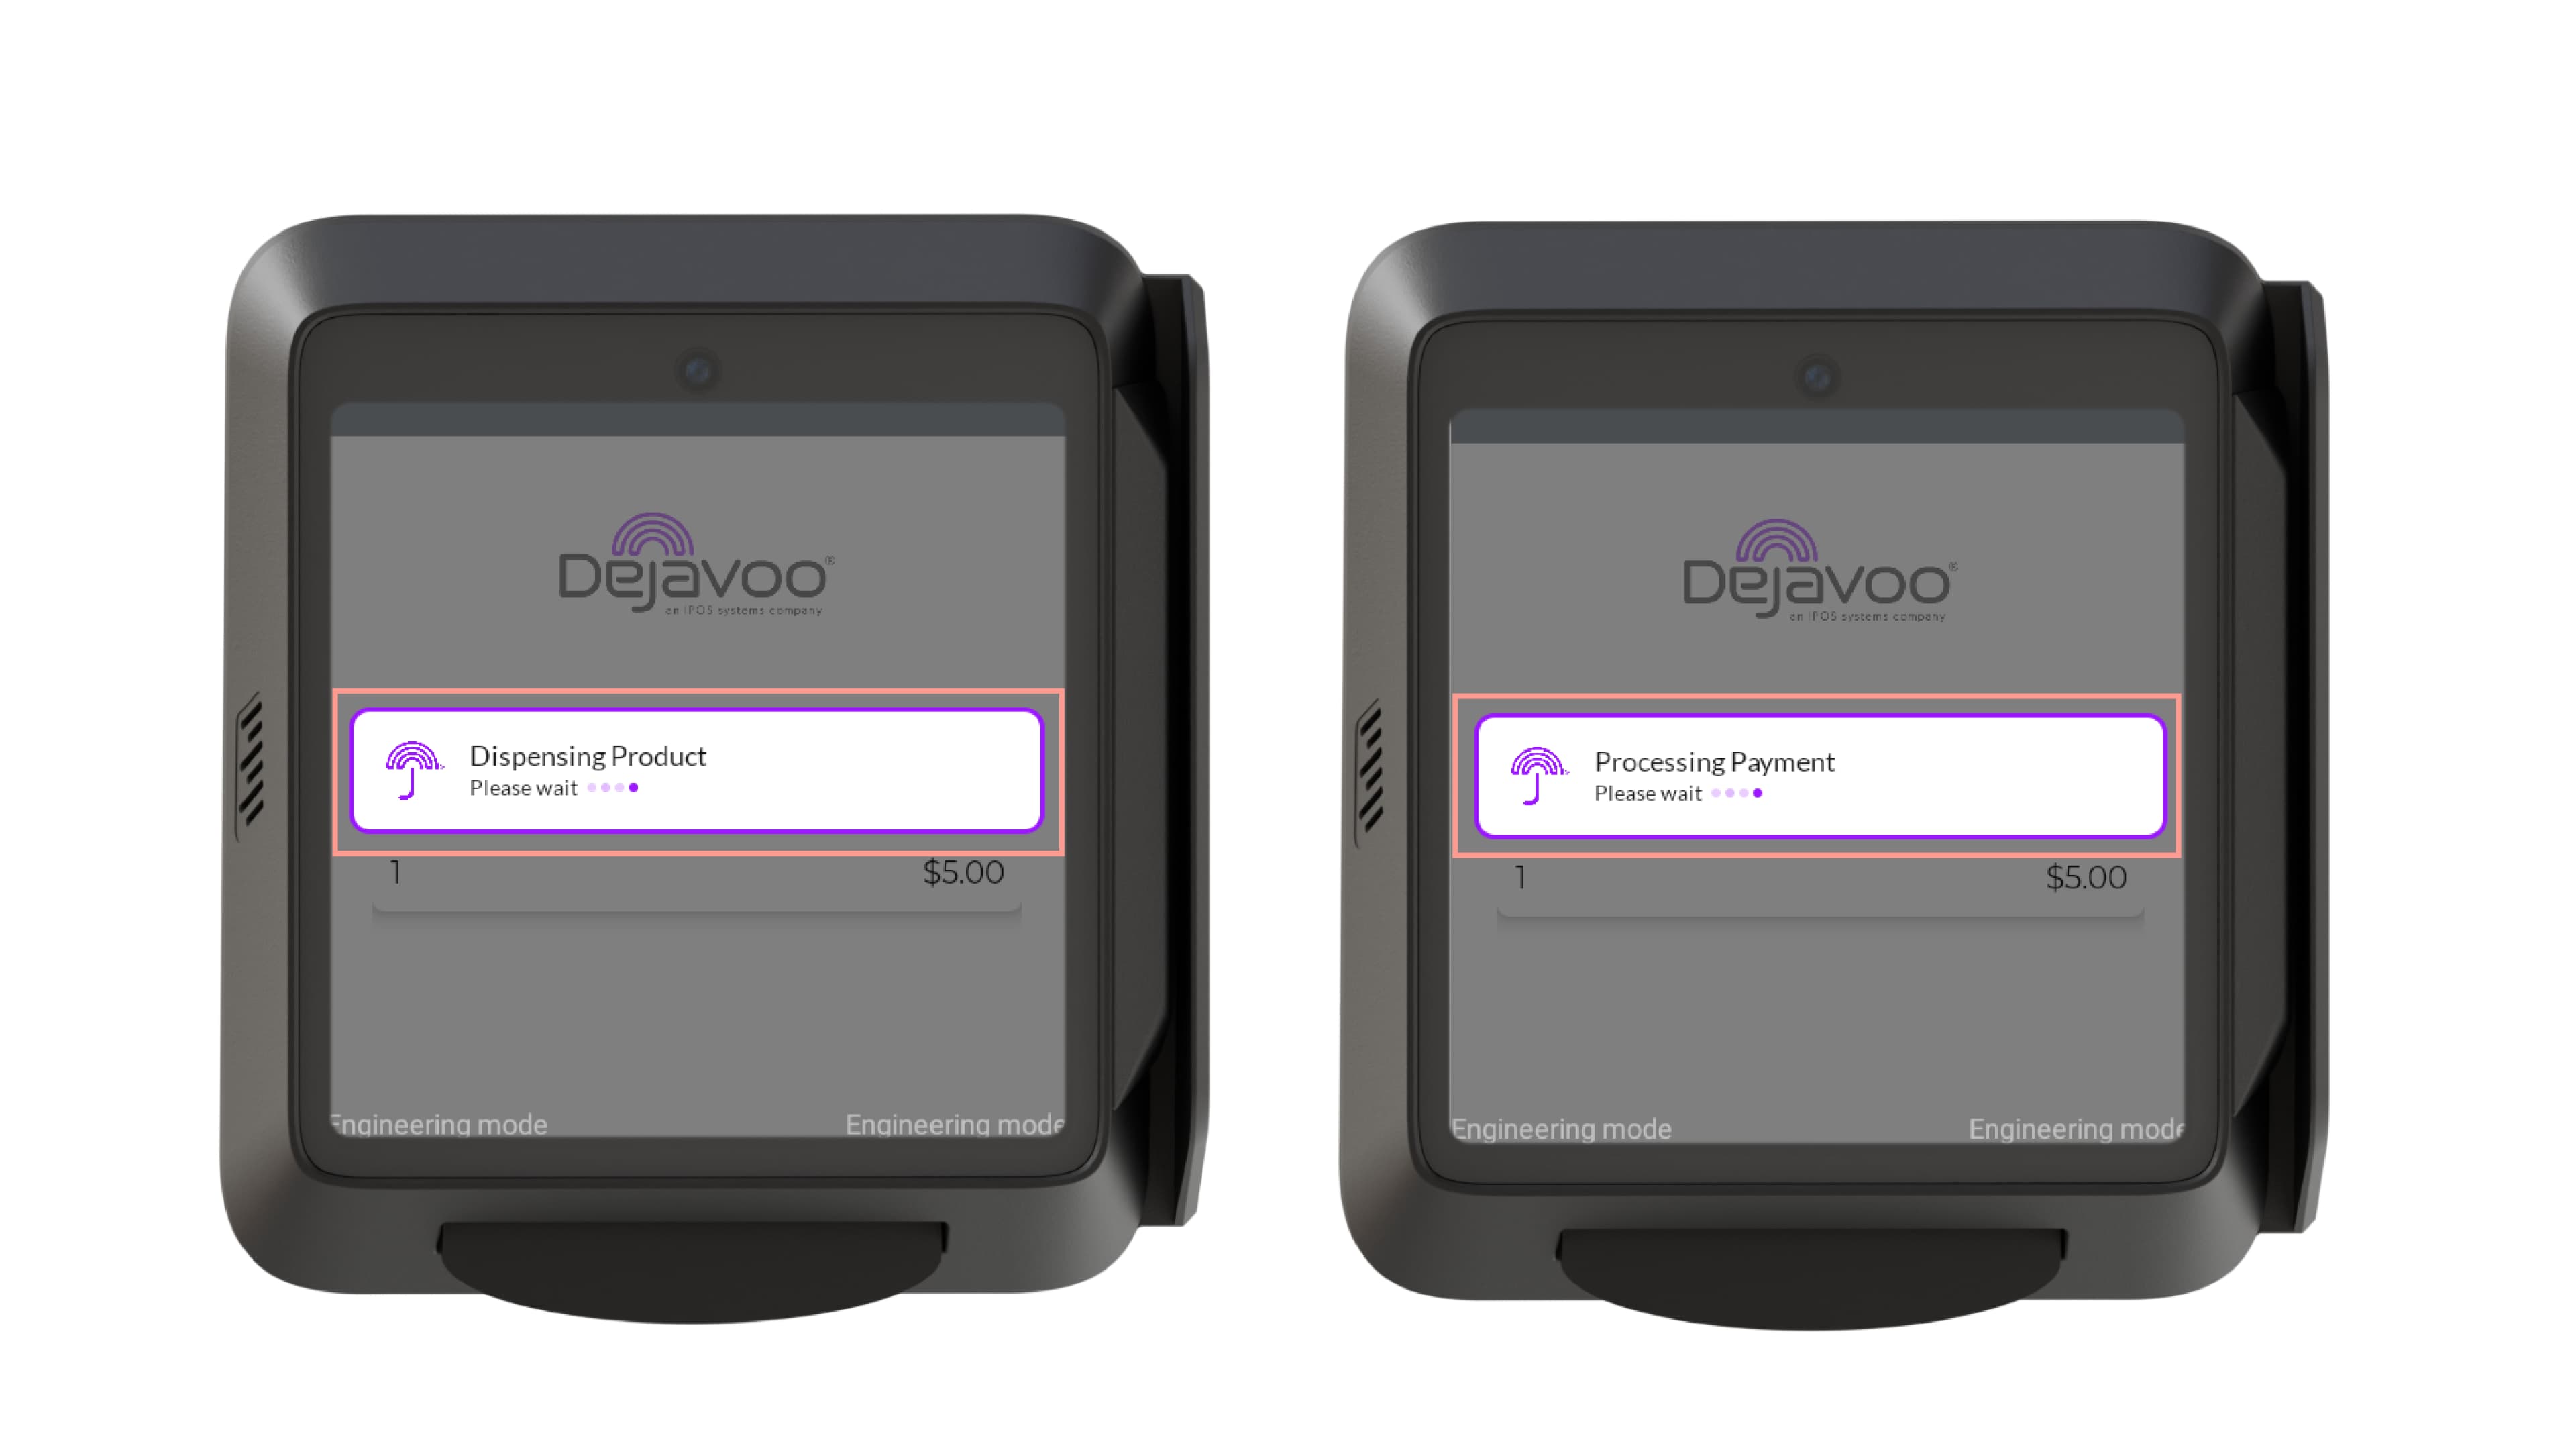
Step 3: Wait While the Product Is Dispensed
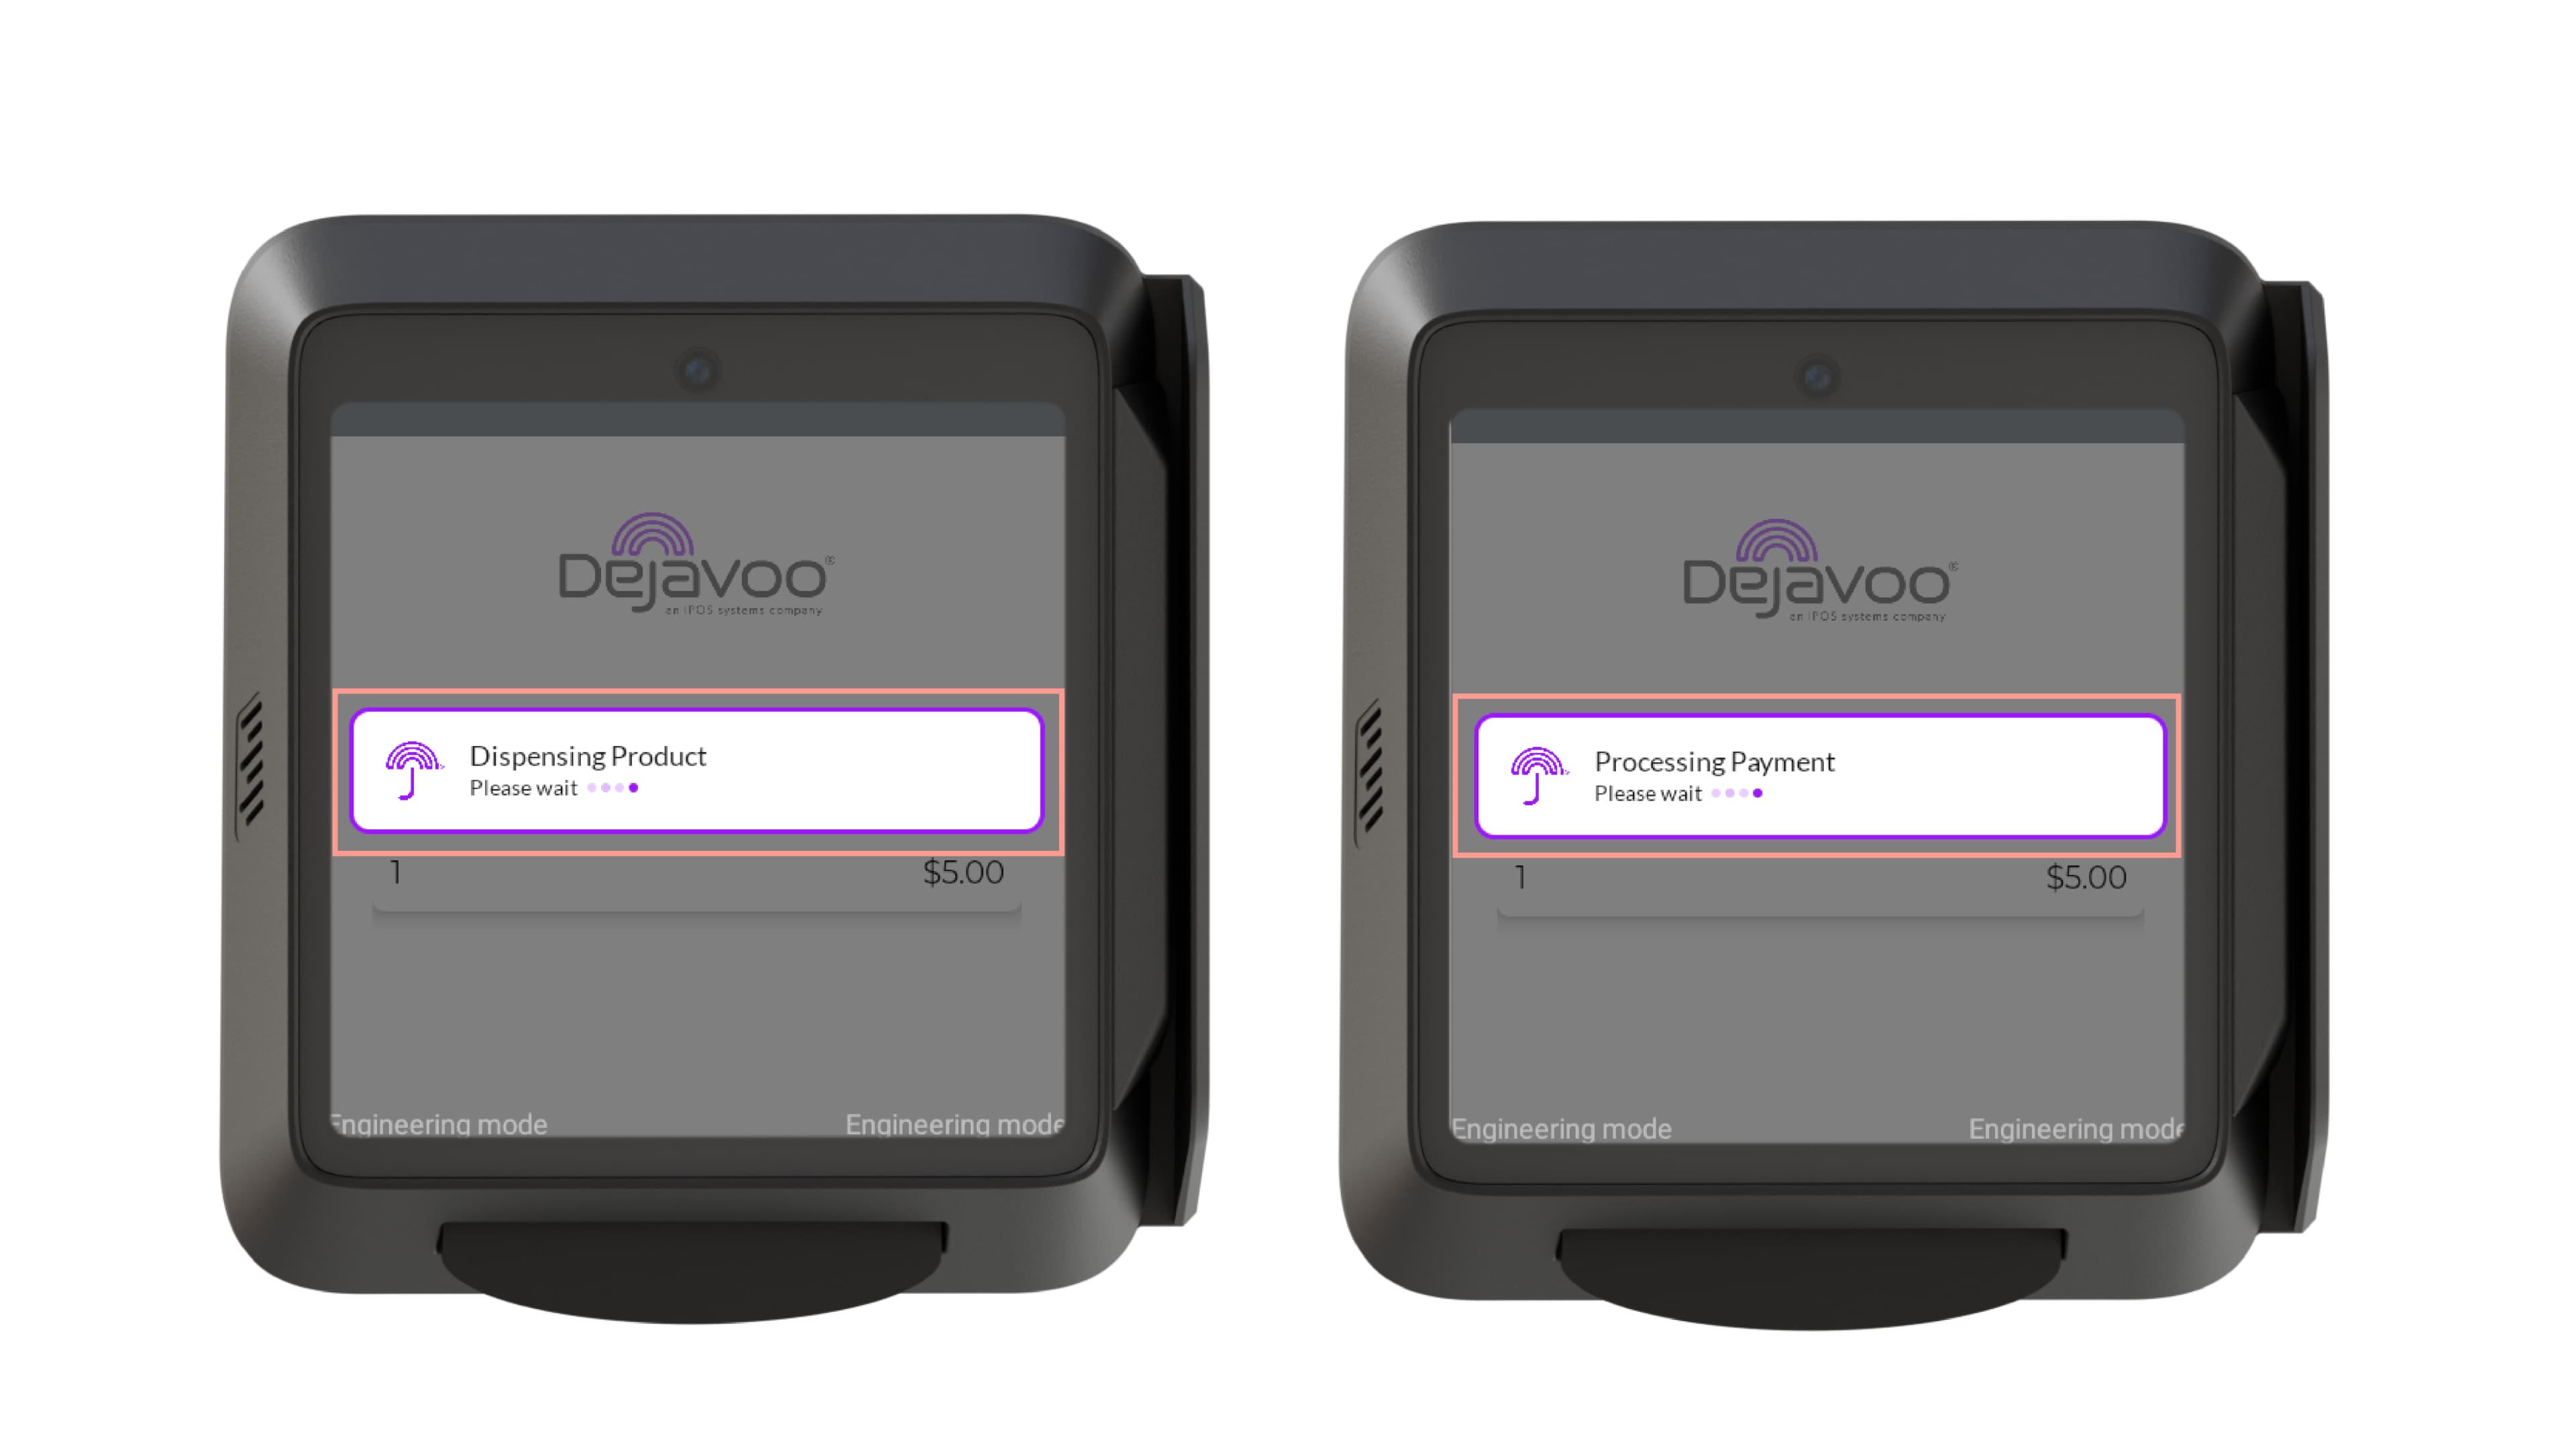
The terminal displays:
Dispensing Product
Wait while the vending machine dispenses the selected item.
Step 4: Wait for Payment Processing
Once the product has been dispensed, the terminal processes the payment.
The terminal displays:
Processing Payment
Step 5: Complete the Transaction
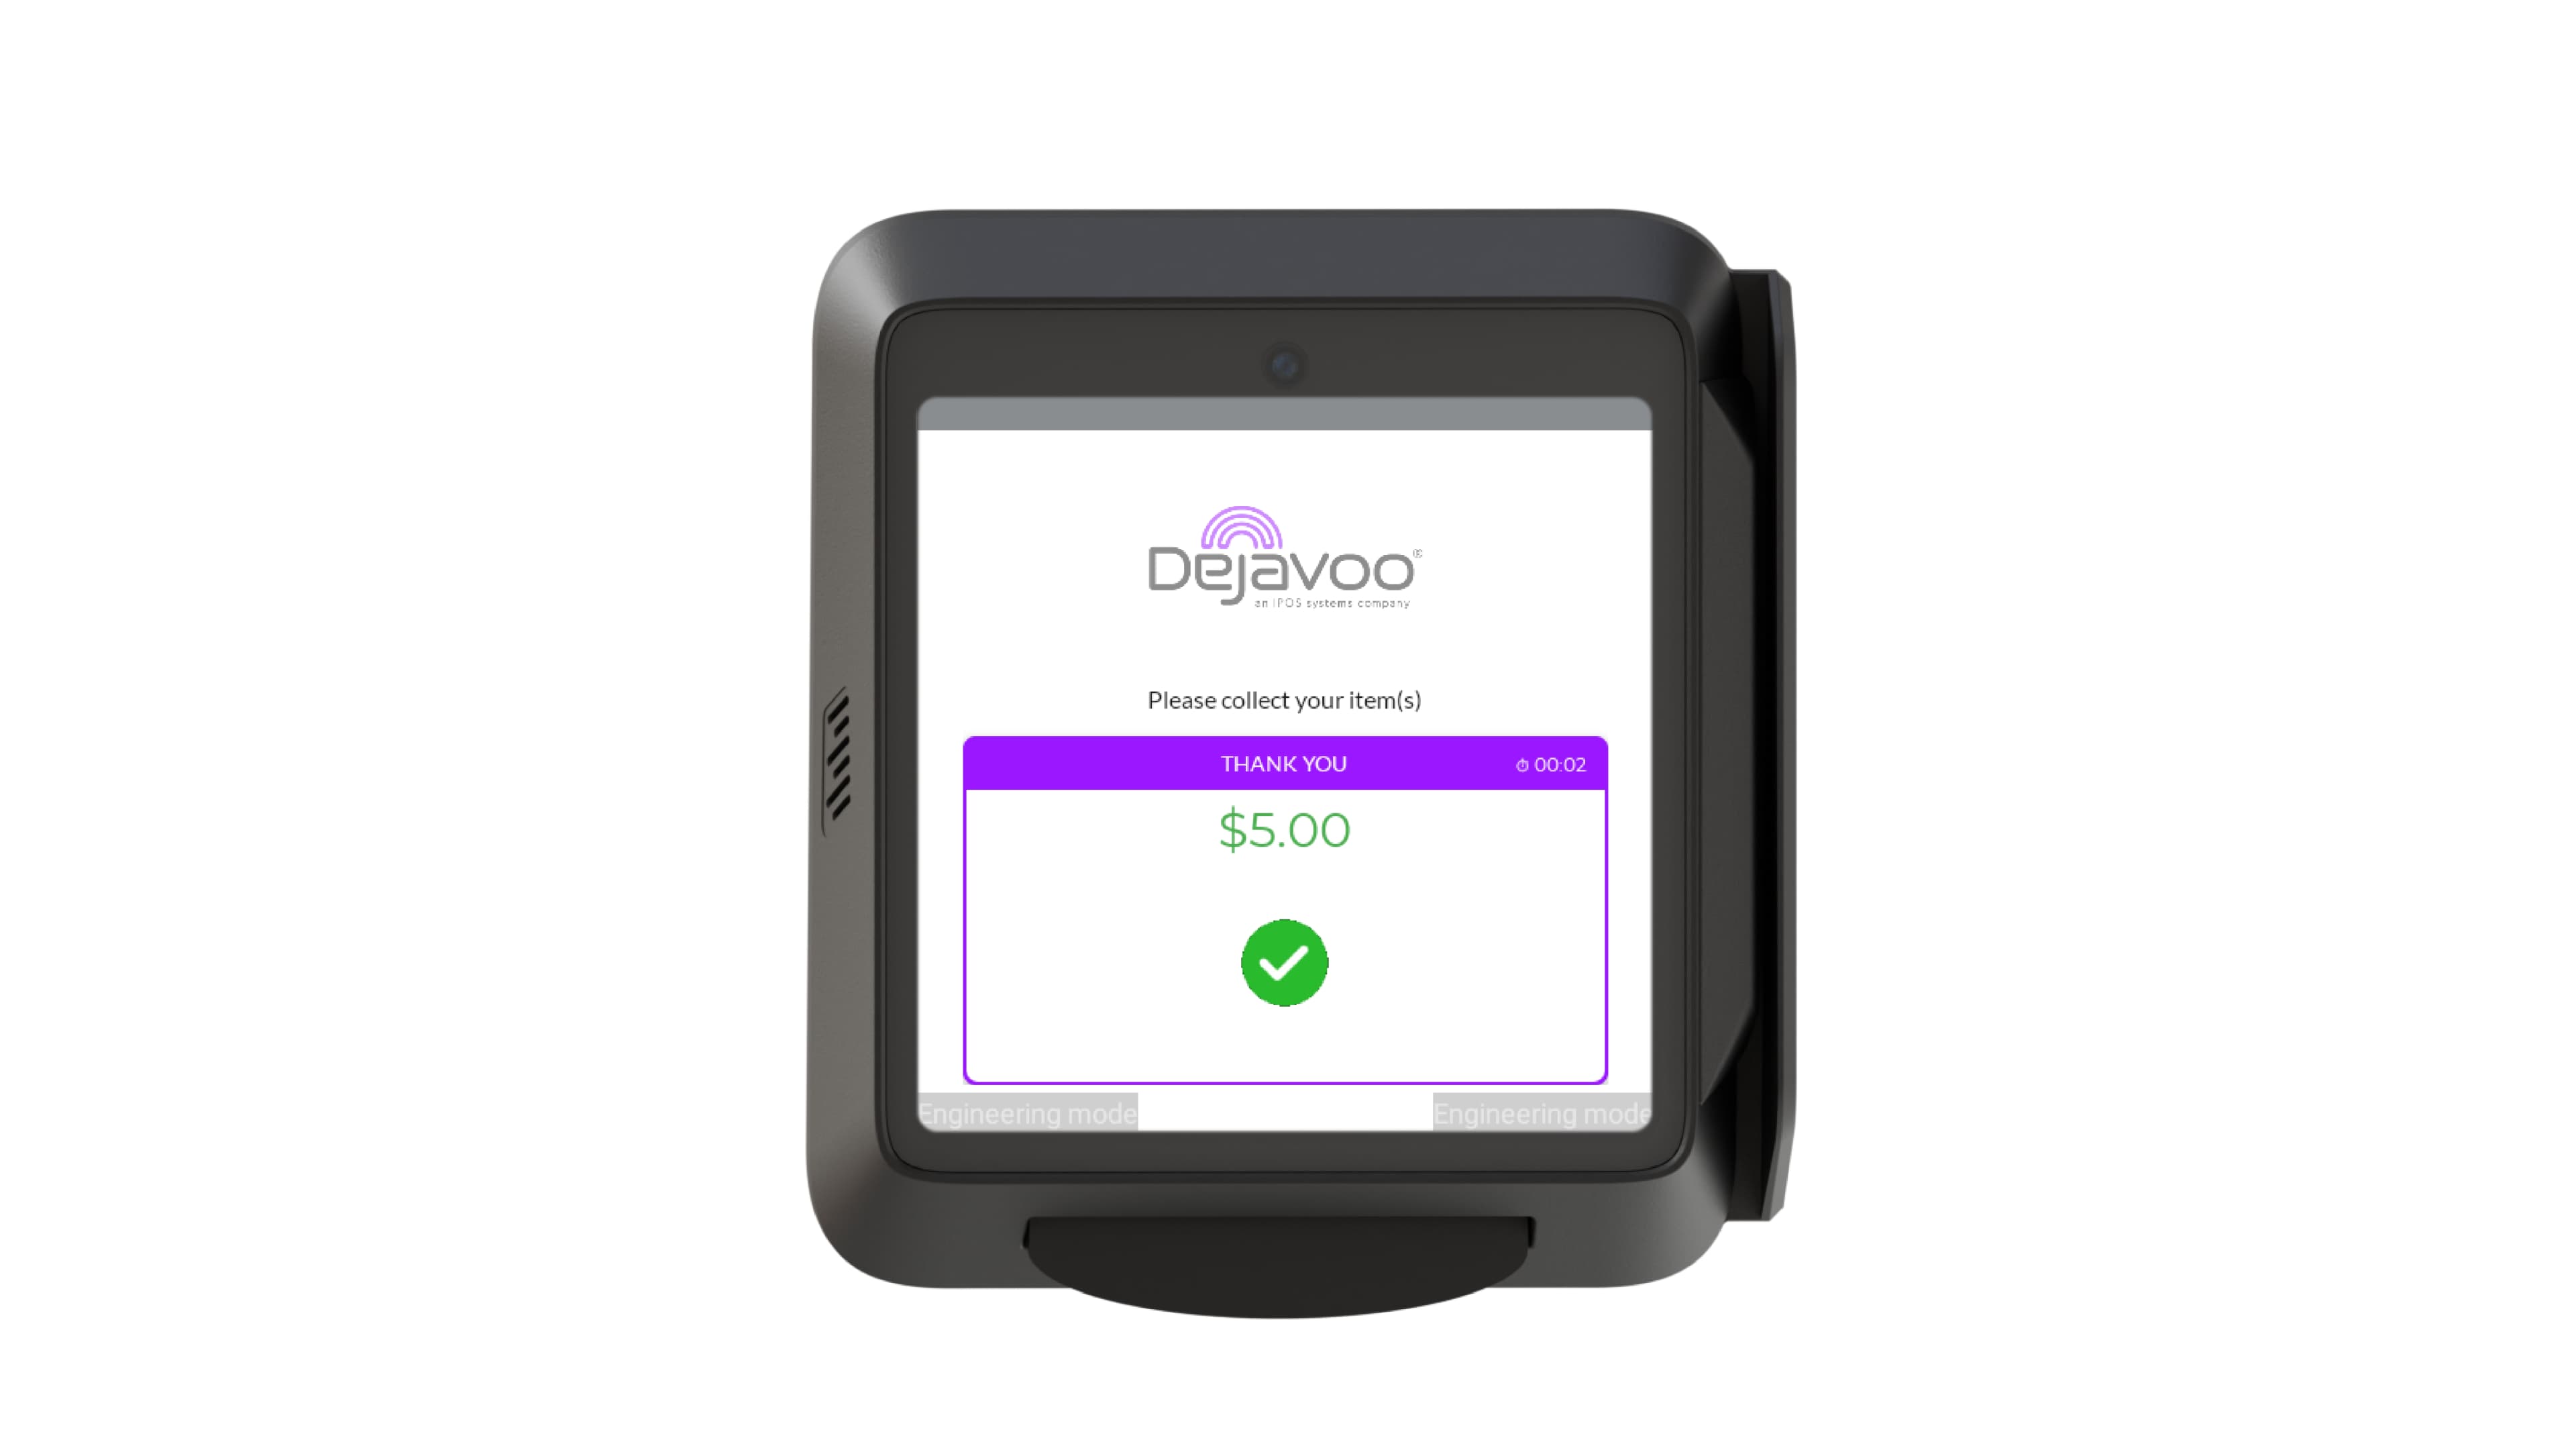
After the payment is successfully processed, the terminal displays the approved transaction amount.
The customer collects the dispensed product.
The transaction is complete.
Multivend
The Multivend transaction flow allows customers to purchase multiple products during a single payment session. The terminal pre-authorizes a predefined amount and adds the approved balance to the VMC. Customers may continue selecting products until they finish shopping or the remaining balance is insufficient. The customer is charged once for the total value of all dispensed products.
Configure the Multivend Transaction Flow
Before configuring the Multivend transaction flow, access the terminal configuration page in DejaUP!.
Step 1: Open the Terminal Configuration
- Log in to the iPOSpays Portal using your Merchant credentials.
- Navigate to DejaUP!. The DejaUP! portal opens in a new browser tab.
- From the left navigation panel, select Terminals.
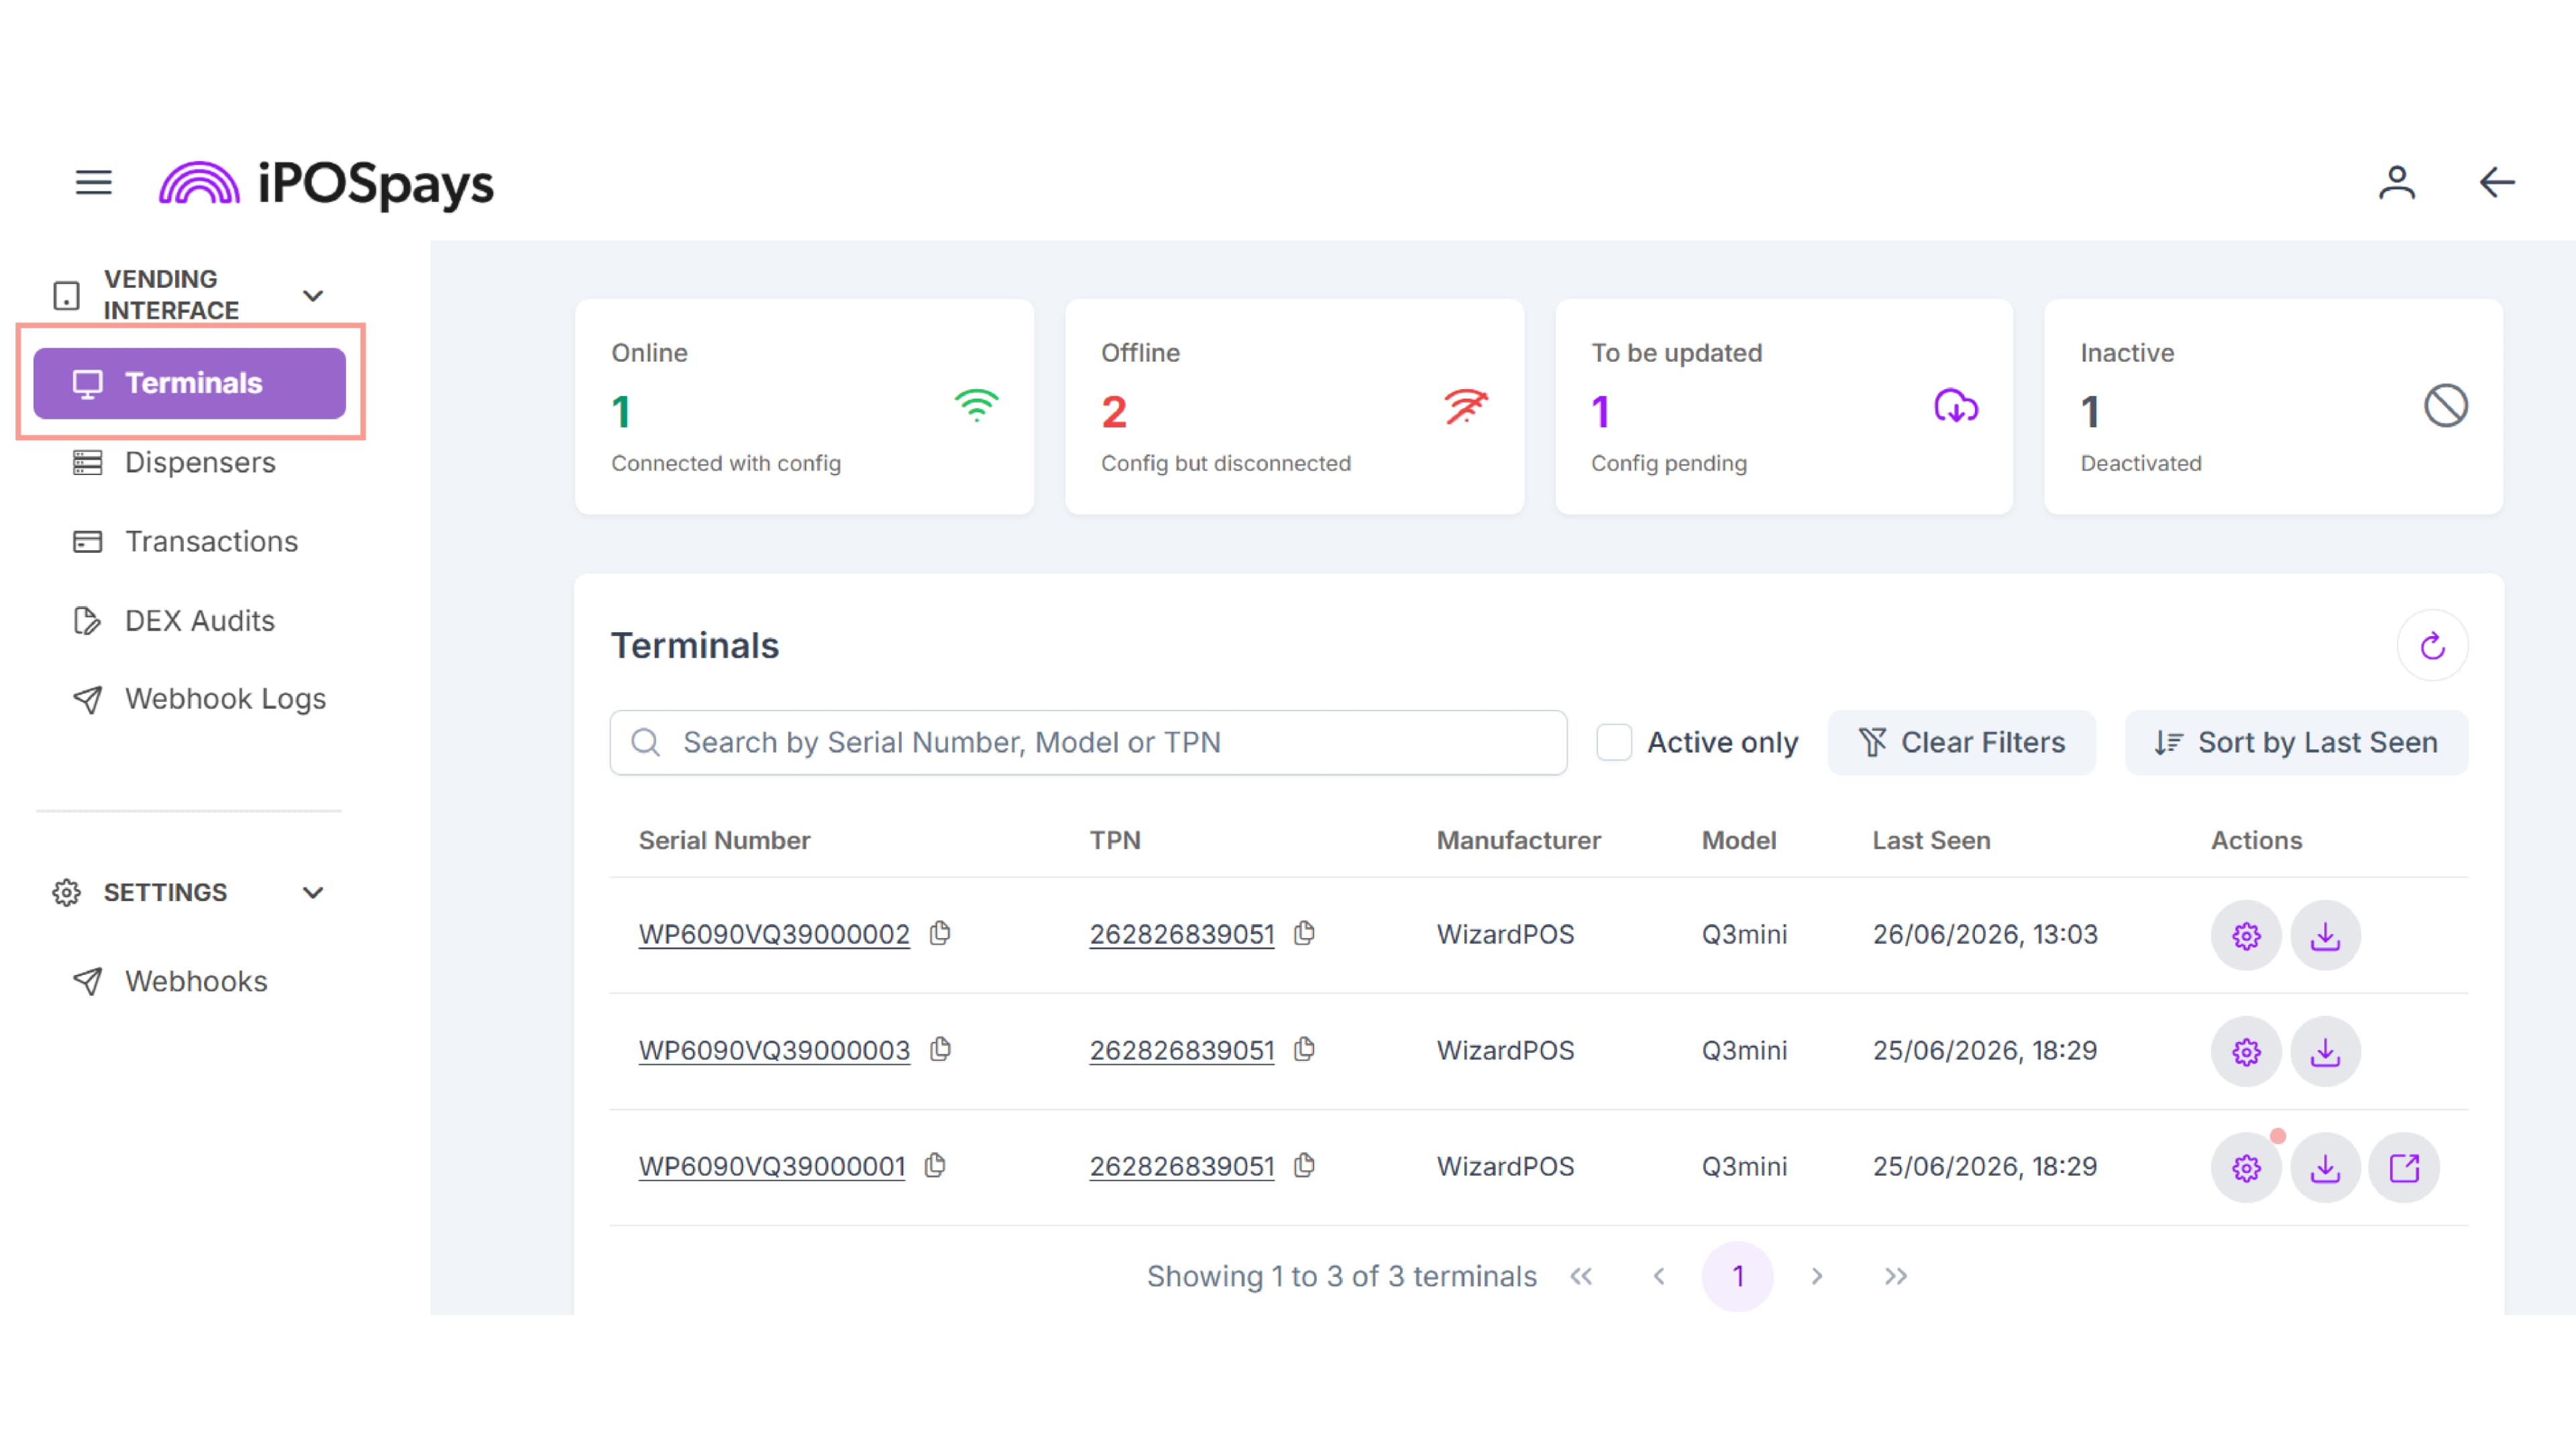
- Click the required Serial Number, TPN, or Settings icon to open the Terminal Configuration page.
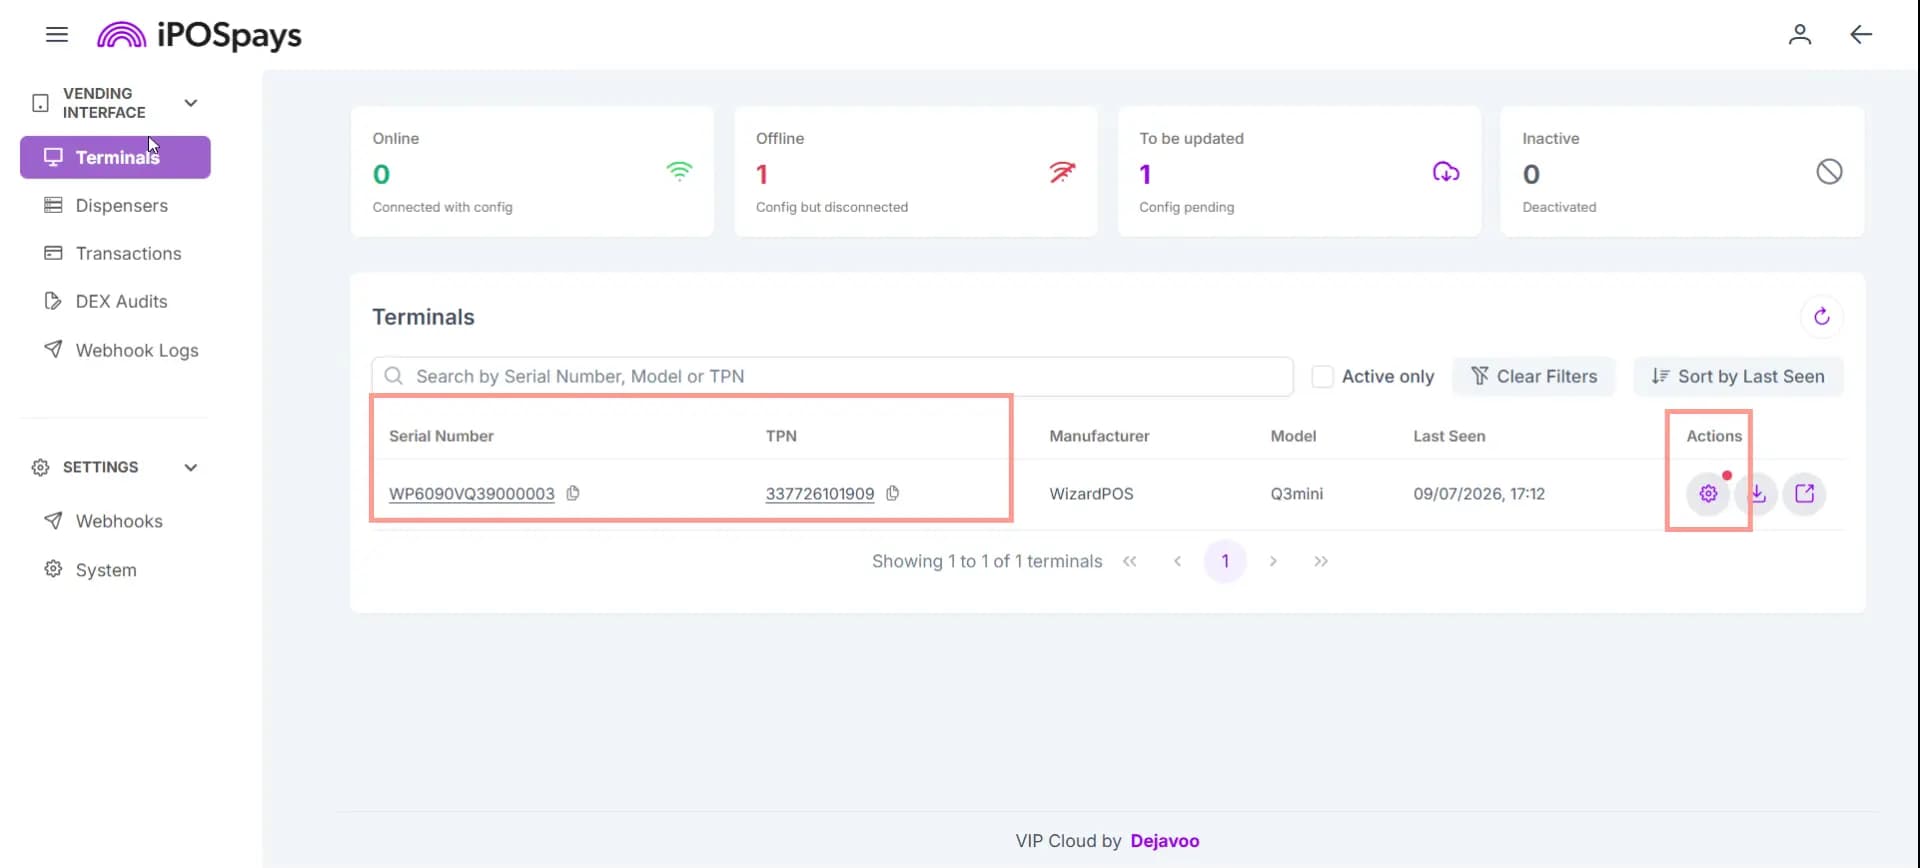
- Select the Vending tab.
Step 2: Configure the Multivend Transaction Flow
- Under Vending Mode, select Multivend.
- Click Save Changes.
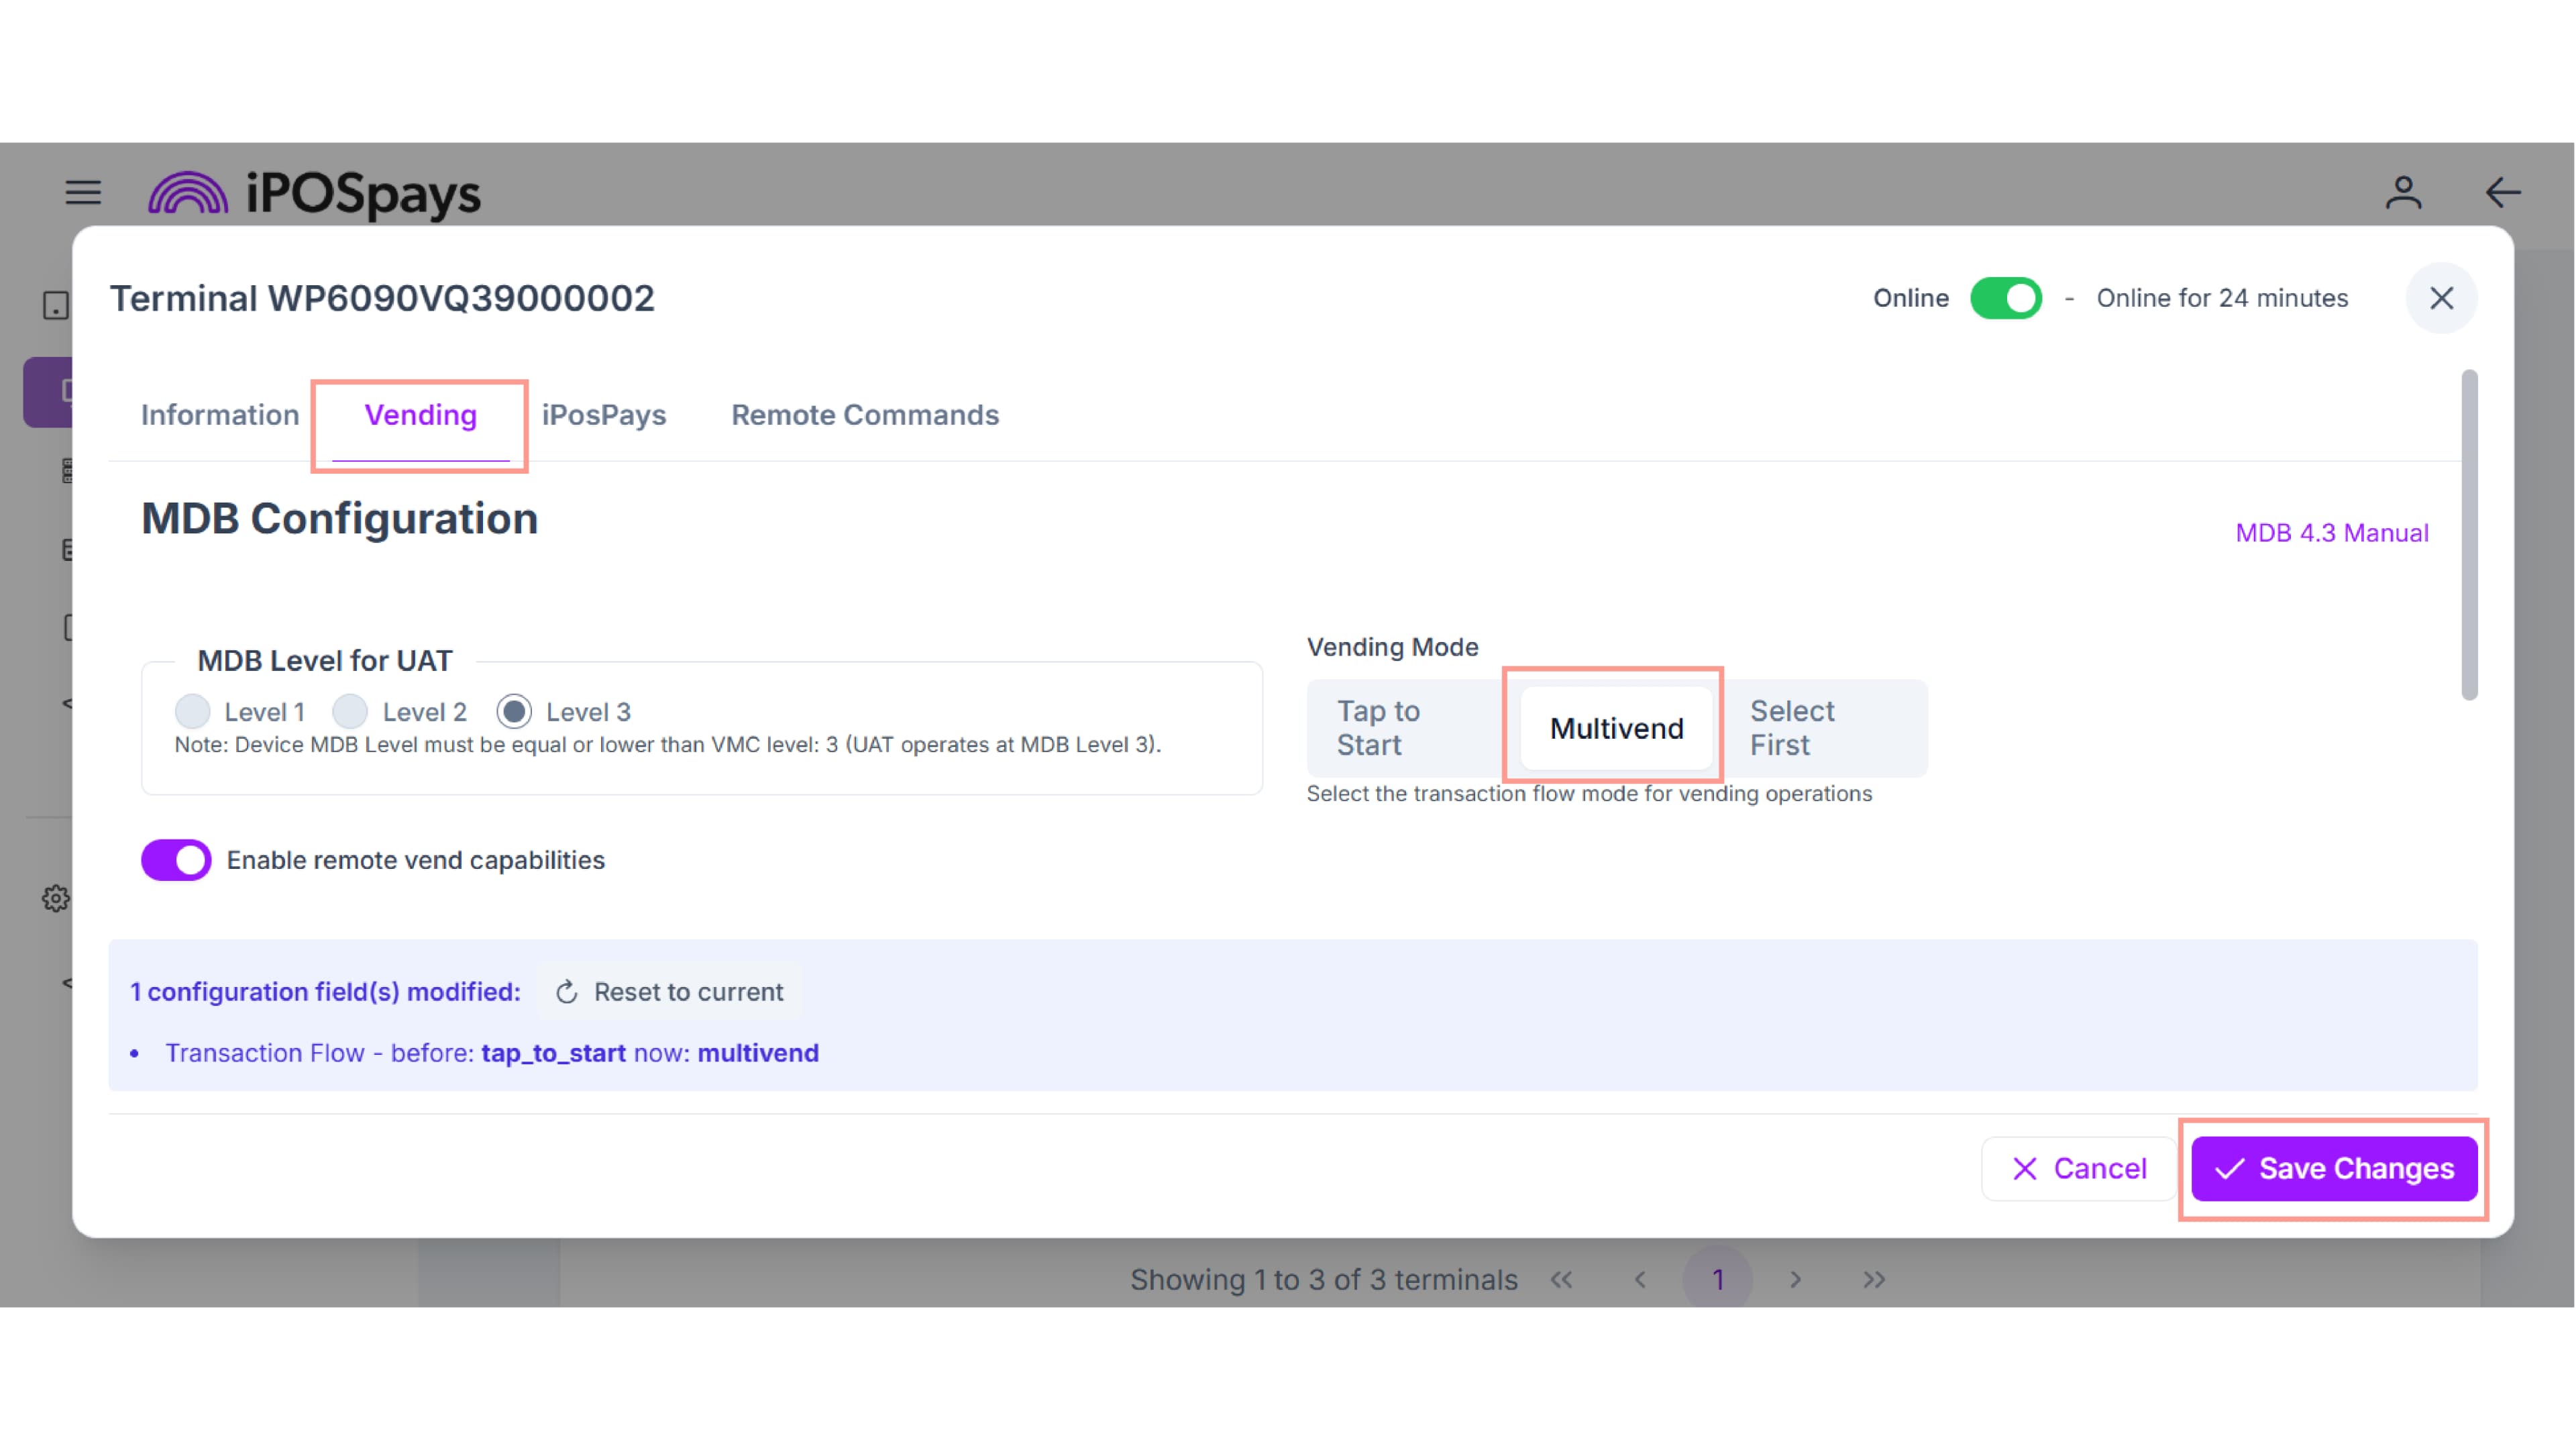
- When the confirmation message appears, click OK.
The following message is displayed:
Notice: You must restart the vending machine to apply the change.
After changing the vending mode, restart the vending machine so the new vending mode takes effect and DejaUP! can establish a new handshake. Depending on the vending machine, the handshake process may take a few moments to complete.
Process a Multivend Transaction
Step 1: Present the Payment Method
When the terminal displays the payment screen, tap or insert the customer’s payment card or mobile wallet.
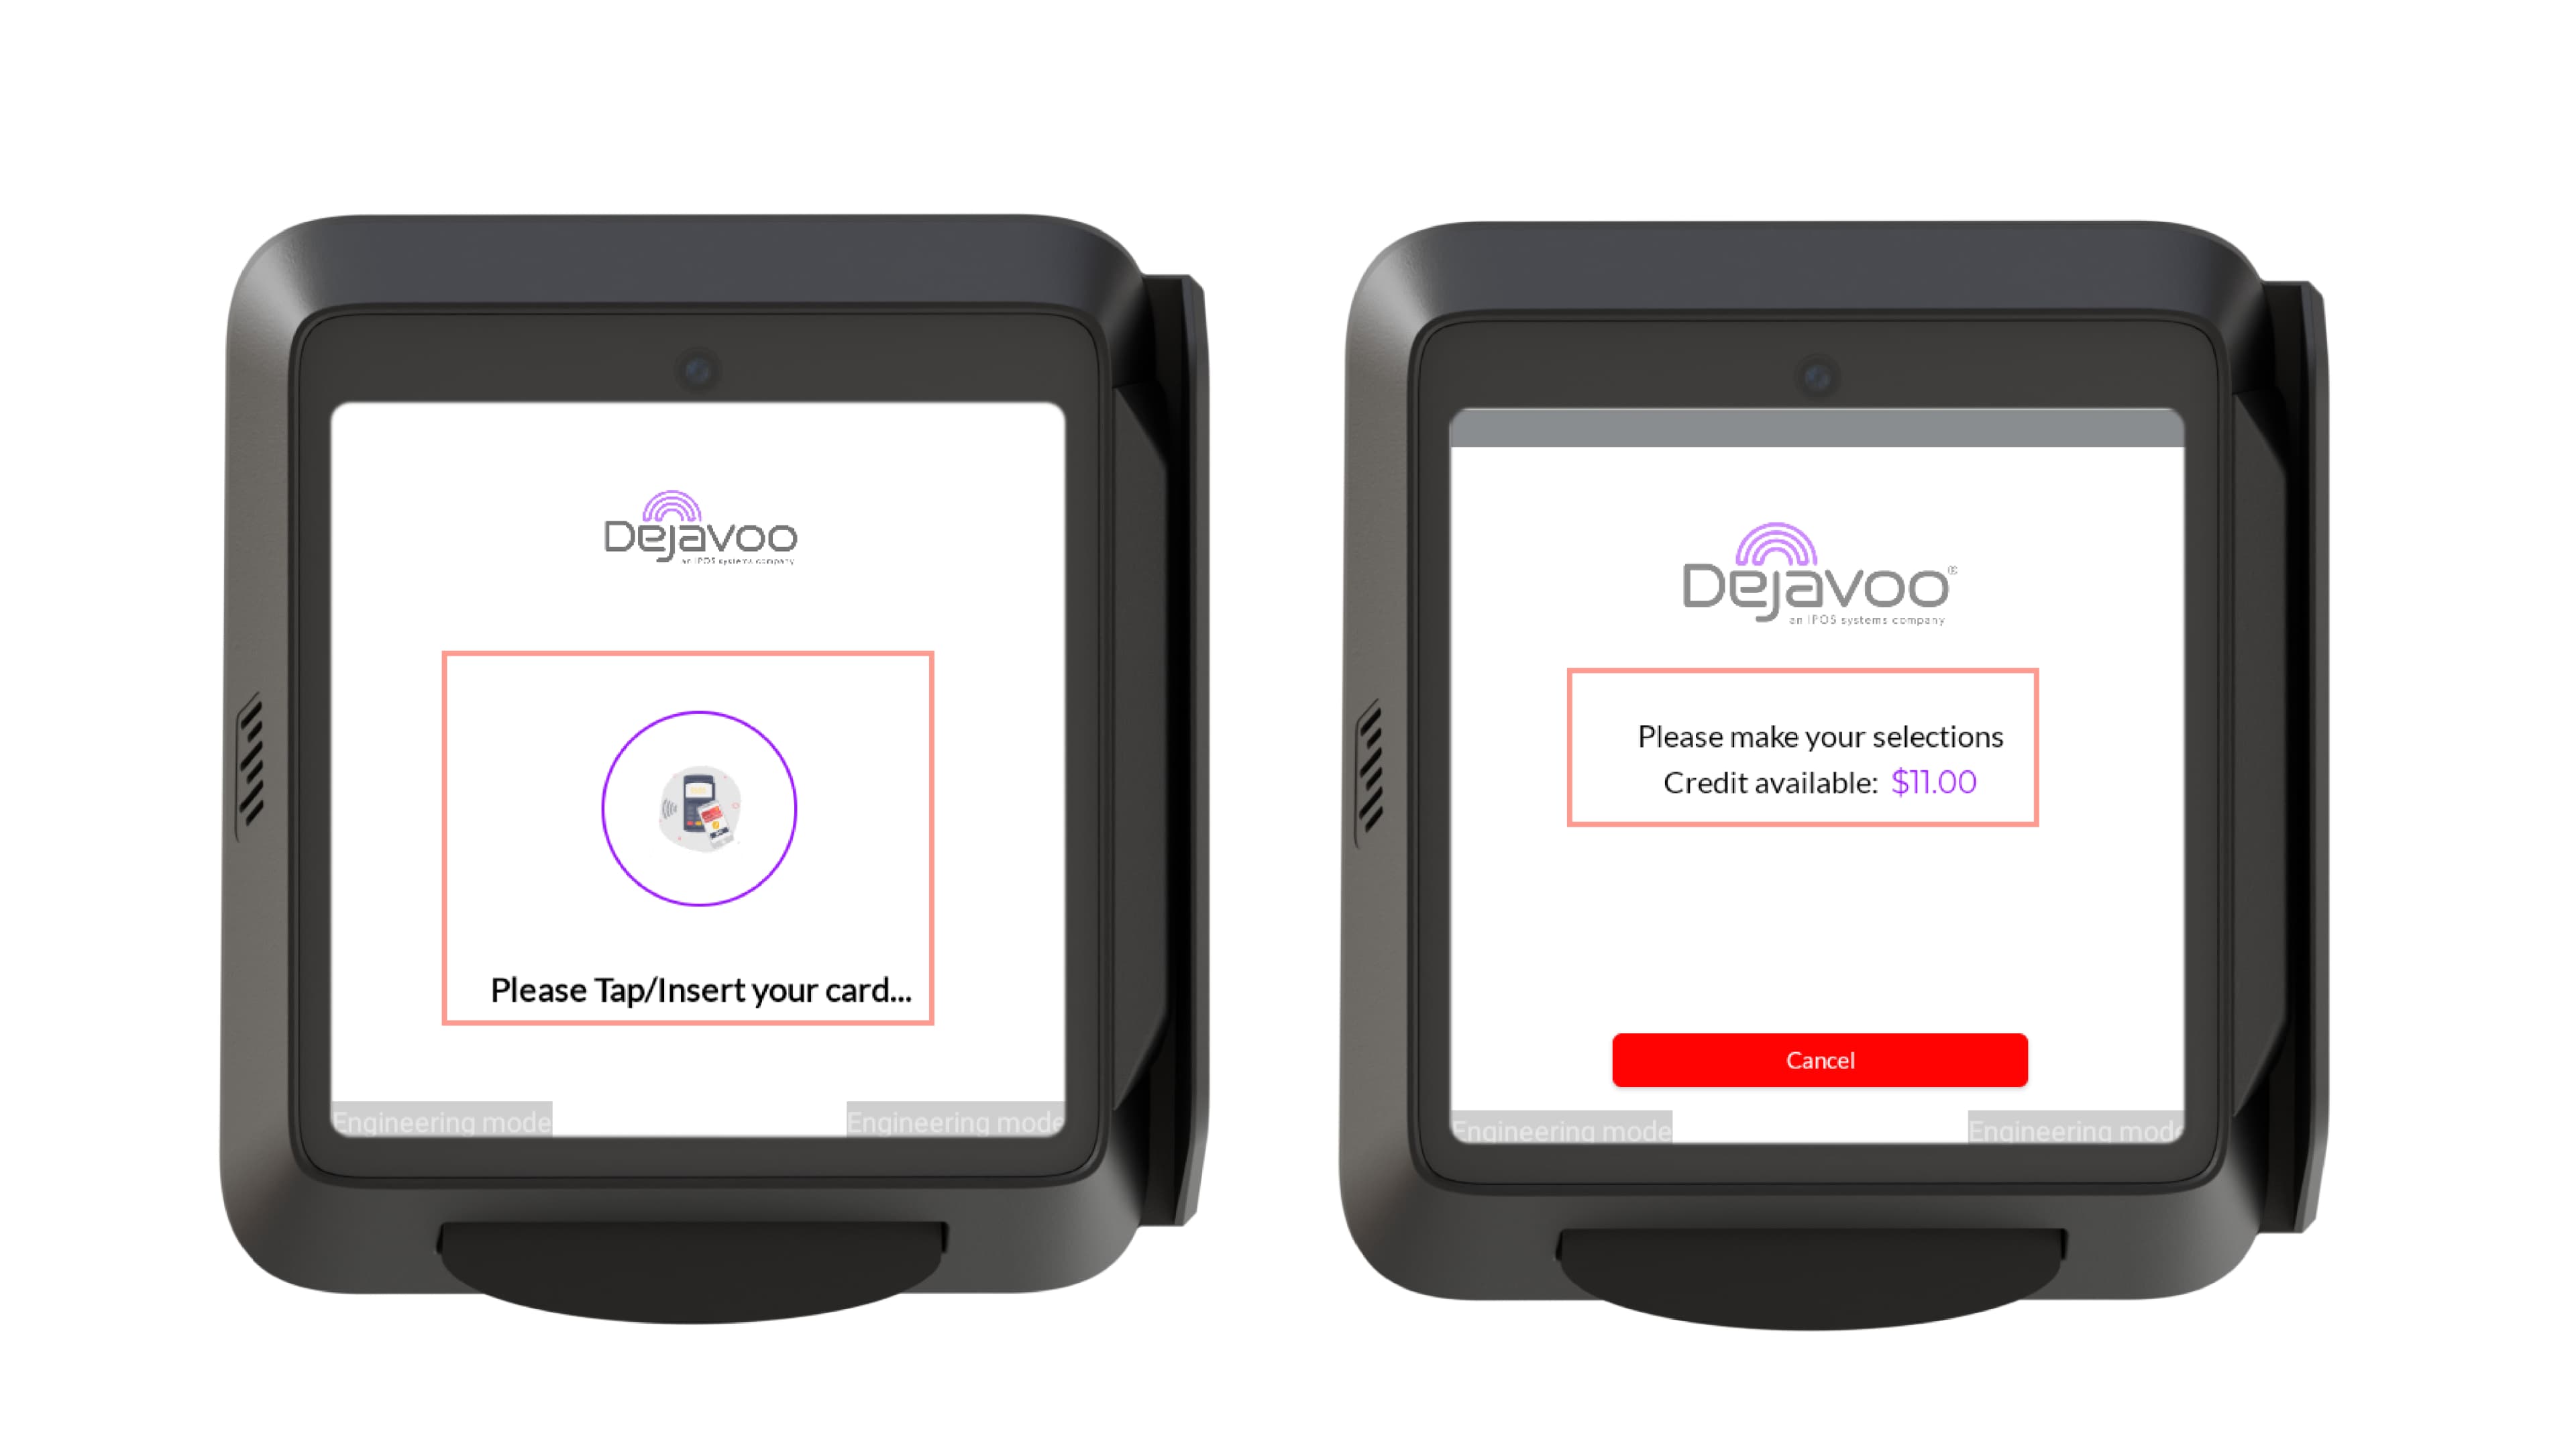
The terminal displays:
Please Tap/Insert your card…
The terminal pre-authorizes the predefined amount and starts the session.
Step 2: Select the First Product
After payment approval, the terminal displays the available balance.
Select the desired product from the vending machine.
The selected product is dispensed.
Step 3: Continue Selecting Products
After each product is dispensed, the remaining available balance is displayed.
Continue selecting products until:
- The customer finishes making selections.
- The available balance is exhausted.
- The VMC reaches its configured Multivend item limit.
The terminal updates the remaining balance after each successful selection.
Step 4: Complete the Transaction
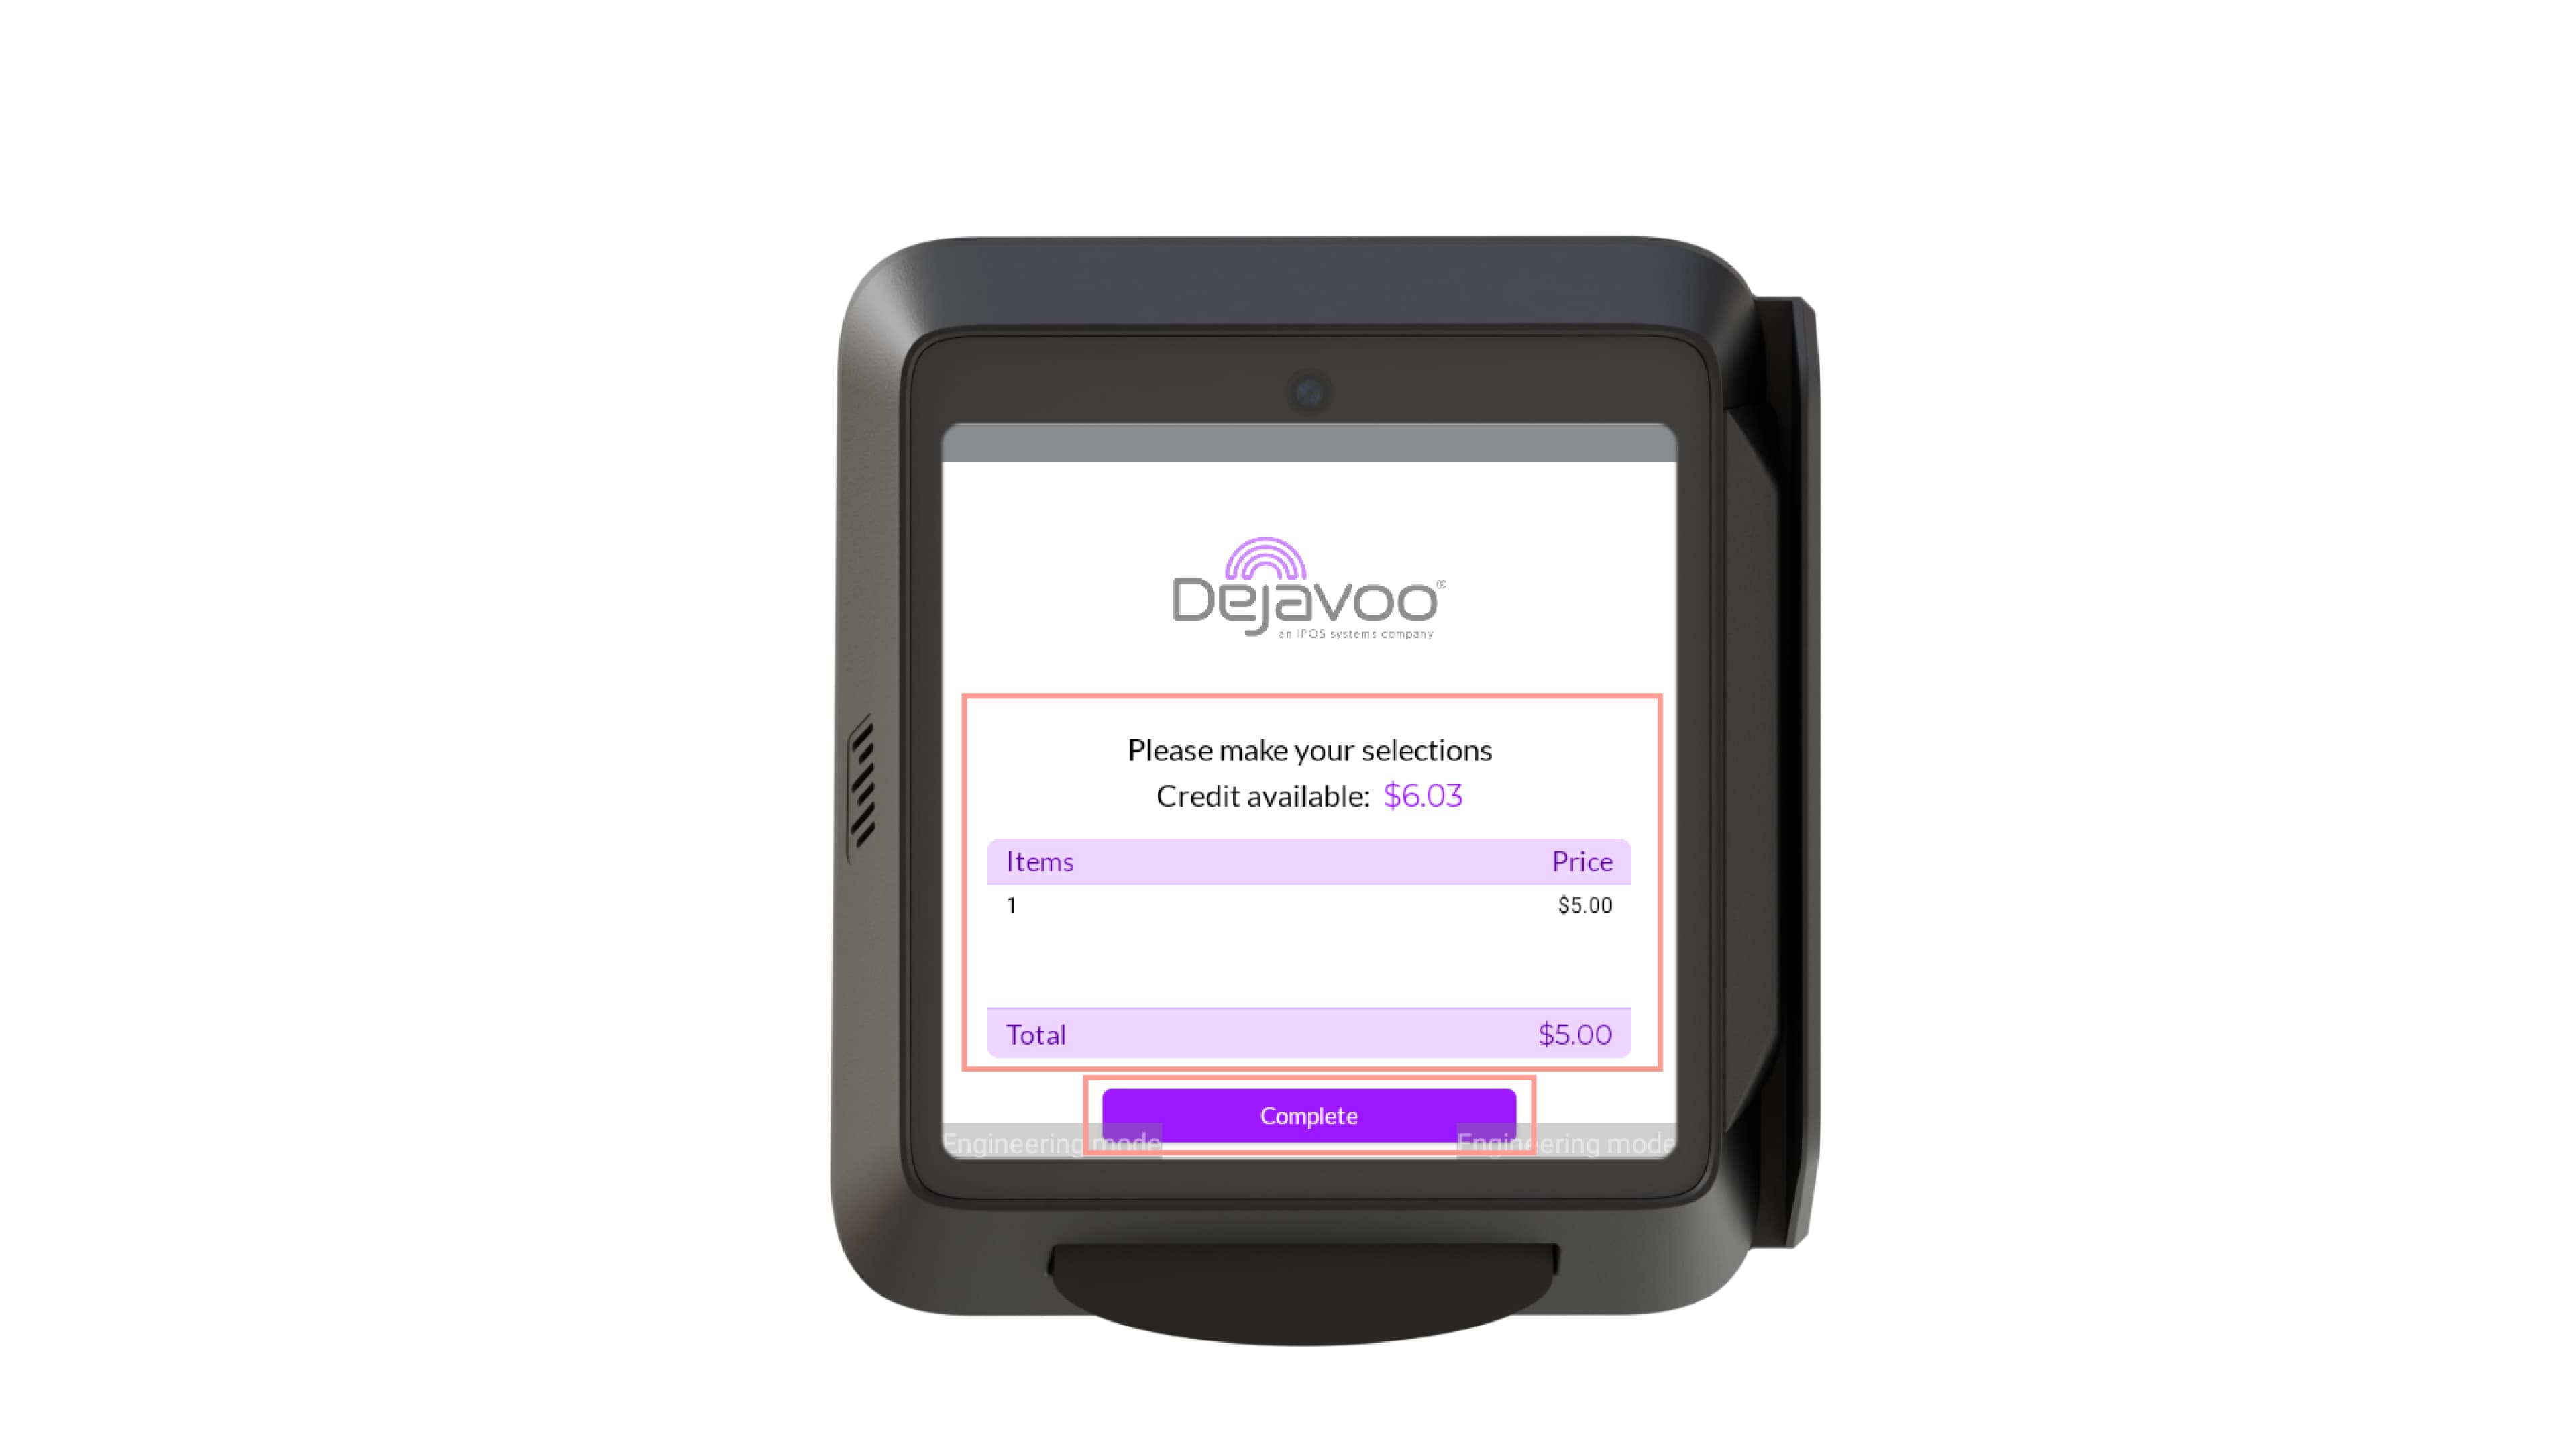
When all desired products have been selected, tap Complete on the terminal.
The terminal processes the total transaction amount.
Step 5: Wait for Payment Processing
The terminal processes the payment and displays the transaction status.
Do not interrupt the transaction while payment processing is in progress.
Select First
The Select First transaction flow allows customers to choose a product before making a payment. After a product is selected, the payment terminal displays the exact purchase amount and prompts the customer to present a payment method. Once payment is approved, the vending machine dispenses the selected product.
Configure the Select First Transaction Flow
Before configuring the Select First transaction flow, access the terminal configuration page in DejaUP!.
Step 1: Open the Terminal Configuration
- Log in to the iPOSpays Portal using your Merchant credentials.
- Navigate to DejaUP!. The DejaUP! portal opens in a new browser tab.
- From the left navigation panel, select Terminals.
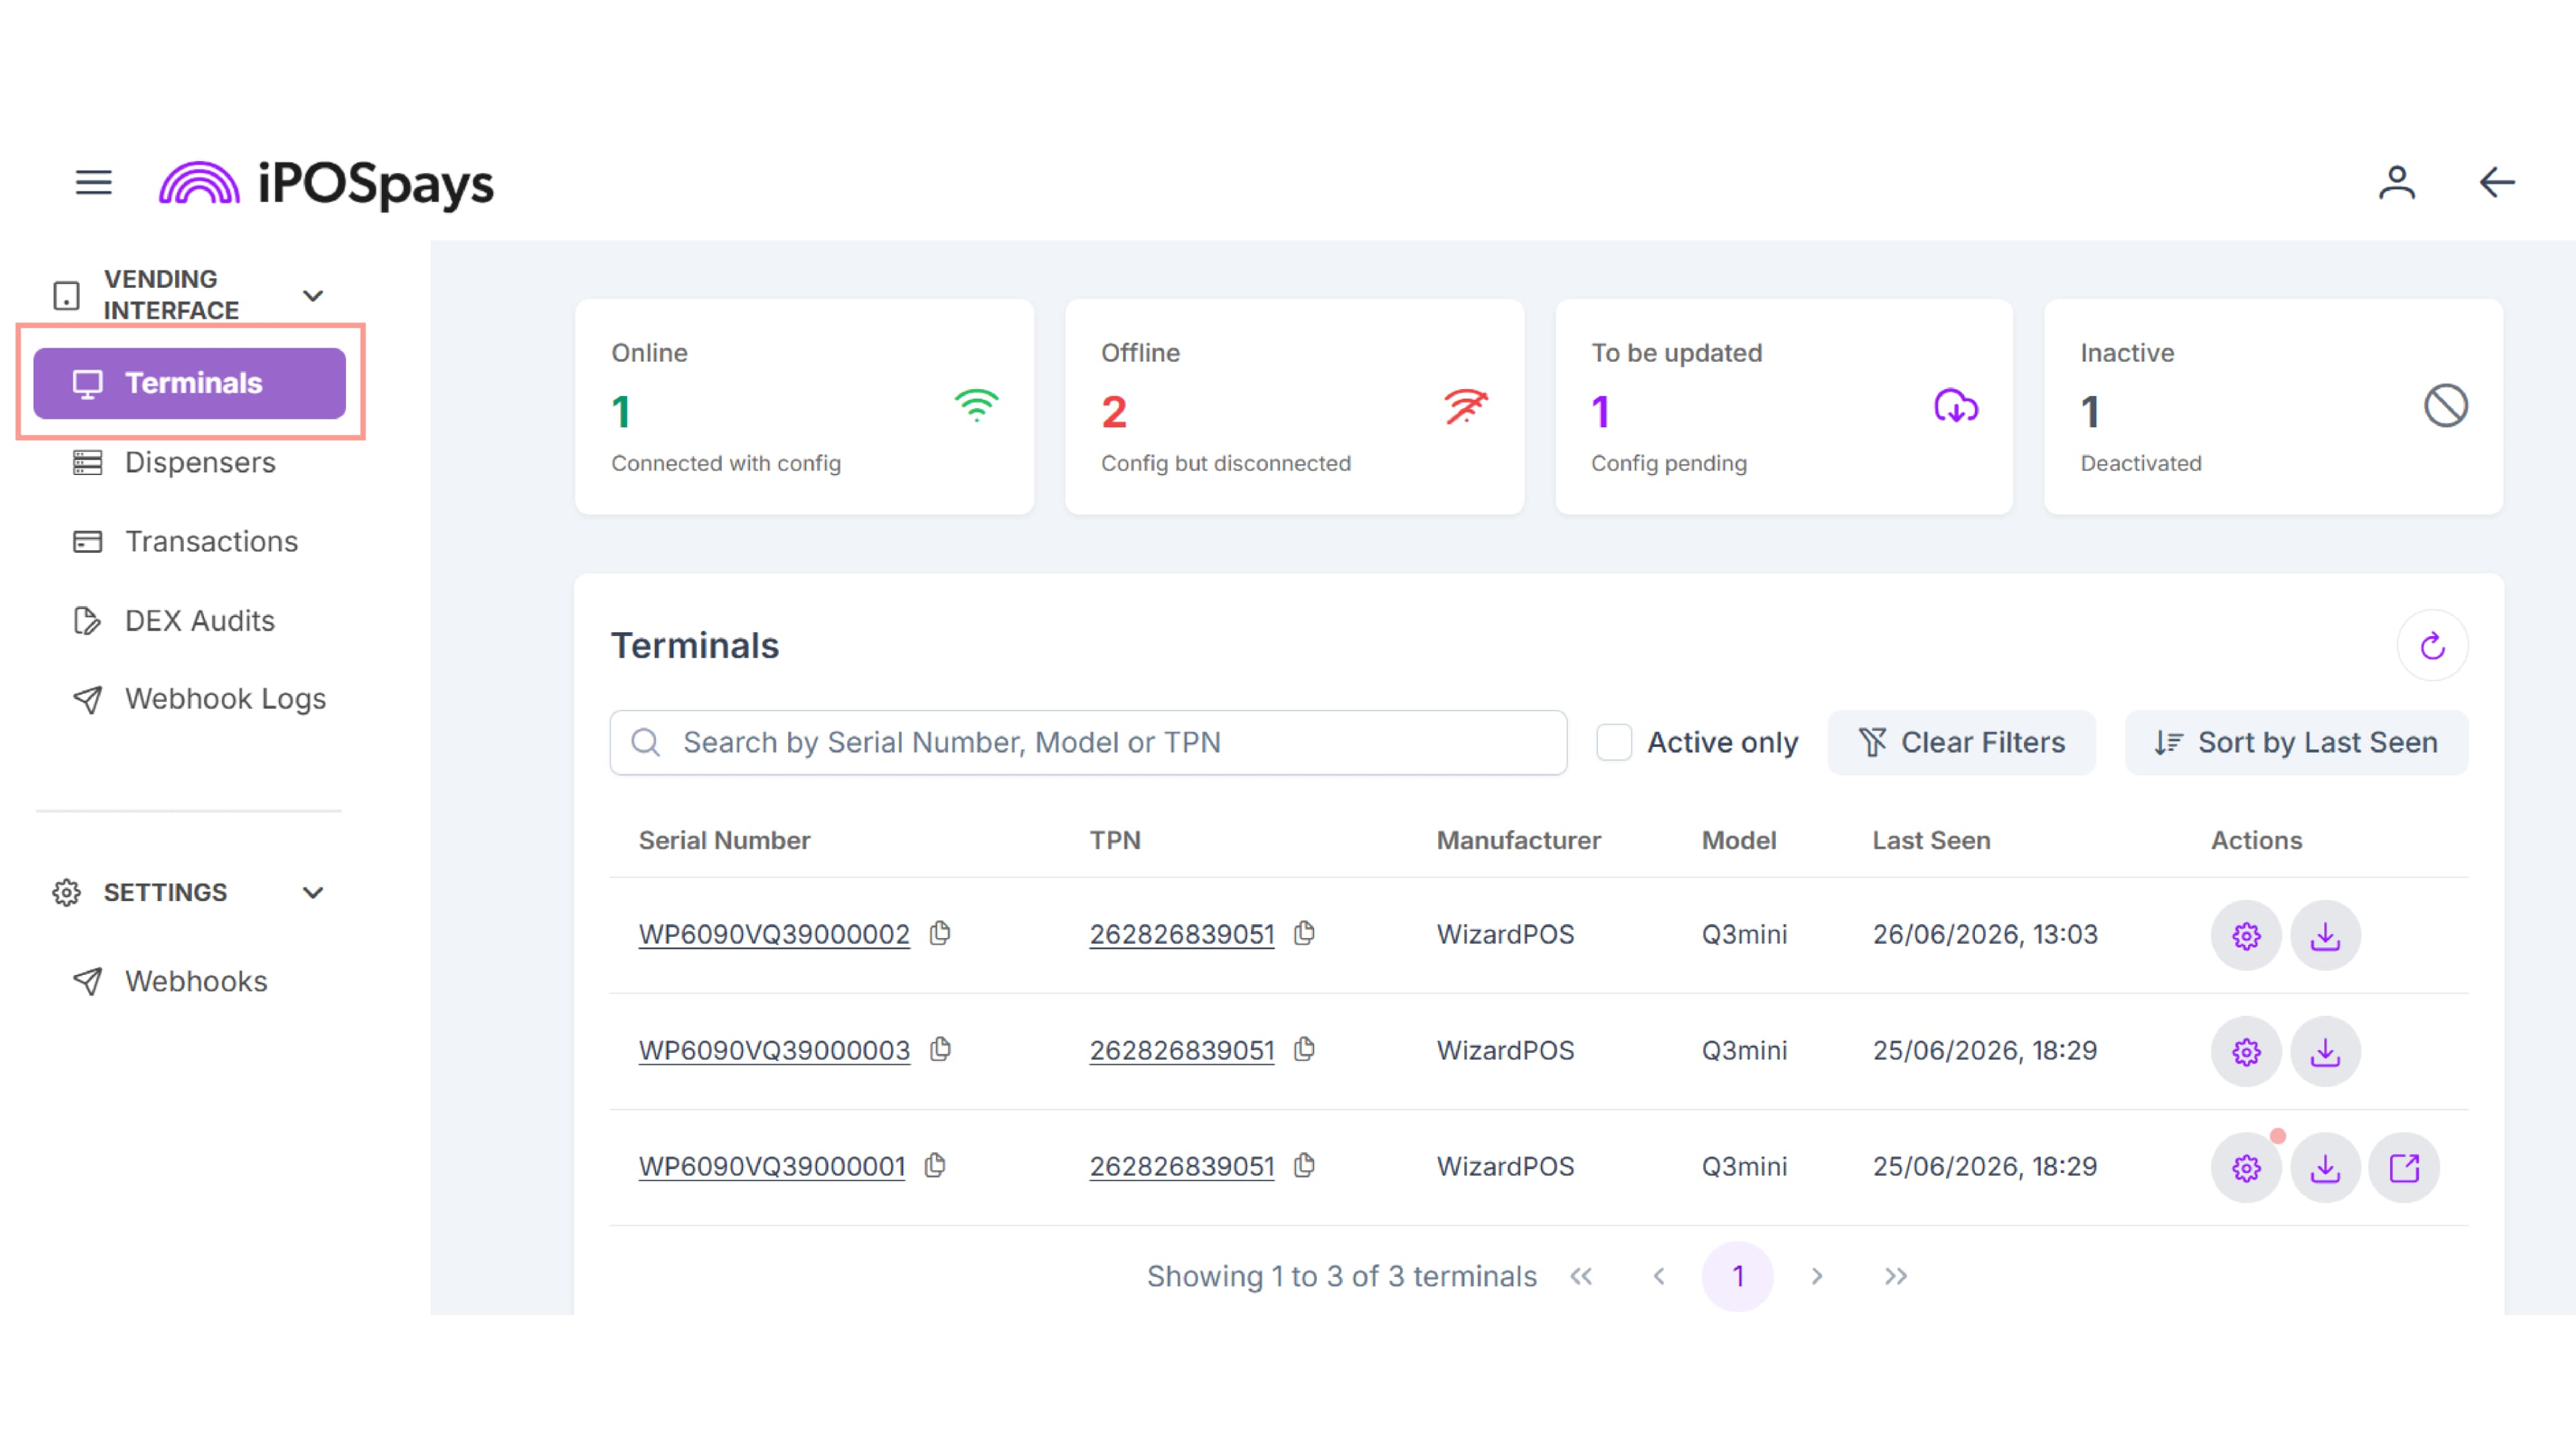
- Click the required Serial Number, TPN, or Settings icon to open the Terminal Configuration page.
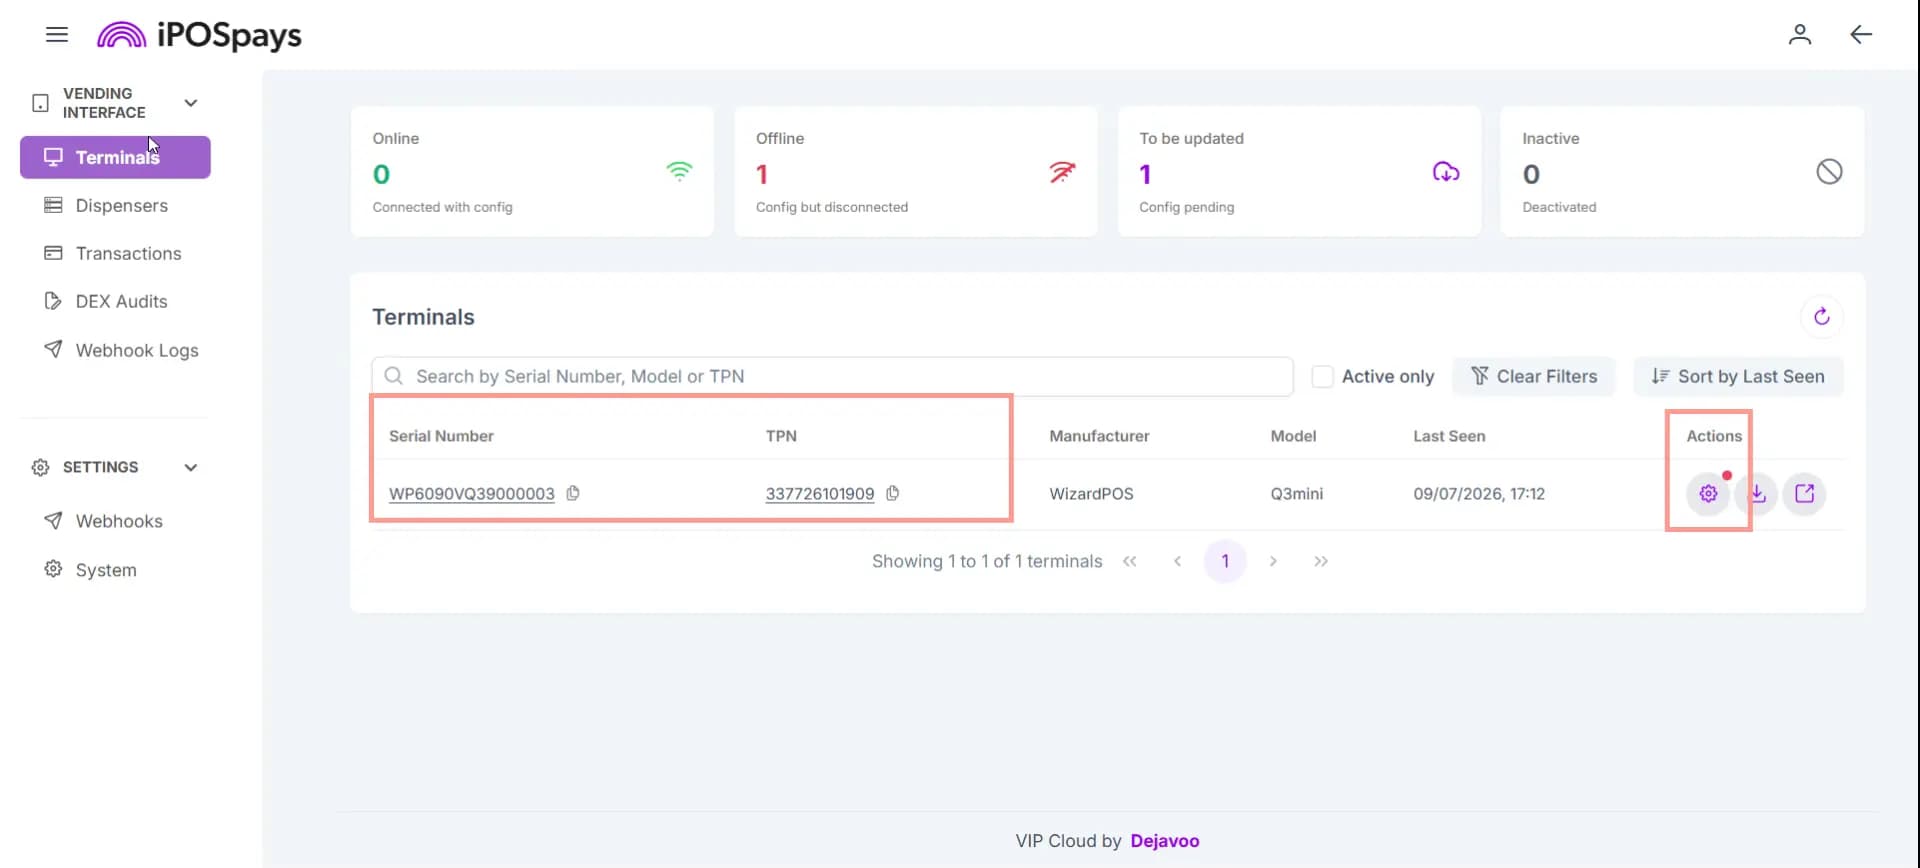
- Select the Vending tab.
Step 2: Configure the Select First Transaction Flow
- Under Vending Mode, select Select First.
- Click Save Changes.
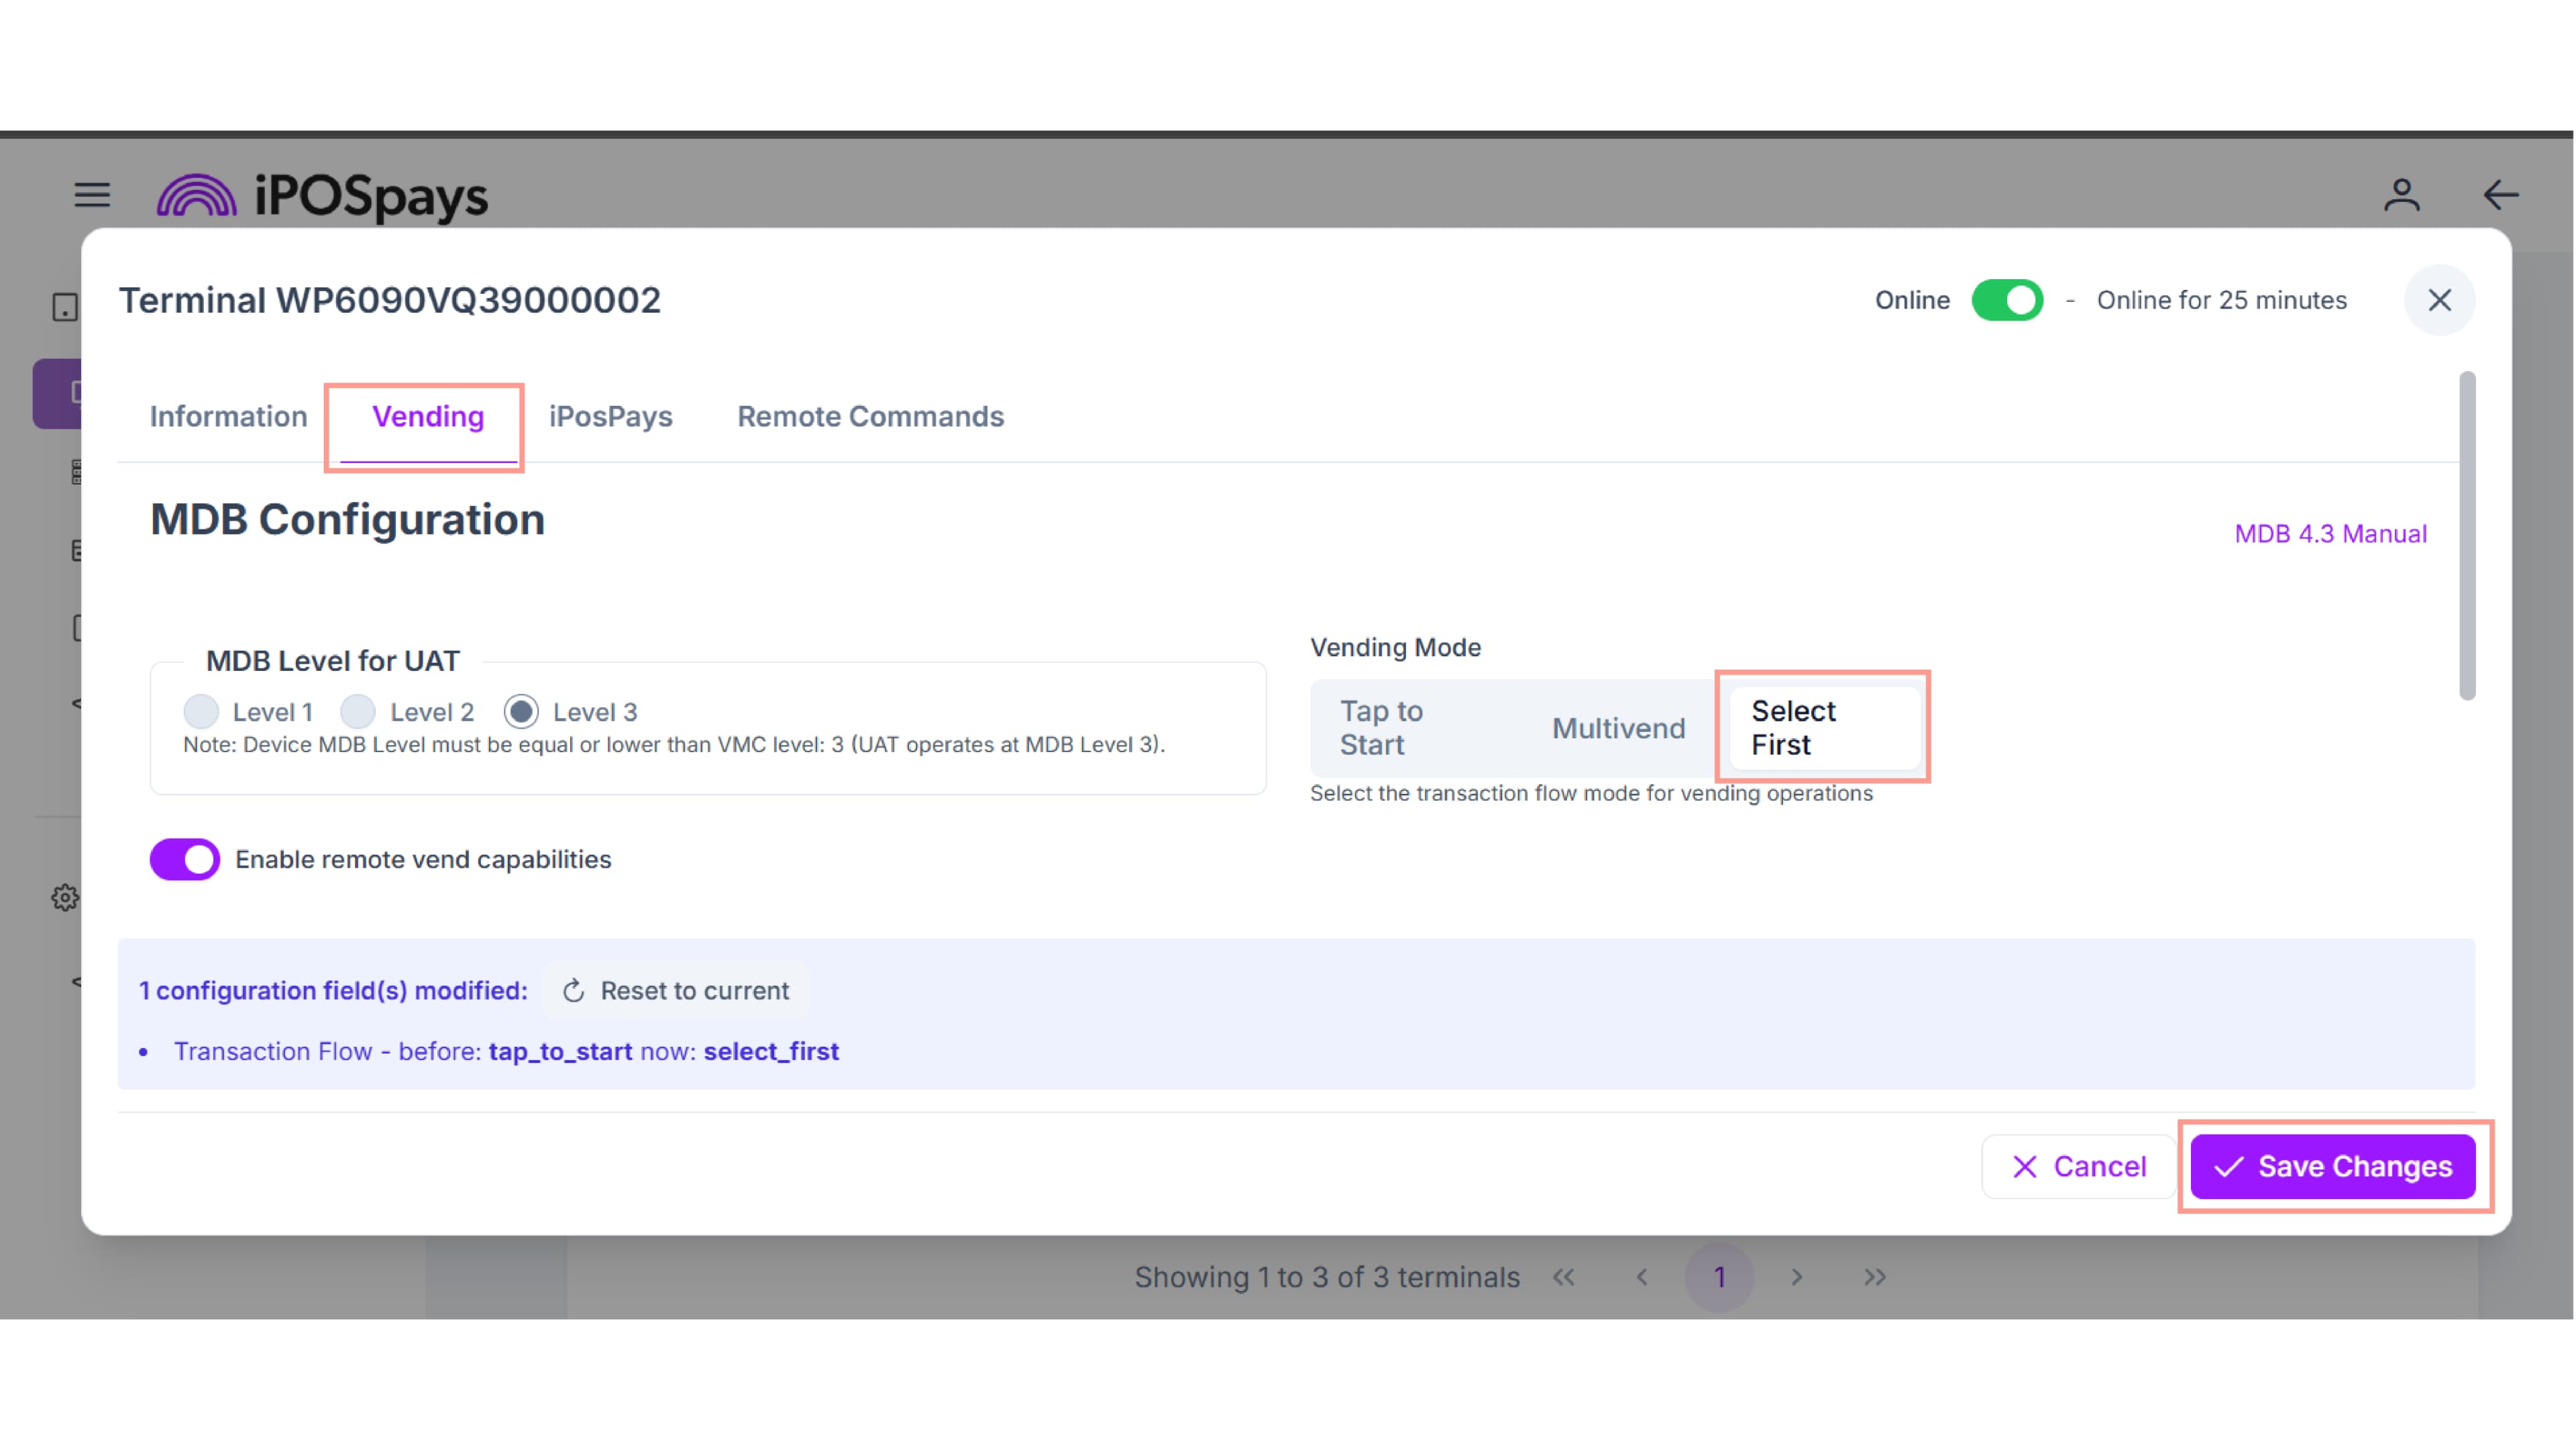
- When the confirmation message appears, click OK.
The following message is displayed:
Notice: You must restart the vending machine to apply the change.
After changing the vending mode, restart the vending machine so the new vending mode takes effect and DejaUP! can establish a new handshake. Depending on the vending machine, the handshake process may take a few moments to complete.
Process a Select First Transaction
Step 1: Select a Product
When the terminal displays the product selection screen, select the desired product on the vending machine.
The terminal displays:
Please make your selection…
Step 2: Review the Total Amount
After the product is selected, the terminal displays the total amount due.
Verify the amount before proceeding.
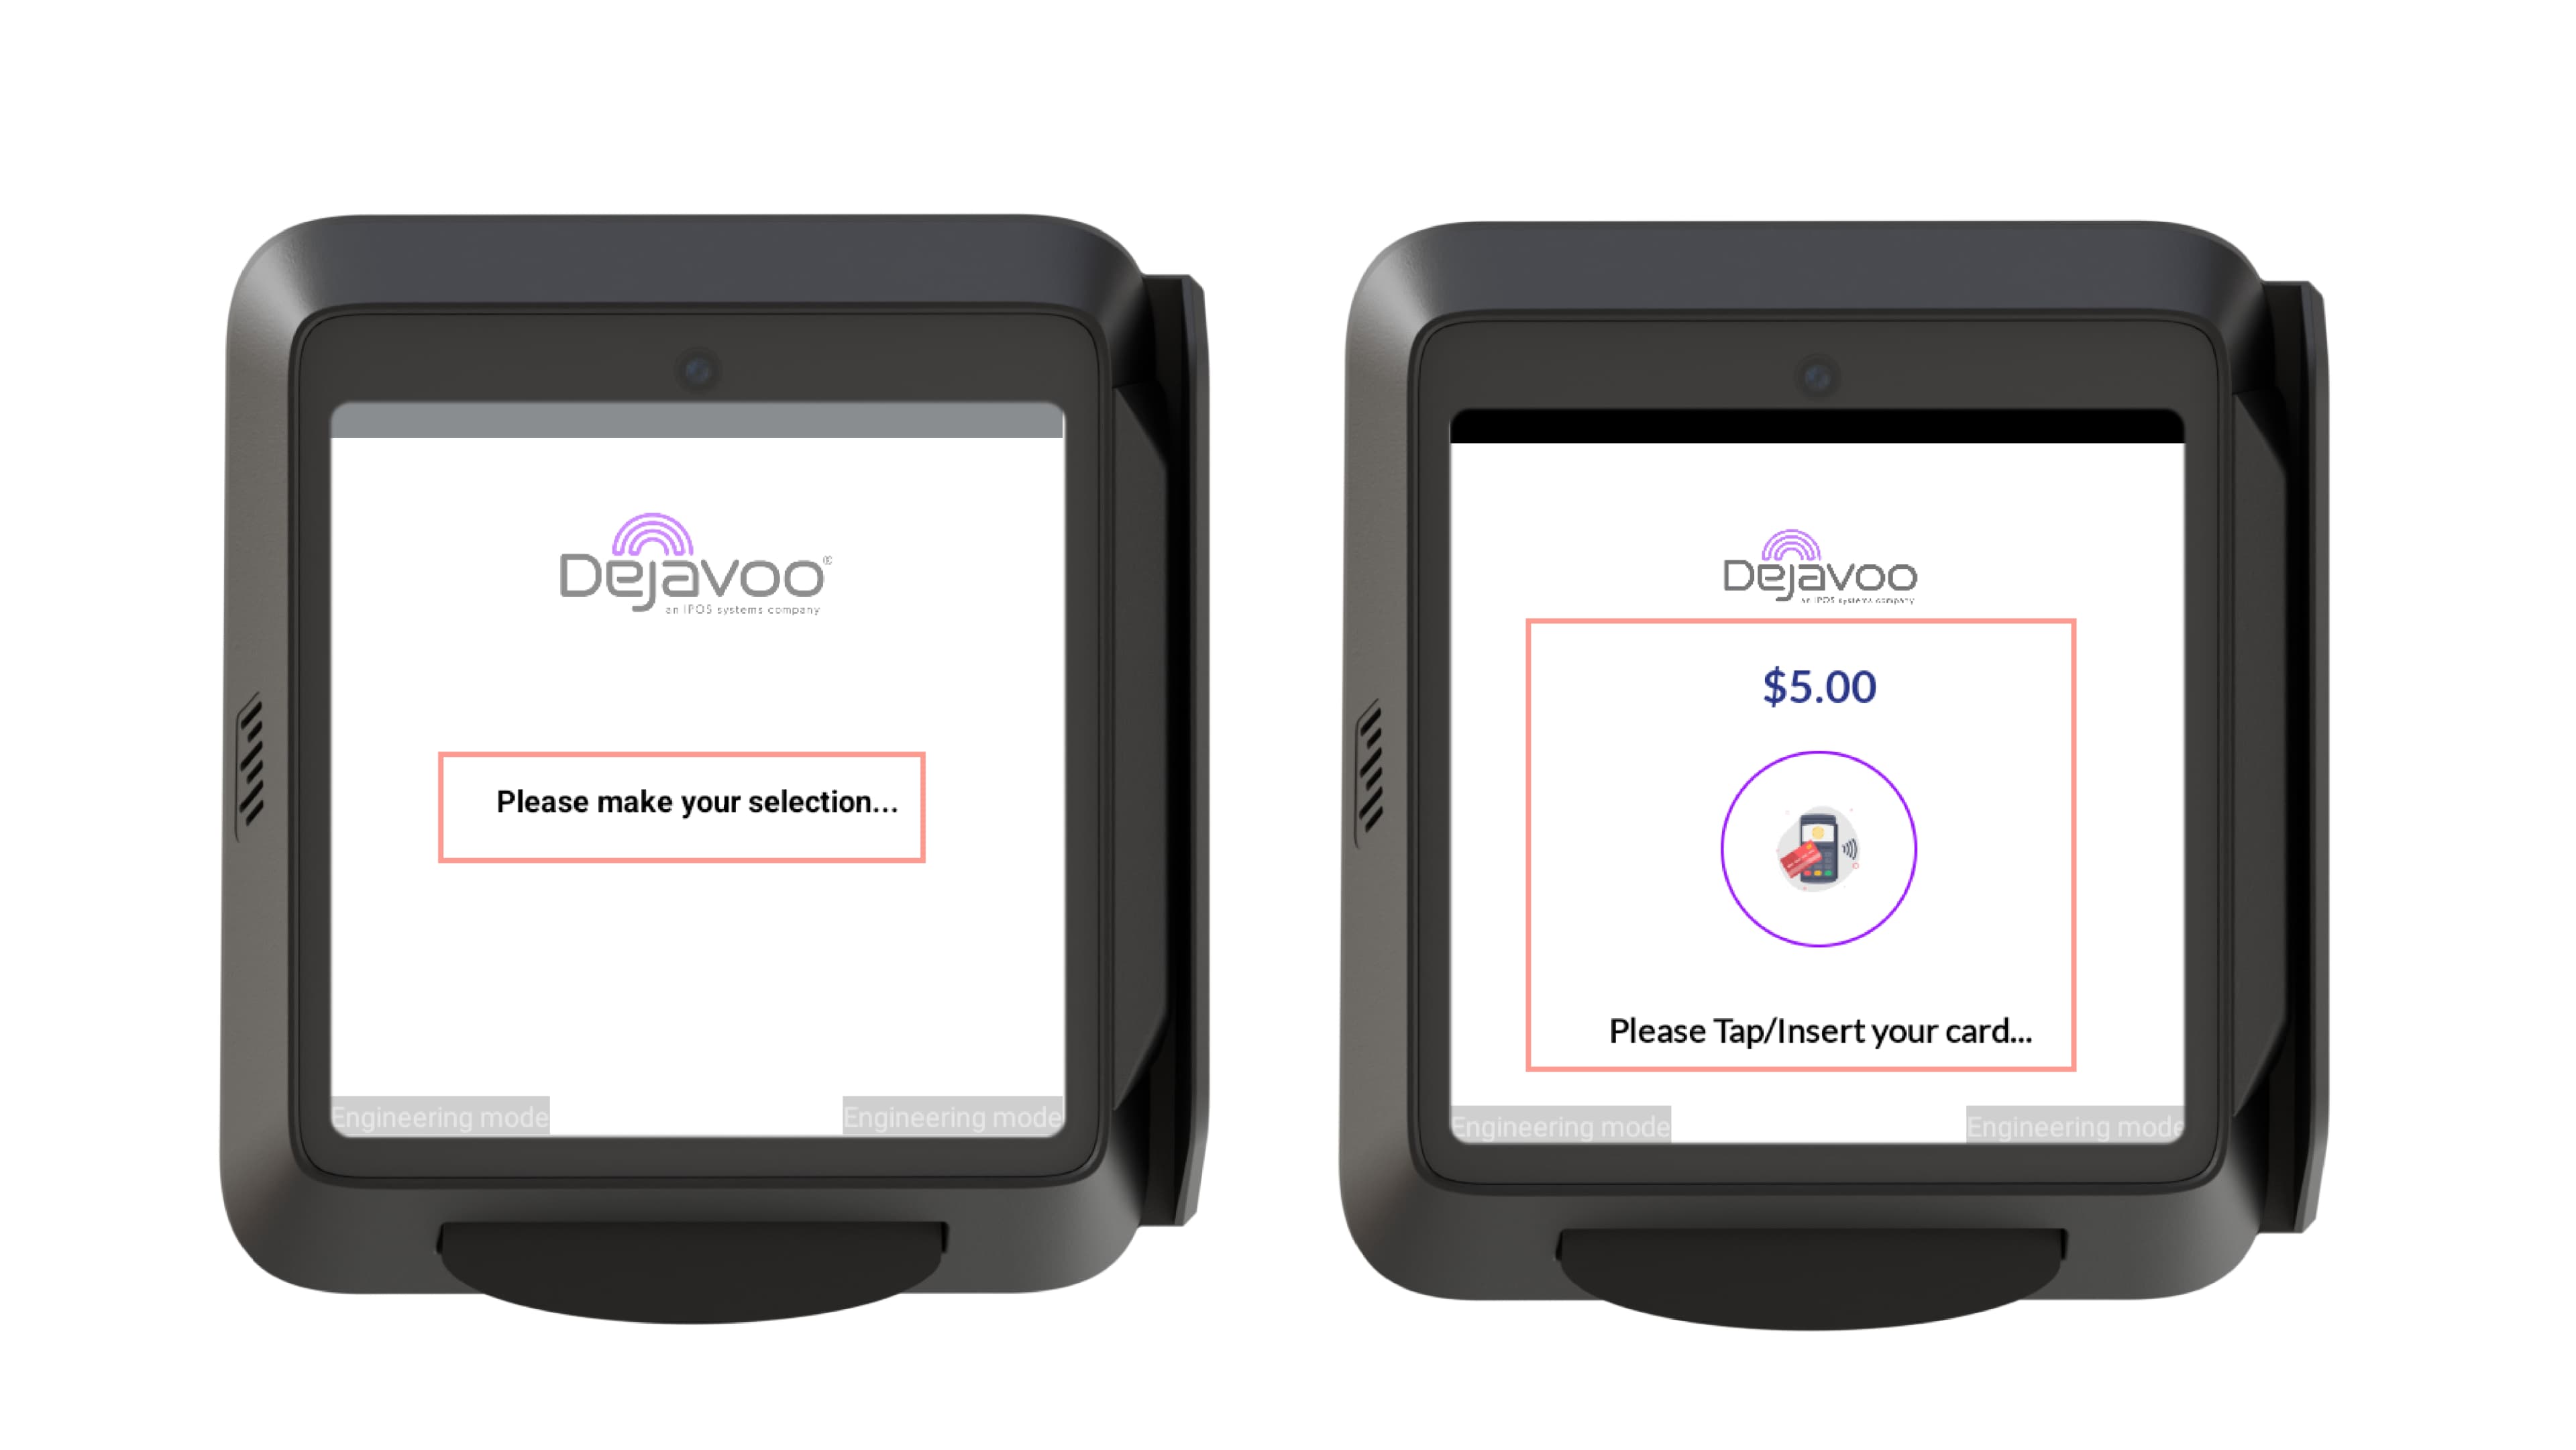
Step 3: Present the Payment Method
When prompted, tap or insert the customer’s payment card or mobile wallet.
The terminal begins processing the payment.
Step 4: Wait for Payment Processing
The terminal displays the payment processing screen while the transaction is being authorized.
Do not interrupt the transaction while payment processing is in progress.
Step 5: Complete the Transaction
After the payment is approved, the vending machine dispenses the selected product.
The transaction is complete.