How to Enable and Configure Fee Types on iPOSpays
This document explains how ISOs and Merchants can enable and configure different fee types using the iPOSpays Portal.
Supported Channels
The following channels support Fee Type configuration and processing on iPOSpays:
- POS
- CloudPOS
- iPOSgo! (iOS & Android)
Steps to Enable Fee from the iPOSpays Portal
Fees can be configured in the iPOSpays Portal to apply fees or discounts based on the payment method used. Only ISOs can configure these settings in the portal.
The ISO controls the availability of fee types by enabling or disabling options, and merchants can modify these settings on the supported platform when permitted by the ISO.
Step 1: Log In to iPOSpays Portal
- Log in to the iPOSpays Portal using ISO credentials.
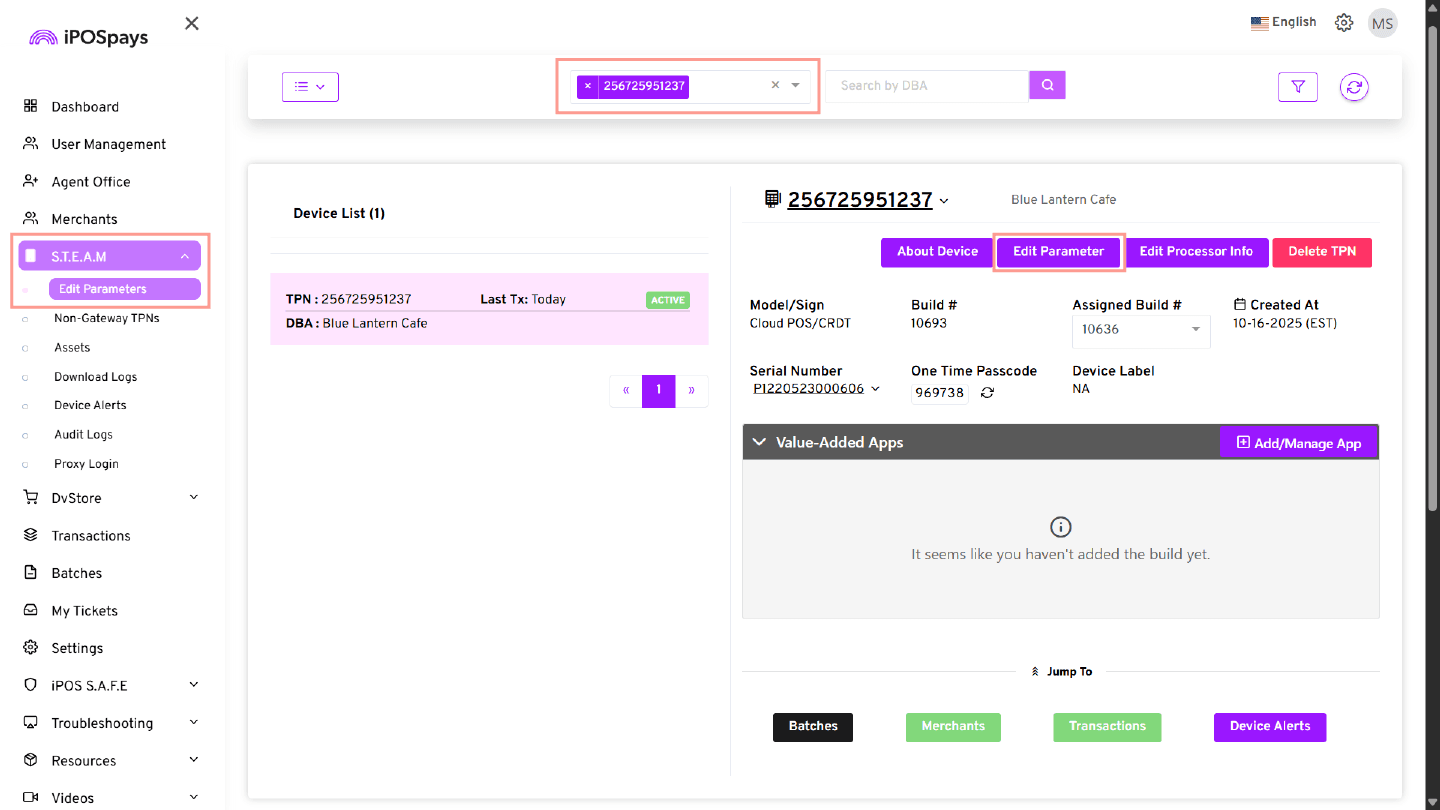
Step 2: Navigate to Terminal Settings
-
Click S.T.E.A.M from the left menu.
-
Select Edit Parameters.
Step 3: Search and Select the Payment Terminal (TPN)
-
Use the search box to find the required TPN.
-
Select the TPN.
-
Click Edit Parameter.
Step 4: Configure Fee Settings
Navigate to the Fee tab and configure the required fee settings.
Fee Options
-
Enable / Disable Fee
-
Enable – Activates fee configuration for the selected TPN.
-
Disable – Turns off all fee processing.
-

-
Fee Type — Select the required fee type:
-
Custom Fee
-
Surcharge
-
Tender Based Pricing (TBP)
-
Dual Pricing
-
True Cash Discount
-
Step 5: Save and Update Terminal
After configuring the parameters, you have two options:
-
Save – Apply the current parameter configurations directly to the selected TPN.
-
Save as Template – Save the current parameter configurations as a reusable template.
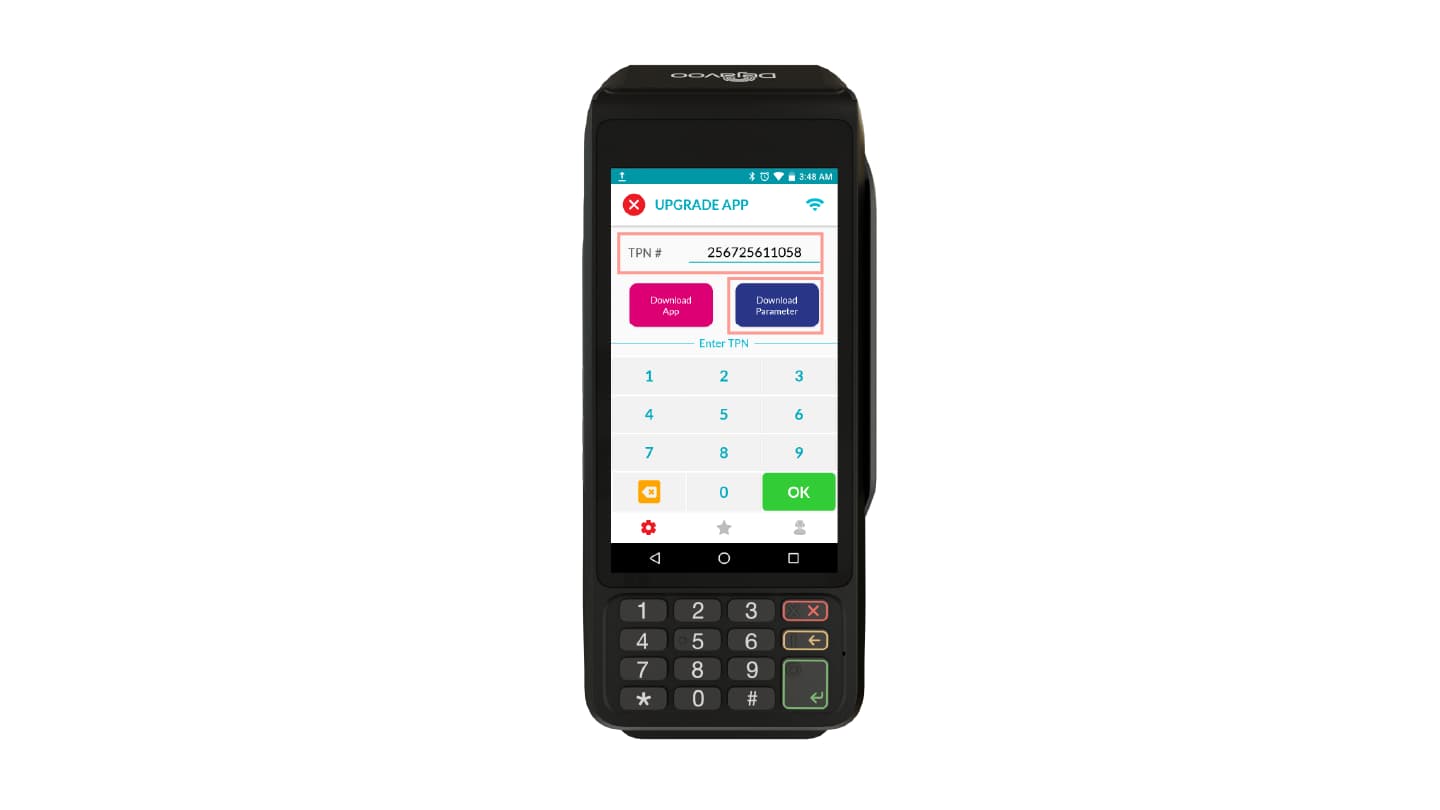
Download Parameter and Update Terminal
-
Enter the TPN on the terminal.
-
Perform a parameter update on the device by clicking Download Parameter.
-
A SUCCESS prompt will appear on the device.
-
Tap OK to proceed.
-
Changes take effect after the update is completed.
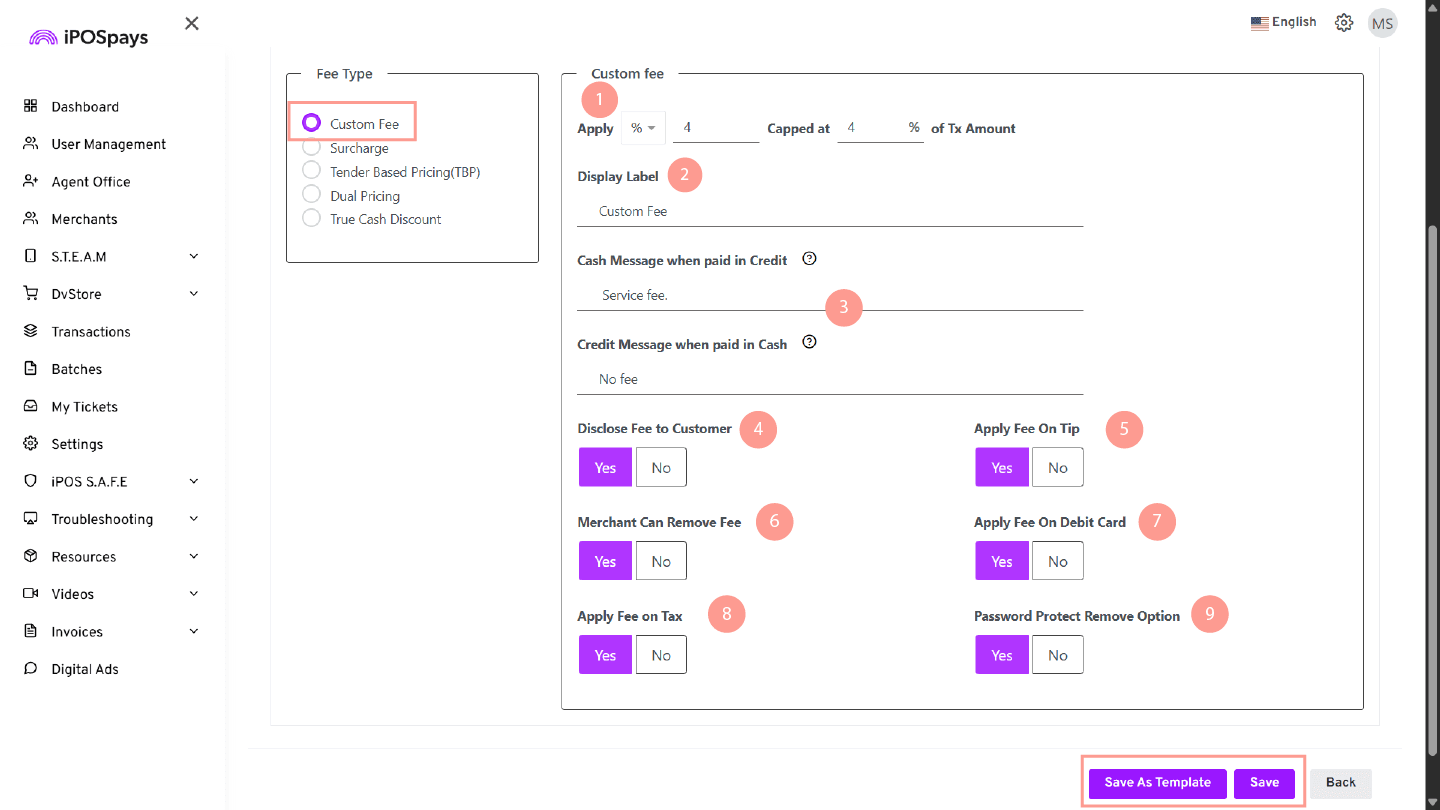
Steps to Configure Custom Fee
Custom Fee allows merchants to add an additional charge to transactions. The fee is calculated as a percentage of the transaction amount and can be configured based on business requirements.
Merchants can also choose how the fee is applied based on payment type, tips, and tax settings.
Step 1: Enable Fee
- Navigate to Settings → Fee.
- Click Enable to activate the fee.
Step 2: Select Fee Type
- Under Fee Type, select Custom Fee.
Step 3: Configure Custom Fee Settings
-
Fee Configuration (Percentage vs Fixed Amount)
In the Fee Percentage field, choose how the fee is applied using the dropdown option:
- Percentage (%) – Enter a percentage value (e.g., 4%). The fee is calculated dynamically based on the transaction amount.
- Example: If transaction = $100 and fee = 4% → Fee = $4
- Fixed Amount ($) – Enter a fixed dollar value (e.g., $2). The same fee amount is applied to every transaction, regardless of the transaction value.
- Example: If fee = $2 → Fee will always be $2 for all transactions
Define the Capped at value to limit the maximum Custom Fee.
- Percentage (%) – Enter a percentage value (e.g., 4%). The fee is calculated dynamically based on the transaction amount.
-
Display Label
Enter a label name for the fee (e.g.,
Custom Fee). This appears on the receipt and the POS device screen. -
Cash & Credit Messages
- Cash Message when paid in Credit – Display a message when the customer pays via credit card.
- Credit Message when paid in Cash – Display a message when the customer pays via cash.
-
Disclose Fee to Customer
- Yes – Fee is shown to the customer.
- No – Fee is hidden.
-
Apply Fee on Tip
- Yes – Fee is applied to the tip amount.
- No – Fee excludes tip.
-
Merchant Can Remove Fee
- Yes – The merchant can remove the fee during the transaction.
- No – Fee is mandatory.
-
Apply Fee on Debit Card
- Yes – Fee applies to debit card transactions.
- No – Debit cards are excluded.
-
Apply Fee on Tax
- Yes – Fee is calculated on tax-inclusive amount.
- No – Fee excludes tax.
-
Password Protect Remove Option
- Yes – Requires PIN to remove fee.
- No – Fee can be removed without authentication.
Step 4: Save Configuration
- Click Save or Save As Template after completing all settings.
Step 5: Download Parameters
- Download parameters on the terminal to apply changes.
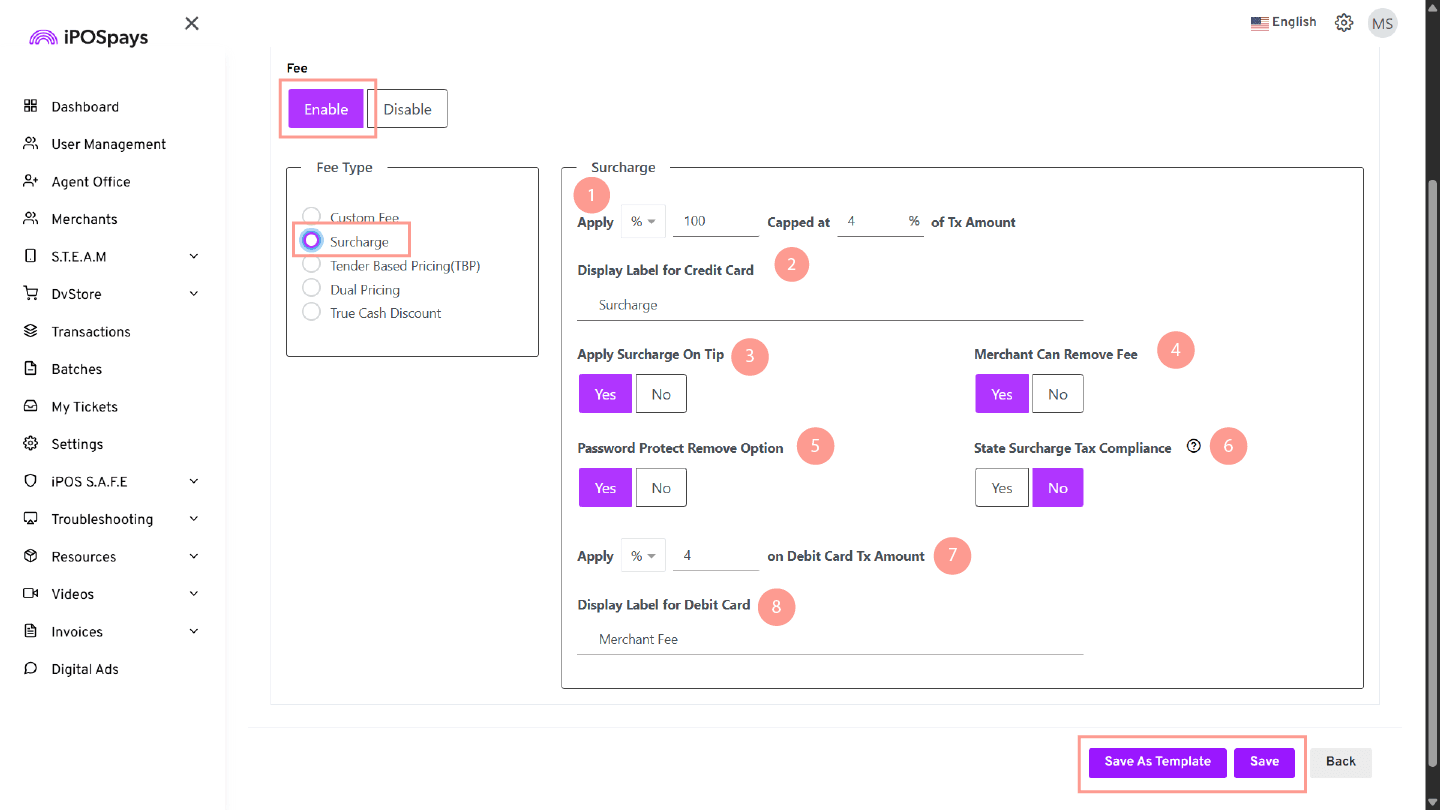
Steps to Configure Surcharge
The Surcharge feature allows merchants to apply an additional fee on credit card transactions. This fee can be defined as a percentage or fixed amount and configured with controls for tips, debit cards, and compliance settings.
Step 1: Enable Fee
- Navigate to Edit Parameters → Fee.
- Click Enable to activate the fee.
Step 2: Select Fee Type
- Under Fee Type, select Surcharge.
Step 3: Configure Surcharge Settings
-
Fee Configuration (Percentage vs Fixed Amount)
In the Fee Percentage field, choose how the fee is applied using the dropdown option:
- Percentage (%) – Enter a percentage value (e.g., 4%). The fee is calculated dynamically based on the transaction amount.
- Example: If transaction = $100 and fee = 4% → Fee = $4
- Fixed Amount ($) – Enter a fixed dollar value (e.g., $2). The same fee amount is applied to every transaction.
- Example: If fee = $2 → Fee will always be $2
Define the Capped at value to limit the maximum surcharge.
- Percentage (%) – Enter a percentage value (e.g., 4%). The fee is calculated dynamically based on the transaction amount.
-
Display Label for Credit Card
Enter a label name for credit card transactions (e.g.,
Surcharge). This appears on the receipt and POS device screen. -
Apply Surcharge on Tip
- Yes – Surcharge is applied to the tip amount.
- No – Surcharge excludes tip.
-
Merchant Can Remove Fee
- Yes – The merchant can remove the surcharge during the transaction.
- No – Surcharge is mandatory.
-
Password Protect Remove Option
- Yes – Requires PIN to remove surcharge.
- No – Surcharge can be removed without authentication.
-
State Surcharge Tax Compliance
- Yes – Enables state-specific surcharge compliance rules.
- No – Standard surcharge behavior applies.
-
Apply Fee on Debit Card
- Select the fee type using the dropdown (Percentage (%) or Dollar ($)).
- Enter the fee value to be applied to debit card transactions.
-
Display Label for Debit Card
Enter a label name for debit card transactions (e.g.,
Merchant Fee). This appears on the receipt and POS device screen.
Step 4: Save Configuration
- Click Save or Save As Template after completing all settings.
Step 5: Download Parameters
- Download parameters on the terminal to apply changes.
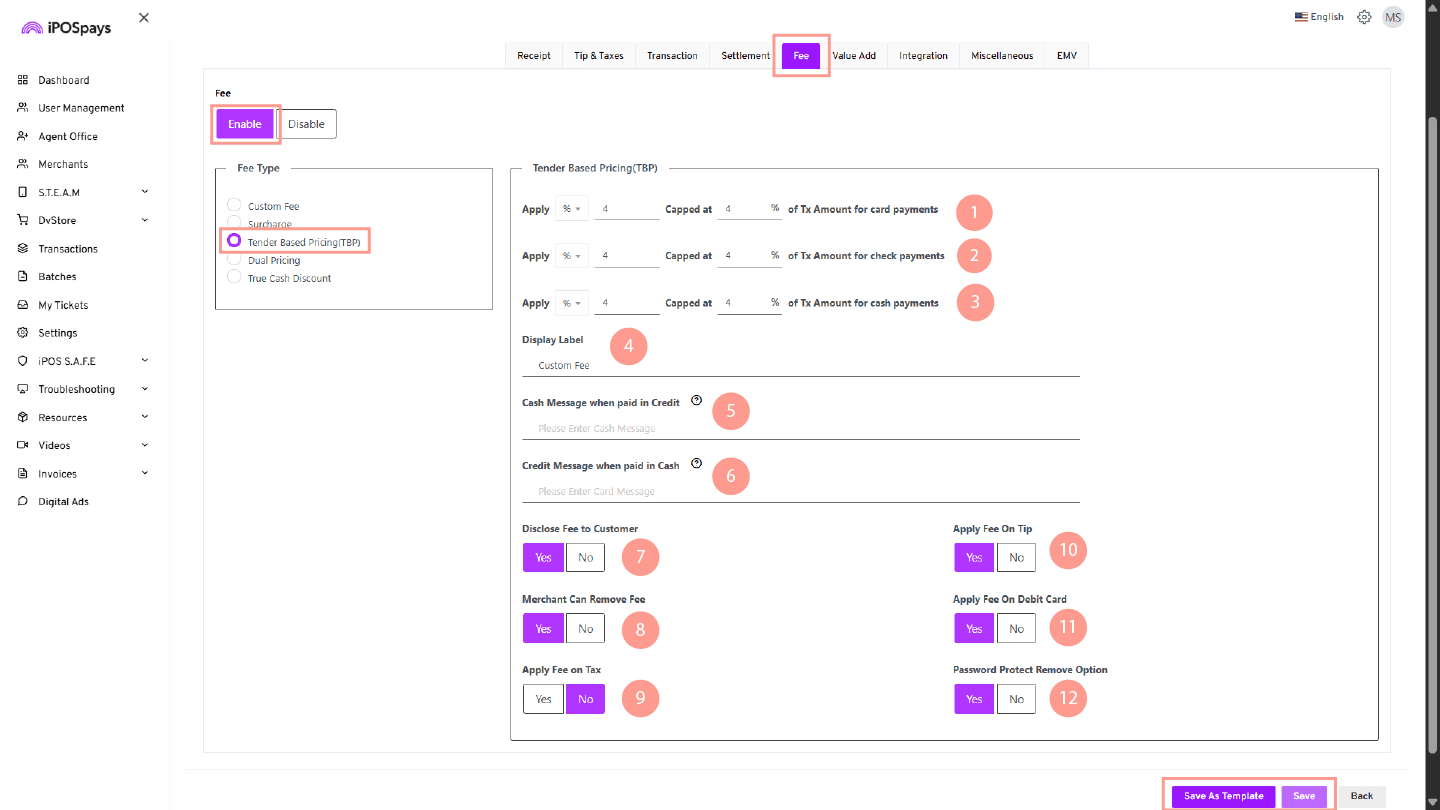
Steps to Configure Tender Based Pricing (TBP)
The Tender Based Pricing (TBP) feature allows merchants to apply different pricing or fees based on the payment method used (cash or card). This helps in adjusting transaction amounts dynamically depending on the tender type.
Step 1: Enable Fee
- Navigate to Settings → Fee.
- Click Enable to activate the fee.
Step 2: Select Fee Type
- Under Fee Type, select Tender Based Pricing (TBP).
Step 3: Configure Tender Based Pricing Settings
Card Payment Fee Configuration (POS-specific option)
Configure the fee settings for card payments.
- Select the fee type:
- Percentage (%) – Fee is calculated based on the transaction amount.
- Fixed Amount ($) – Fixed fee applied for every transaction.
- Enter the fee value.
- Define the Capped at value to limit the maximum fee amount.
- Example (Percentage): Transaction = $100 and fee = 4% → Fee = $4
- Example (Fixed Amount): Fee = $2 → Fee will always be $2
Check Payment Fee Configuration (POS-specific option)
Configure the fee settings for check payments.
- Select the fee type: Percentage (%) or Fixed Amount ($).
- Enter the fee value.
- Define the Capped at value to limit the maximum fee amount.
Cash Payment Fee Configuration (POS-specific option)
Configure the fee settings for cash payments.
- Select the fee type: Percentage (%) or Fixed Amount ($).
- Enter the fee value.
- Define the Capped at value to limit the maximum fee amount.
Display Label
Enter the fee label name (e.g., Custom Fee).
Cash Message when paid in Credit
Enter the message displayed when payment is made using a credit card.
Credit Message when paid in Cash
Enter the message displayed when payment is made using cash.
Disclose Fee to Customer
- Yes – Displays the fee to the customer.
- No – Hides the fee.
Merchant Can Remove Fee
- Yes – The merchant can remove the fee.
- No – Fee cannot be removed.
Apply Fee on Tax (POS-specific option)
- Yes – Fee is calculated on the tax amount.
- No – Tax amount is excluded.
Apply Fee on Tip
- Yes – Fee is applied to the tip amount.
- No – Tip amount is excluded.
Apply Fee on Debit Card (POS-specific option)
- Yes – Applies fee to debit card transactions.
- No – Excludes debit card transactions.
Password Protect Remove Option (POS-specific option)
- Yes – Requires a password/PIN to remove the fee.
- No – Fee can be removed without authentication.
Step 4: Save Configuration
- Click Save or Save As Template after completing all settings.
Step 5: Download Parameters
- Download parameters on the terminal to apply changes.
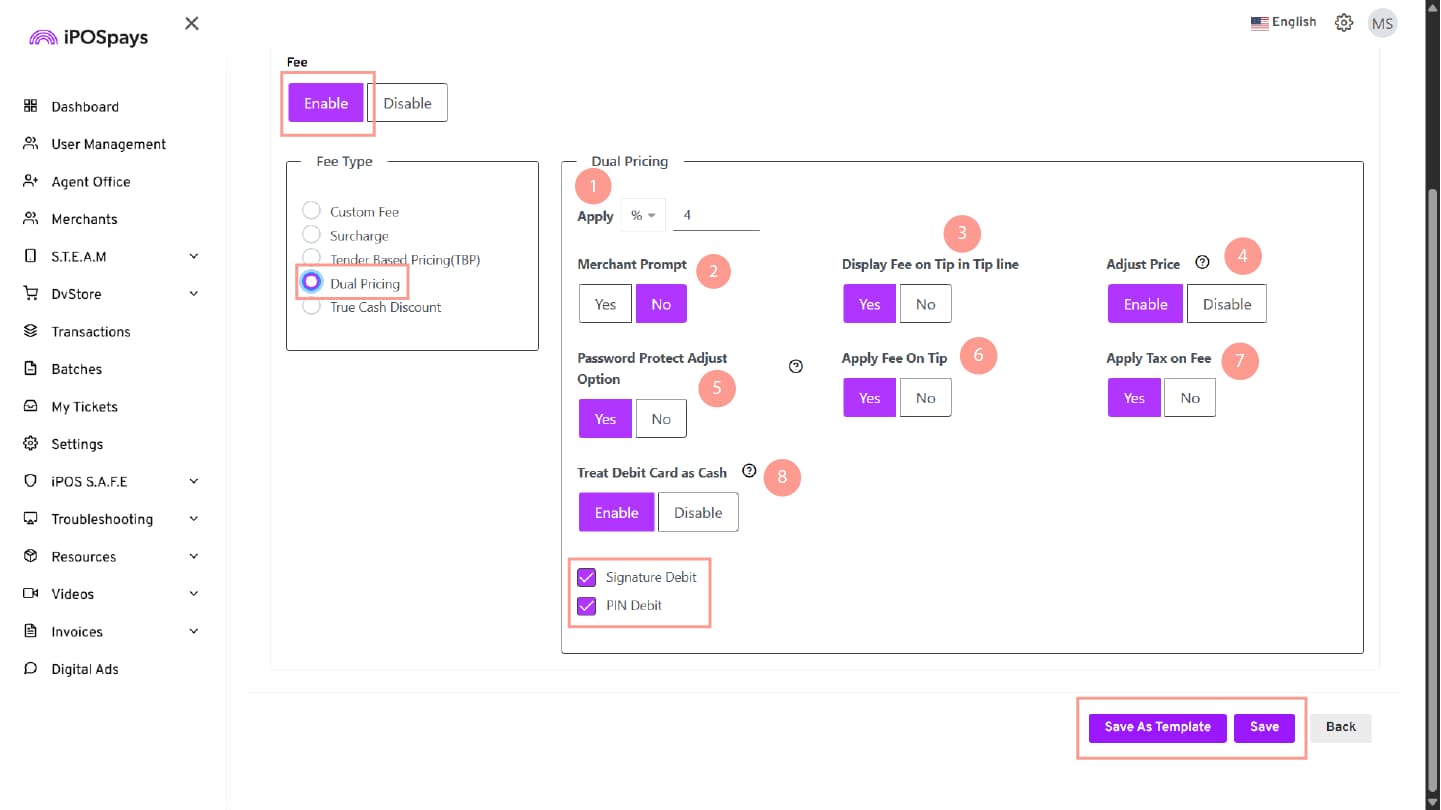
Steps to Configure Dual Pricing
Dual Pricing allows merchants to display both card price and cash price during a transaction. The card price is calculated based on the configured fee percentage, while the cash price remains the entered amount.
Step 1: Enable Fee
- Navigate to Settings → Fee.
- Click Enable to activate the fee.
Step 2: Select Fee Type
- Under Fee Type, select Dual Pricing.
Step 3: Configure Dual Pricing Settings
-
Fee Configuration (Percentage vs Fixed Amount)
In the Fee Percentage field, choose how the fee is applied using the dropdown option:
- Percentage (%) – Enter a percentage value (e.g., 4%). The fee is calculated dynamically based on the transaction amount.
- Example: If transaction = $100 and fee = 4% → Fee = $4
- Fixed Amount ($) – Enter a fixed dollar value (e.g., $2). The same fee amount is applied to every transaction.
- Example: If fee = $2 → Fee will always be $2
- Percentage (%) – Enter a percentage value (e.g., 4%). The fee is calculated dynamically based on the transaction amount.
-
Merchant Prompt
- Guides the merchant on when to present the device to the customer.
- Allows customers to add tips and choose between cash and card payment.
- The prompt message can be customized.
-
Display Fee on Tip Line
- Displays the fee amount clearly in the breakup screen and on the receipt.
- Ensures transparency when fees are applied along with tips.
-
Adjust Price
- Displays a scissor icon on the transaction screen.
- Allows merchants to remove tax or fee during a transaction.
-
Password Protect Adjust Option
- Adds an extra layer of security when using the Adjust Price option.
- When enabled, the terminal prompts for the device PIN before removing or adjusting the fee/tax.
- Helps prevent unauthorized fee or tax modifications by cashiers or staff.
-
Apply Fee on Tip
- Applies the configured fee on the tip amount entered by the customer.
- When enabled, the fee calculation includes both the transaction amount and the tip amount.
- Example: If transaction = $100, tip = $20, and fee = 4% → Fee is calculated on $120
-
Apply Tax on Fee
- Applies tax to the fee amount collected during the transaction.
- Example: If fee = $4 and applicable tax = 10% → Tax on fee = $0.40
- Applies tax to the fee amount collected during the transaction.
-
Treat Debit Card as Cash
Allows debit card transactions to be processed similarly to cash transactions for fee handling. Merchants can configure Signature Debit and PIN Debit separately:
- Signature Debit – Controls whether fees are applied to debit transactions processed using signature authentication.
- PIN Debit – Controls whether fees are applied to debit transactions processed using PIN authentication.
Step 4: Save Configuration
- Click Save after completing the configuration.
Step 5: Download Parameters
- Download parameters on the terminal to apply changes.
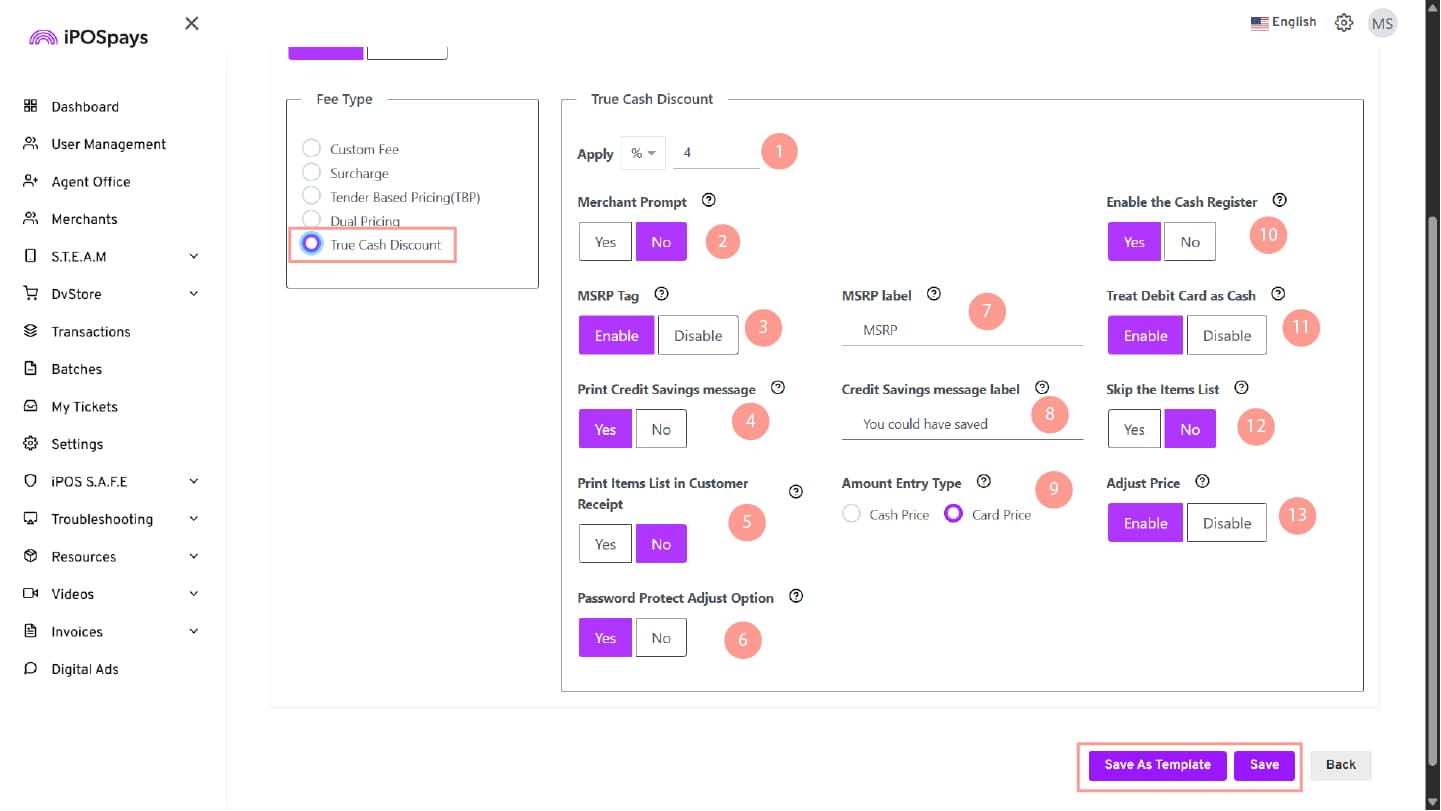
Steps to Configure True Cash Discount
True Cash Discount allows merchants to offer a discount for cash payments when the card price is entered. The system automatically calculates the discounted cash price.
Step 1: Select True Cash Discount
- Navigate to the Fee tab.
- Under Fee Type, select True Cash Discount.
Step 2: Configure True Cash Discount Settings
Discount Configuration
Select the discount type using the dropdown:
- Percentage (%) – Discount is calculated based on the transaction amount.
- Fixed Amount ($) – Fixed discount applied to every transaction.
Enter the discount value.
- Example (Percentage): A 4% discount on $10.00 results in $9.60
Merchant Prompt
- Yes – Prompt is displayed.
- No – Prompt is hidden.
MSRP Tag (POS-specific option)
- Enable – Displays MSRP label.
- Disable – Hides MSRP label.
Print Credit Savings Message
- Yes – Prints savings message.
- No – Does not print savings message.
Print Items List in Customer Receipt (POS-specific option)
- Yes – Prints item list.
- No – Does not print item list.
The item details can also be viewed in the iPOSpays Portal under Transactions.
Password Protect Adjust Option (POS-specific option)
- Yes – Requires terminal PIN/password.
- No – No authentication required.
MSRP Label (POS-specific option)
Enter the label name to display for product pricing (e.g., MSRP, Retail Price, Card Price, Selling Price).
Credit Savings Message Label
Enter the custom savings message to display on the receipt (e.g., You could have saved).
Amount Entry Type (POS-specific option)
Determines how the entered amount is processed:
- Cash Price – The entered amount is treated as cash price and the system calculates the card price.
- Card Price – The entered amount is treated as card price and the system calculates the cash price.
Enable the Cash Register (POS-specific option)
Enables item-wise price entry functionality. When enabled:
- Displays a cash register icon on the device.
- Allows merchants to enter item prices individually.
- Automatically calculates the running total.
Treat Debit Card as Cash (POS-specific option)
- Enable – Debit cards receive cash discount pricing.
- Disable – Debit cards are processed normally.
Skip the Items List (POS-specific option)
- Yes – Skips item list screen.
- No – Displays item list screen.
Adjust Price (POS-specific option)
Displays an adjust/scissor icon during the transaction. When enabled, merchants can:
- Remove taxes.
- Apply discounts.
- Modify transaction pricing.
Step 3: Save Configuration
- Click Save after completing the configuration.
Step 4: Download Parameters
- Download parameters on the terminal to apply changes.
Next Steps
After configuring the required fee type in the iPOSpays Portal, refer to the document below to understand how fee types are applied during transactions across supported platforms.