How to Enable Hacienda Integration on iPOSpays
iPOSpays supports Hacienda integration for merchants in Puerto Rico, ensuring each transaction includes the Hacienda MID for accurate reporting and compliance with the Puerto Rico Department of Treasury (Hacienda).
It also offers a Reduced Tax feature for eligible items like prepared food. This document covers enabling Hacienda, configuring Reduced Tax, POS behavior, and receipt tax breakdown.
Supported Channels
The following channels support Hacienda configuration and processing on iPOSpays:
-
POS Standalone
-
SPIn API (SOAP & REST)
Conditions for Reduced Tax
Reduced Tax is applied only when all of the following conditions are met:
-
The Hacienda parameter is enabled for the TPN
-
The Reduced Tax parameter is enabled for the same TPN
If these conditions are not met, Reduced Tax will not be applied.
How to Enable Hacienda on an Existing TPN
Step 1: Log In
Log in to the iPOSpays Portal using ISO credentials.
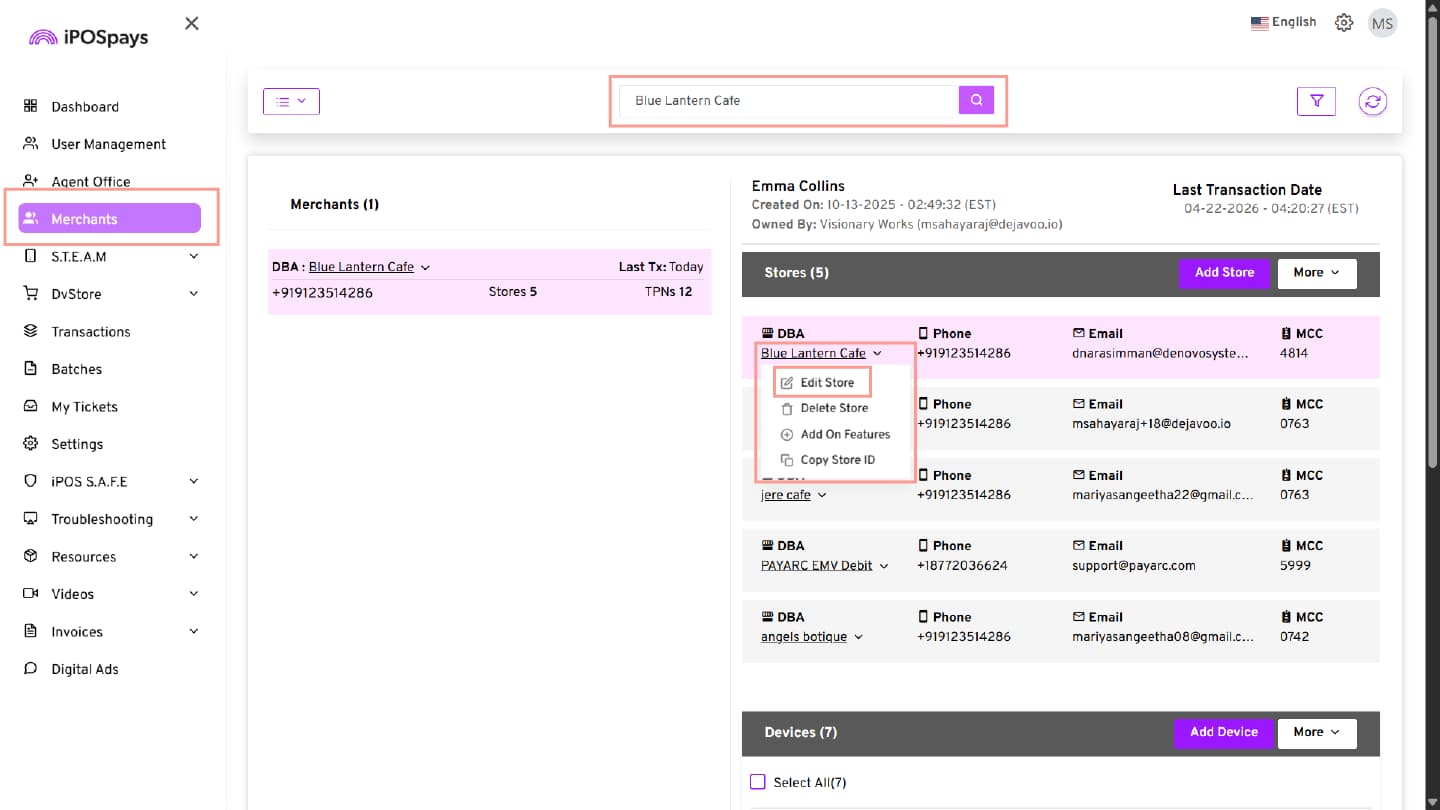
Step 2: Navigate to Merchant
-
Go to Merchants
-
Search and select the required merchant
Step 3: Select Store
-
If the merchant has multiple stores:
- Select the store for which Hacienda needs to be enabled
Step 4: Open Edit Store
-
Click the drop-down icon next to the DBA
-
Click Edit Store
-
The STORE INFO page opens
Step 5: Update ZIP Code
-
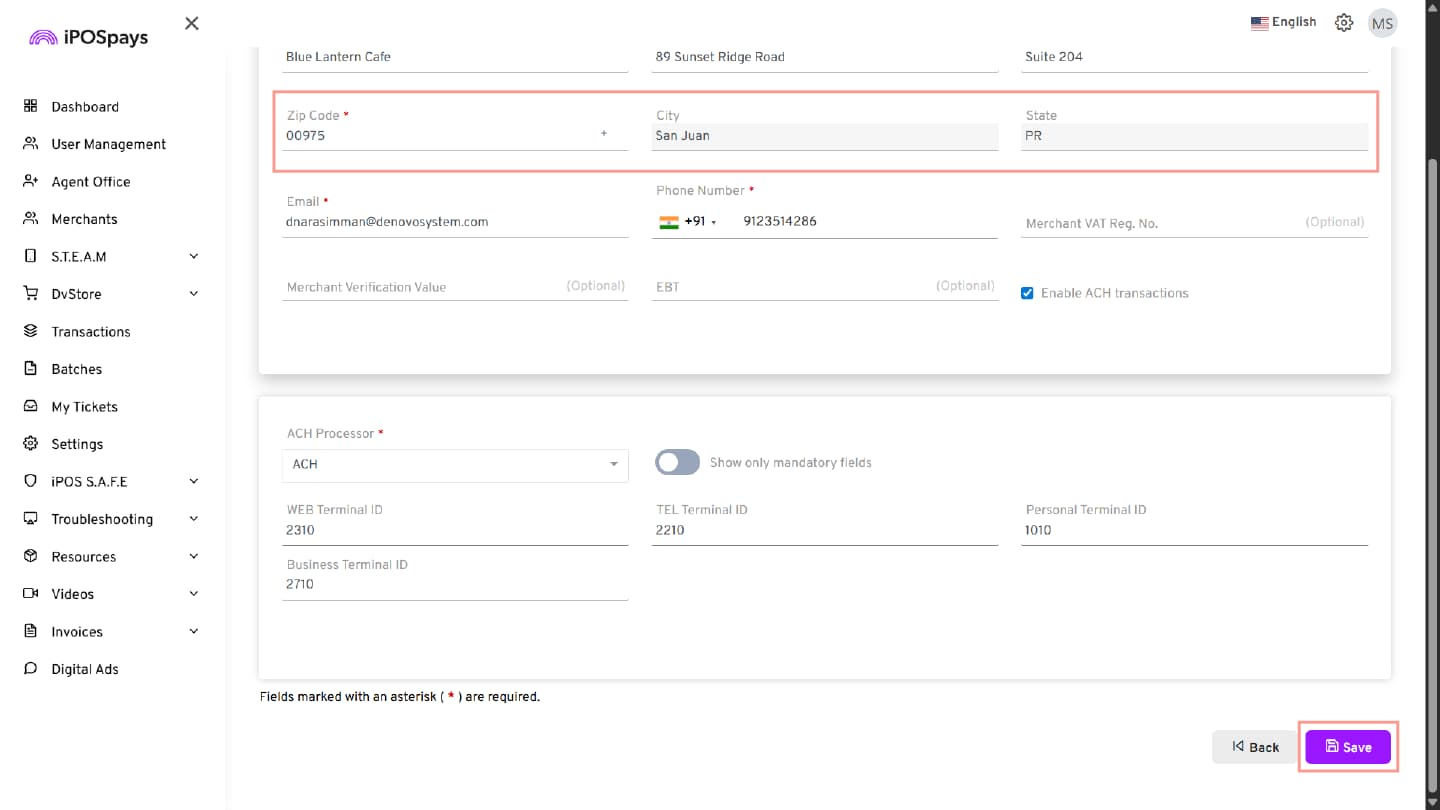
Update the ZIP Code with a valid Puerto Rico ZIP Code (example: 00975)
-
After entering the ZIP code, the City and State fields will be auto-filled. Verify that the populated details are correct.
-
Click Save
Step 6: Open TPN Settings
-
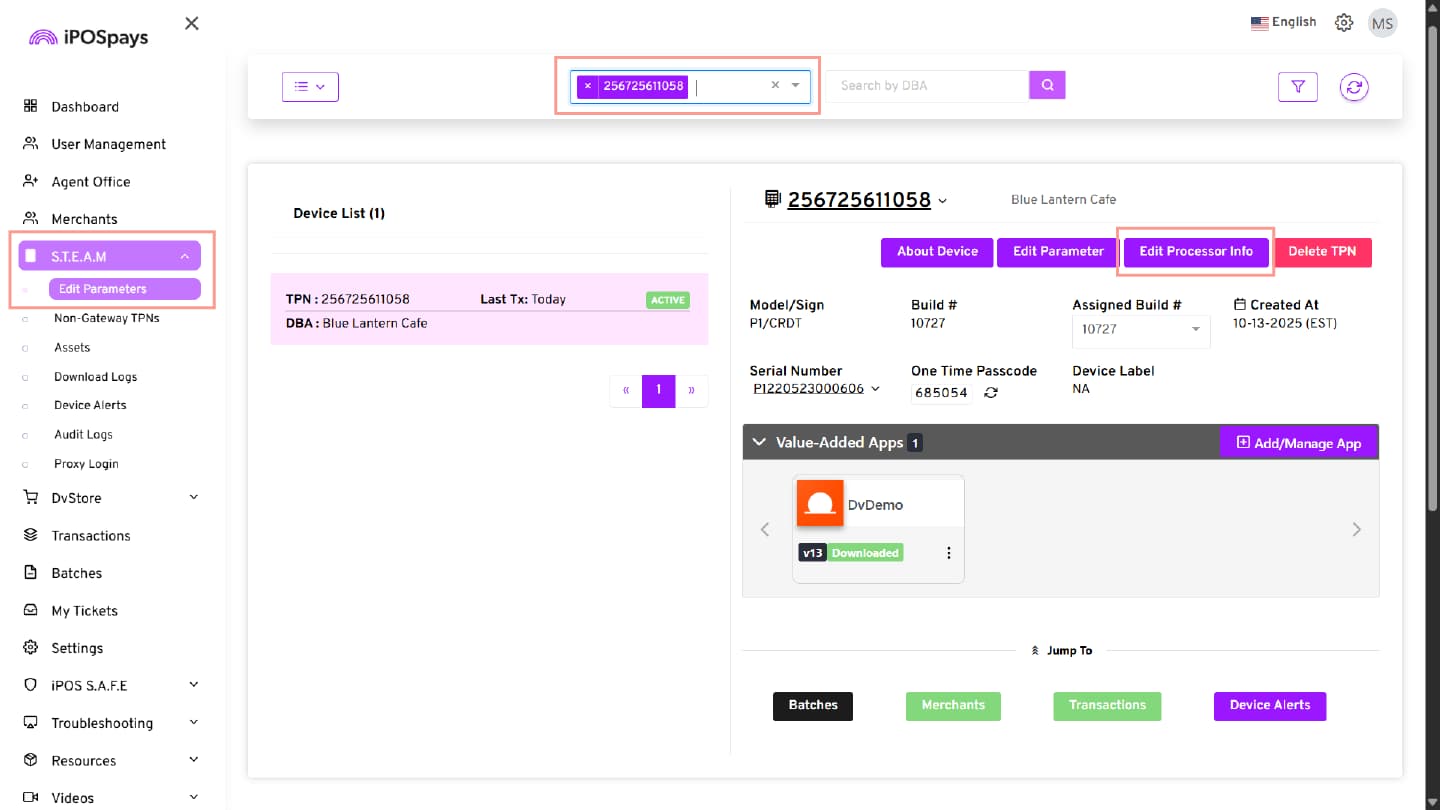
Navigate to S.T.E.A.M → Edit Parameters
-
Search for and select the TPN associated with the store using the Puerto Rico ZIP code.
Step 7: Open Processor Settings
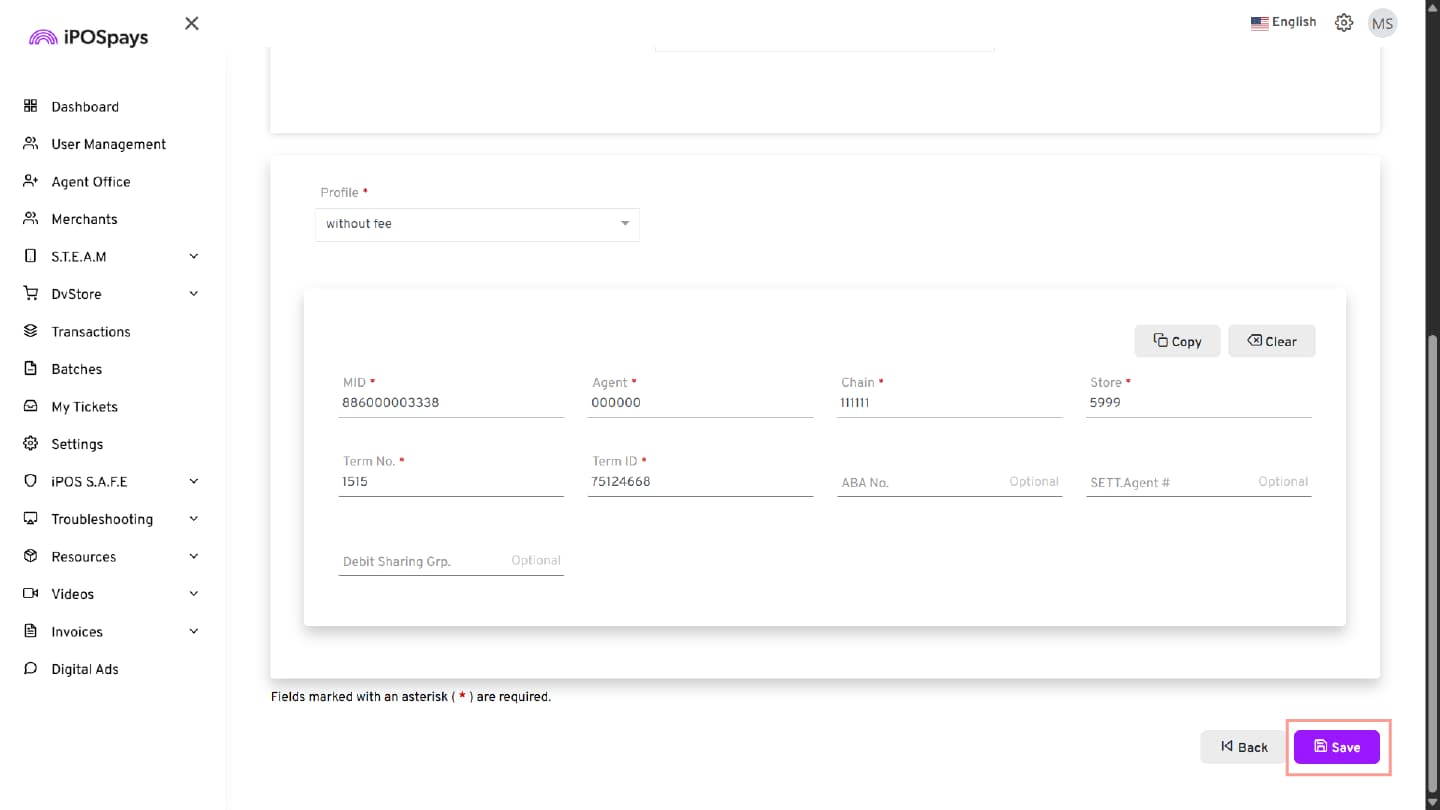
- Click Edit Processor Info
Step 8: Enable Hacienda
-
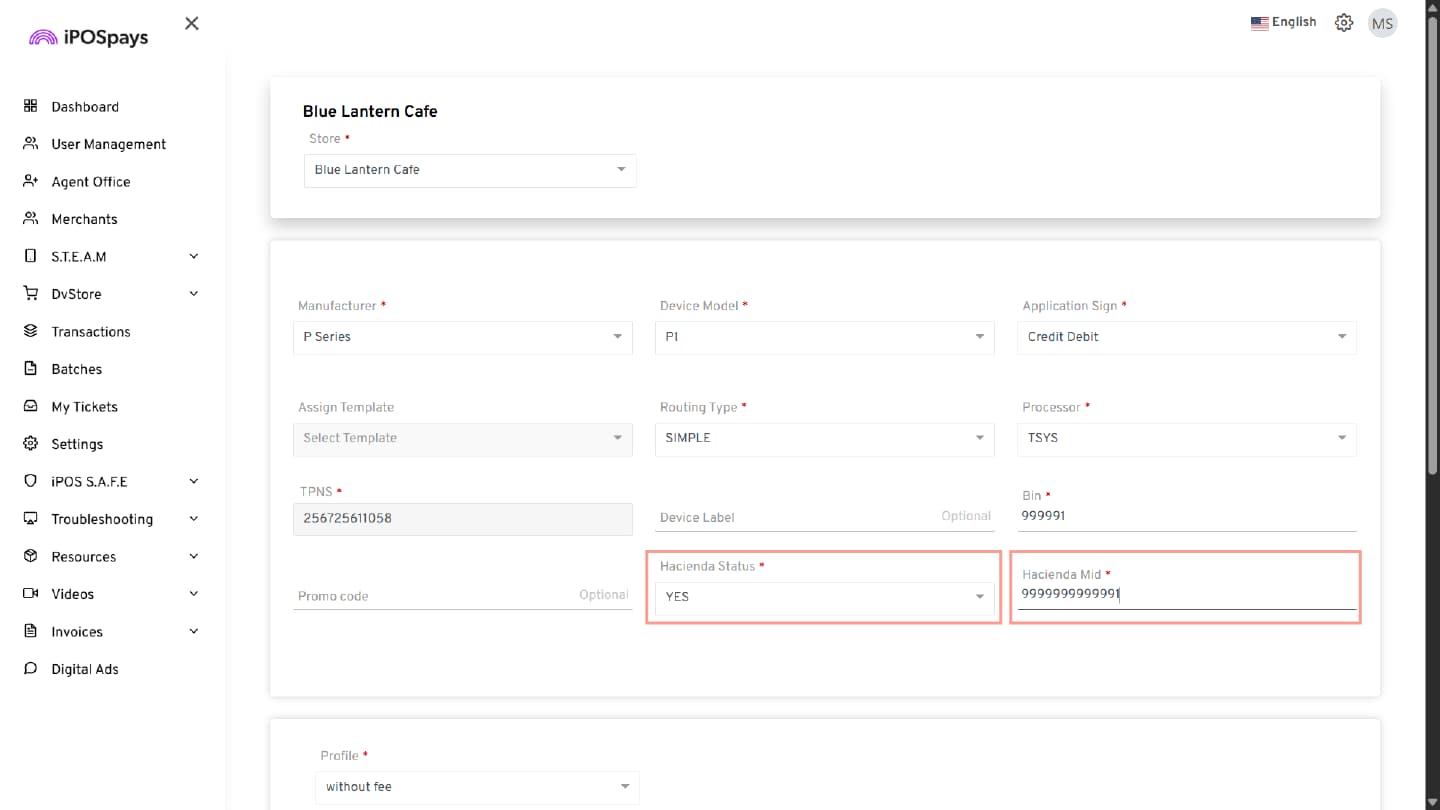
Locate Hacienda Status
-
Set Hacienda Status → YES
-
Enter Hacienda MID
-
Click Save
How to Enable Reduced Tax Parameter
Step 1: Log In
Log in to the iPOSpays Portal using ISO credentials.
Step 2: Open Edit Parameters
-
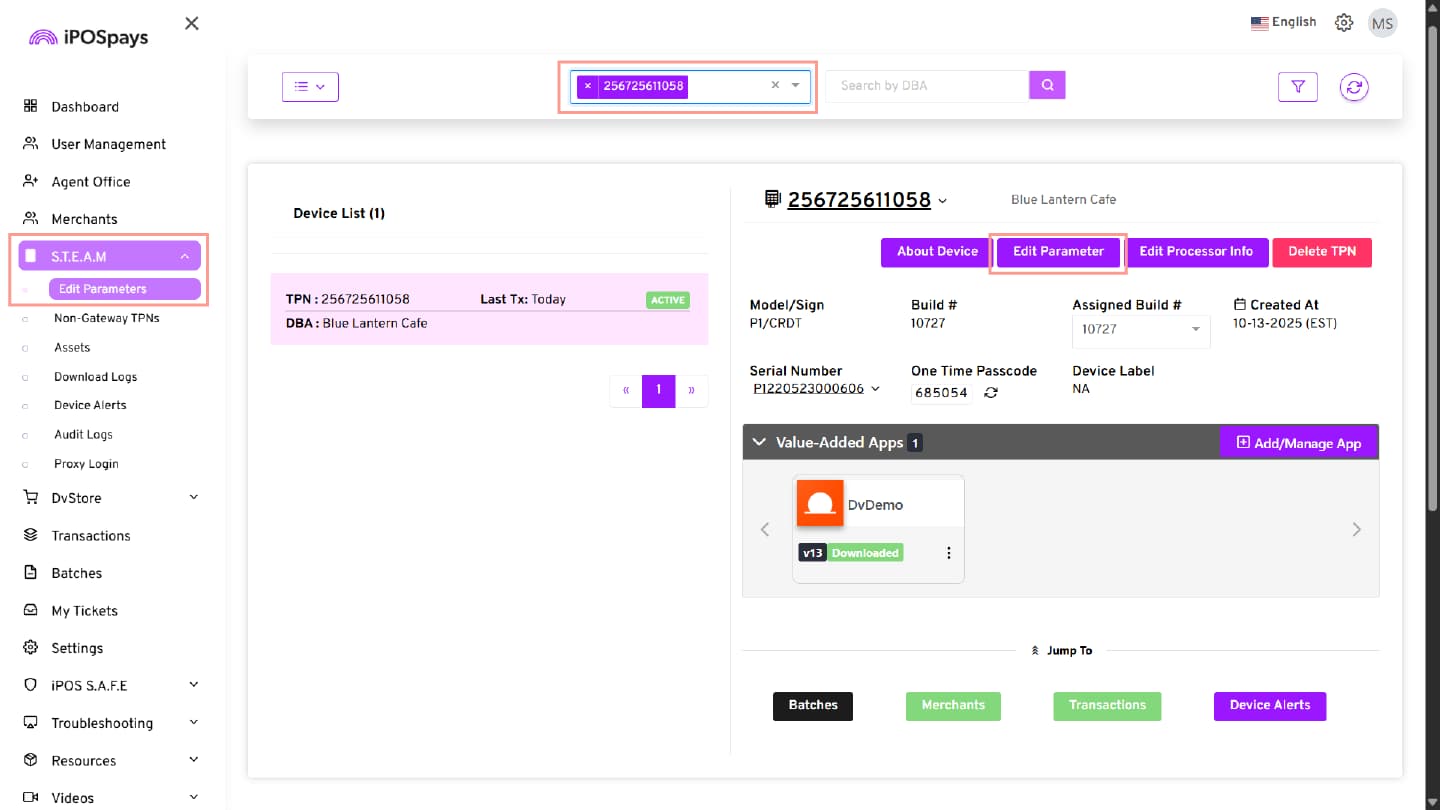
Navigate to S.T.E.A.M → Edit Parameters
-
Search and select the required TPN (Hacienda Enabled)
-
Click Edit Parameter
Step 3: Navigate to Tips & Taxe
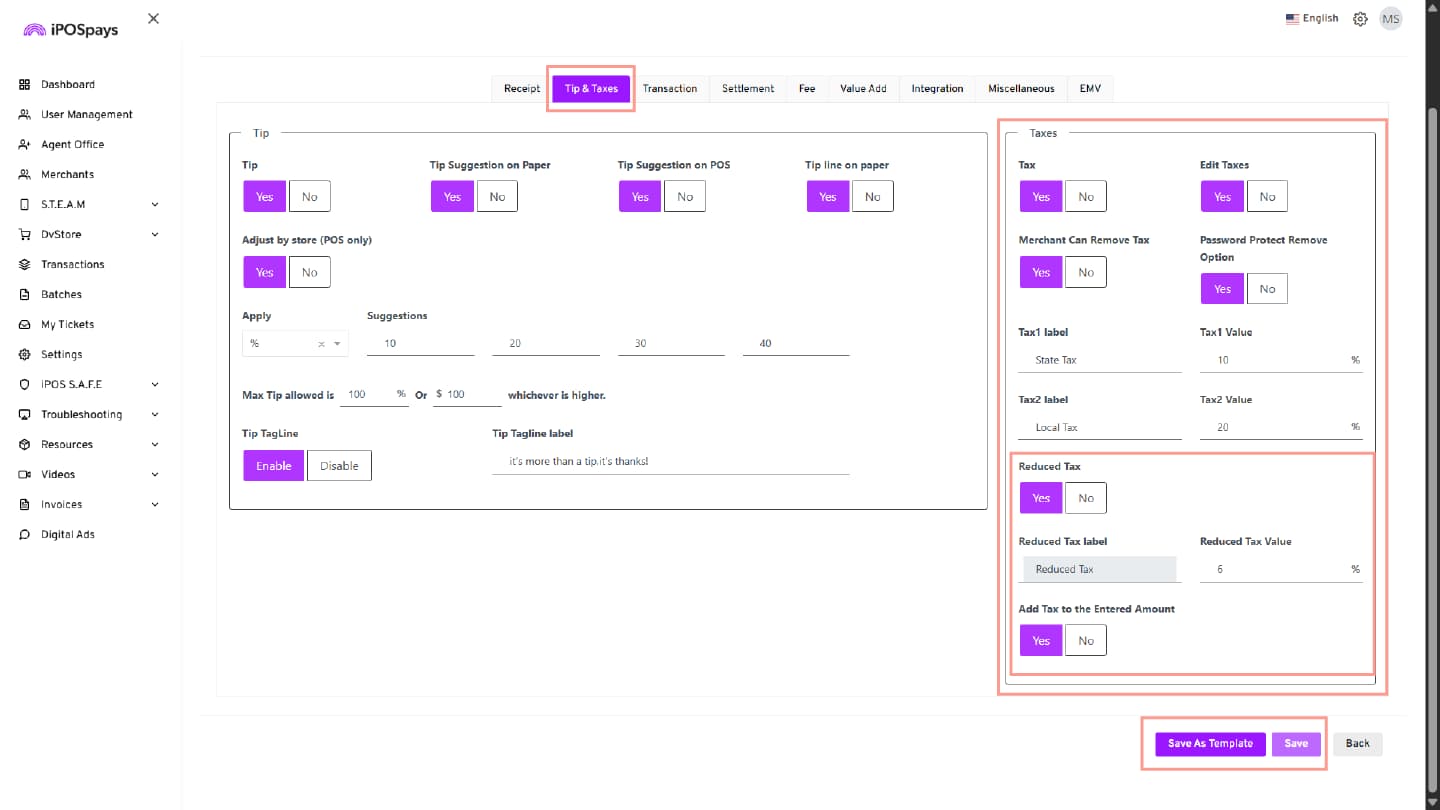
- Go to the Tips & Taxes section
Step 4: Configure Reduced Tax
-
Tax → Yes (enable tax for the merchant)
-
Configure general tax settings (Tax1, Tax2) as required
-
Reduced Tax → Yes
-
Reduced Tax Label → Enter label (e.g., Reduced Tax)
-
Reduced Tax Value → Enter percentage
-
Add Tax to the Entered Amount → Select Yes or No based on requirement
- If Yes:
The entered amount is treated as tax-inclusive. Tax is already included in the total, and the system only splits and displays the tax components (no increase in total).
If a food amount is entered, the system recalculates internally by applying Reduced Tax to the eligible portion and adjusting the tax breakdown accordingly, while keeping the total unchanged.
- If No:
The entered amount is treated as tax-exclusive. Tax is added on top of the entered amount, increasing the total. If a food amount is entered, the system recalculates by applying Reduced Tax to the eligible portion, resulting in a lower final amount compared to standard tax.
Step 5: Save Configuration
- Click Save or Save As Template to apply the changes
For full tax Configuration details, refer to How to Enable and Configure Taxes on iPOSpays
Hacienda Setup During New Merchant Onboarding
If you are onboarding a new merchant, follow all the standard Merchant Onboarding steps. During the setup process, ensure that Hacienda is properly configured by verifying the following:
Key Configuration Requirements
-
*ZIP Code (Store Details)
-
Enter the correct Puerto Rico ZIP Code in the Add Store Information section.
-
After entering the ZIP code, the City and State fields will be auto-filled. Verify that the populated details are correct.
-
This ensures the system identifies the merchant as a Puerto Rico merchant for tax handling.
-
Complete and fill in the remaining details, then click Save.
-
-
Processor Selection (Add Device)
In the Add Device section
-
Set Hacienda Status → Yes
-
Enter Hacienda MID
-
Complete and fill in the remaining details, then click Save.
-
Click Save
Reference: For complete onboarding steps, refer to How to Onboard a Merchant on iPOSpays
Hacienda and Reduced Tax Behavior on Payment Terminal (POS)
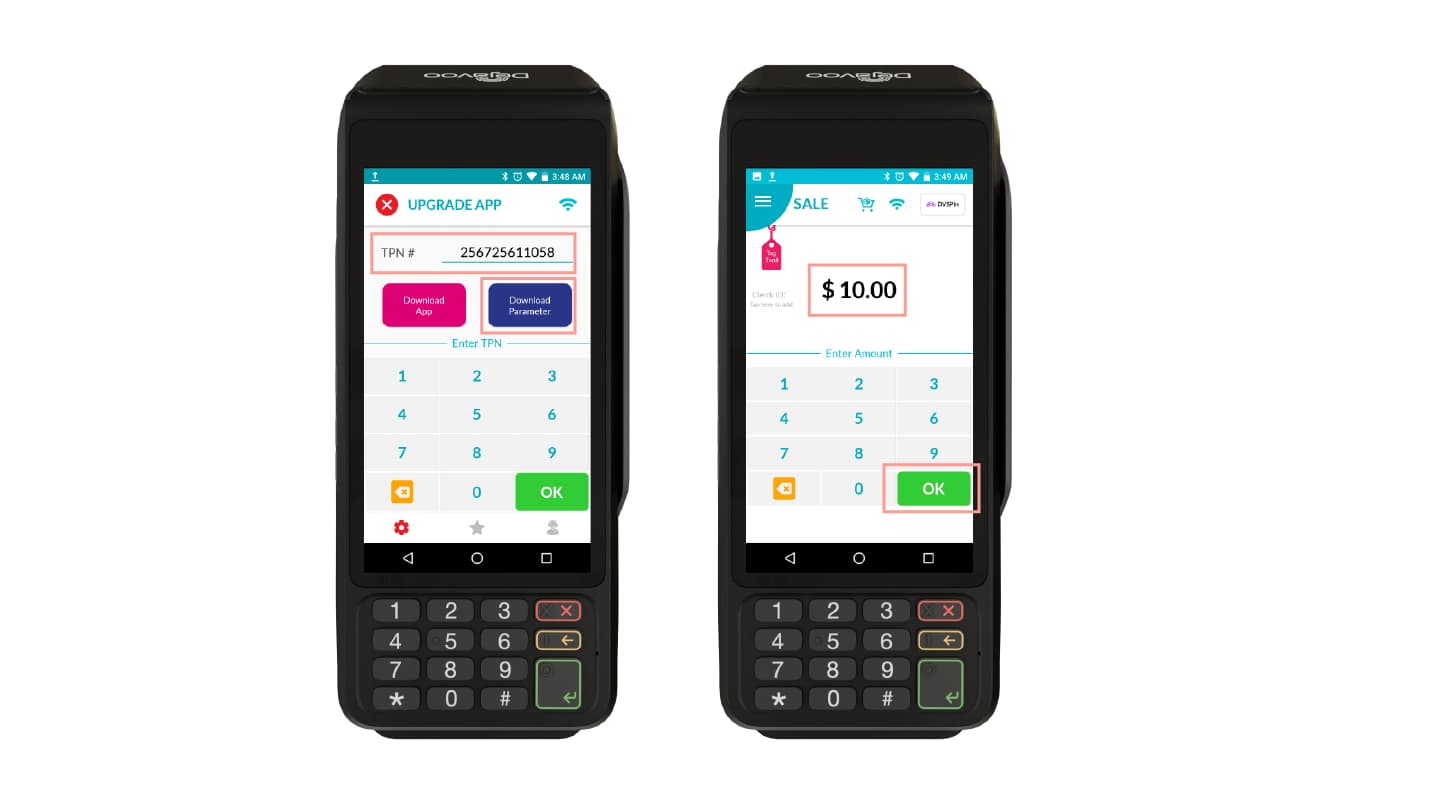
Step 1: Update Parameters
-
Enter the TPN where both Hacienda and Reduced Tax parameters are enabled.
-
Add Tax to the Entered Amount is set to Yes. If Yes (Tax Inclusive):
-
The entered amount includes tax
-
The system splits and displays tax components without increasing the total
-
Step 2: Initiate Transaction
-
Enter the transaction amount
-
Optionally, add a tip if required
Step 3: View Breakdown Screen
-
Before proceeding to payment, the Breakdown Screen appears
-
This screen displays tax-related options
-
Local Tax
-
Displays the local tax amount
-
Includes Edit option (✏️ icon) to modify the value
-
-
State Tax
-
Displays the state tax amount
-
Includes Edit option (✏️ icon) to modify the value
-
-
**Step 4: Enter Food Amount (Reduced Tax Eligible Amount)
-
Tap Enter Food Amount
-
Enter the food amount
The food amount must not exceed the total sale amount
- Tap OK to confirm
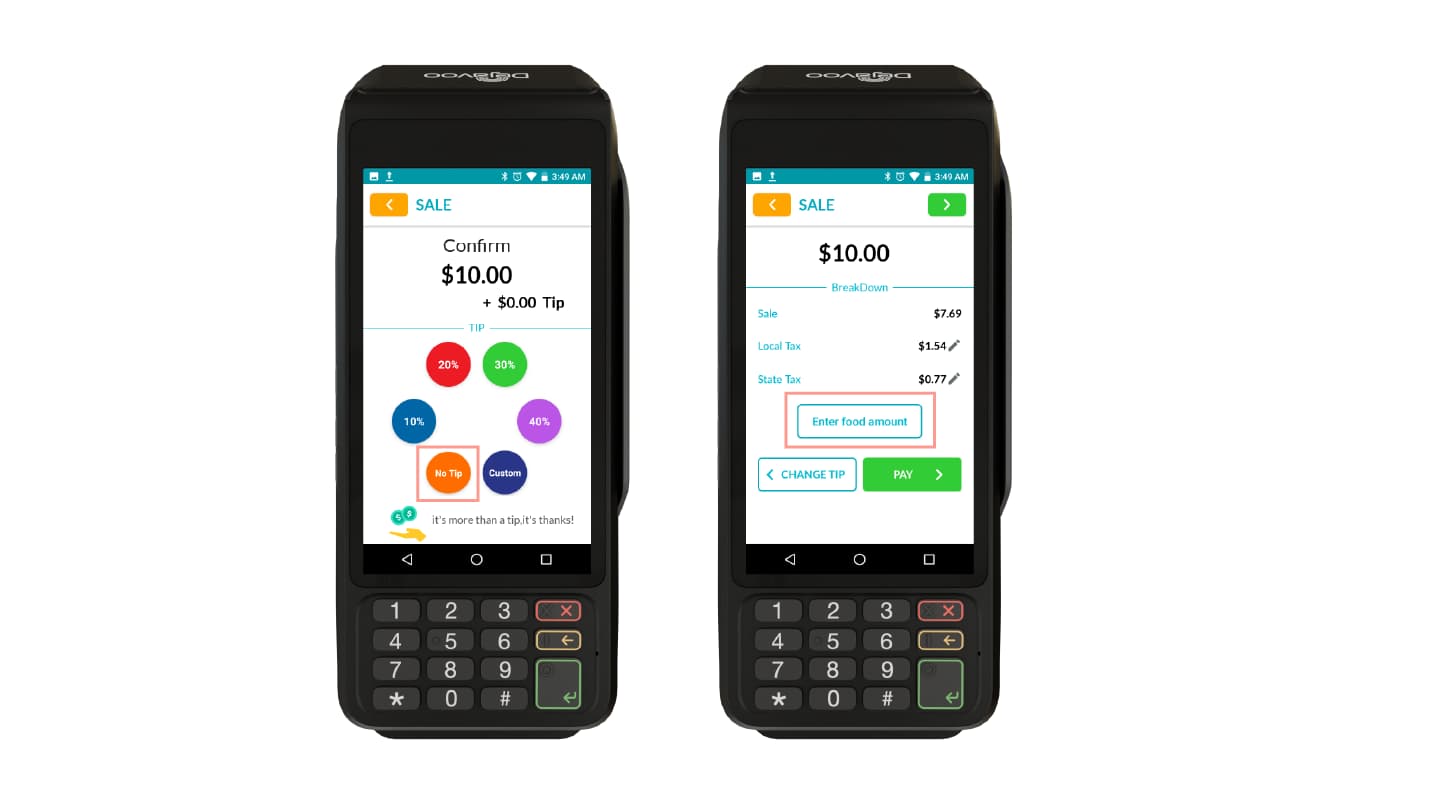
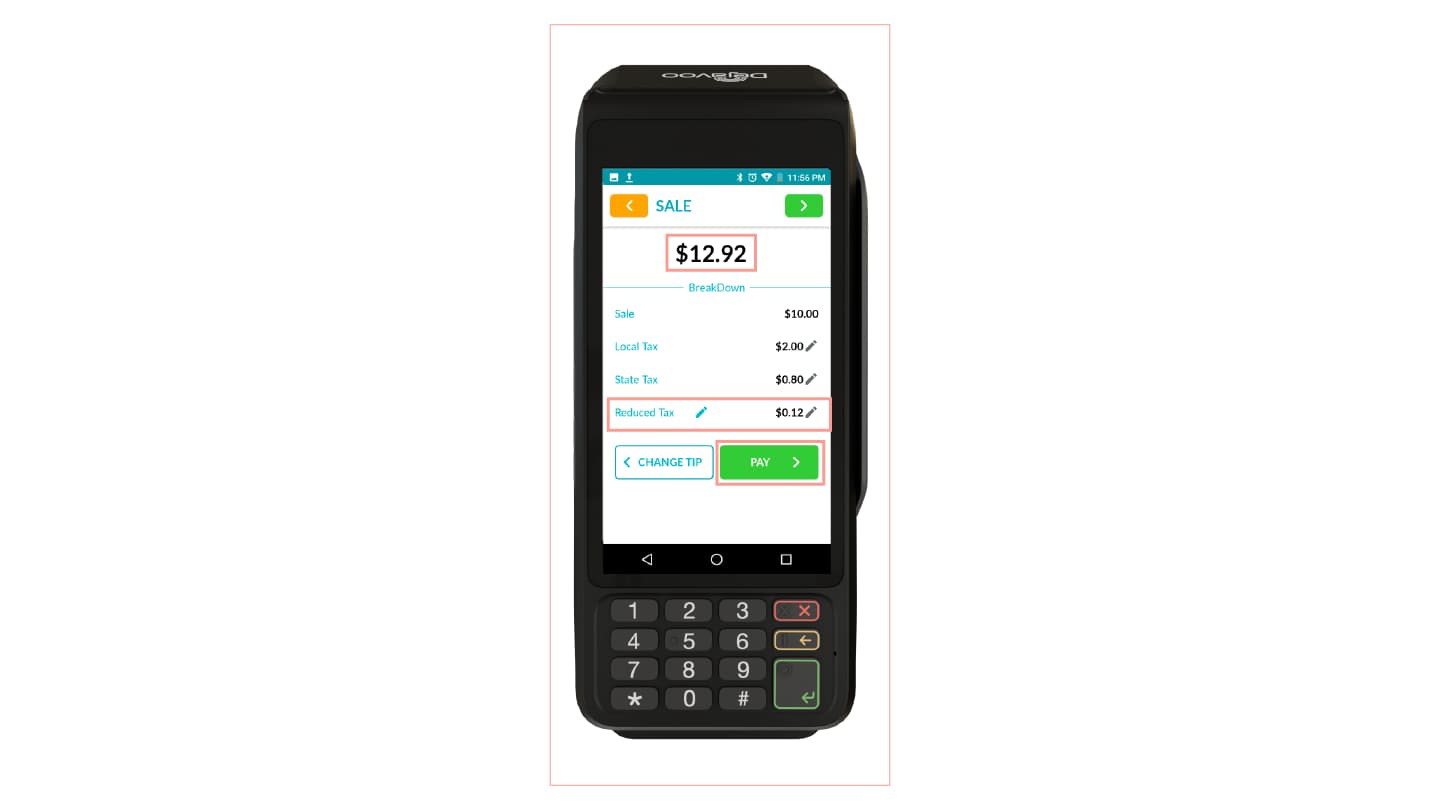
Step 5: Reduced Tax Calculation ( When “Add Tax to the Entered Amount” is Set to Yes )
-
After entering the food amount, the system applies Reduced Tax to the specified amount
-
The remaining amount (if any) is taxed at the regular tax rate
-
The Reduced Tax field is now displayed on the Breakdown Screen, along with:
-
Sale
-
Local Tax
-
State Tax
-
-
The Breakdown Screen now shows a complete tax split, clearly separating:
-
Reduced Tax (for the eligible amount)
-
Standard Tax (for the remaining amount)
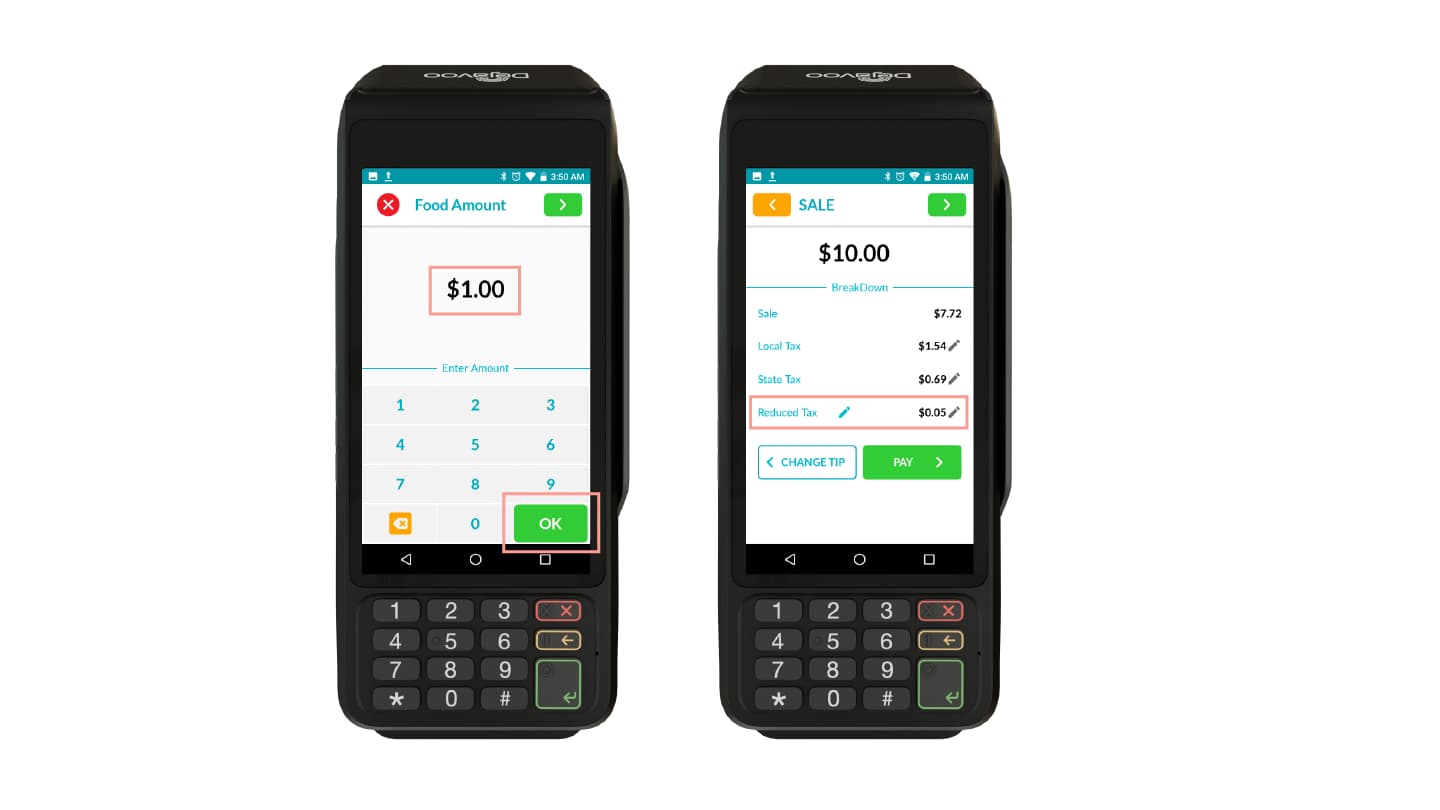
Step 6: Behavior When “Add Tax to the Entered Amount” is Set to No
-
The entered amount is treated as tax-exclusive
-
Tax is added on top of the entered amount, increasing the total
-
If a food amount is entered:
-
Reduced Tax is applied only to the eligible portion (food amount)
-
The remaining amount is taxed at the standard tax rate
-
-
The final total reflects all taxes added separately, resulting in a higher total compared to the entered amount
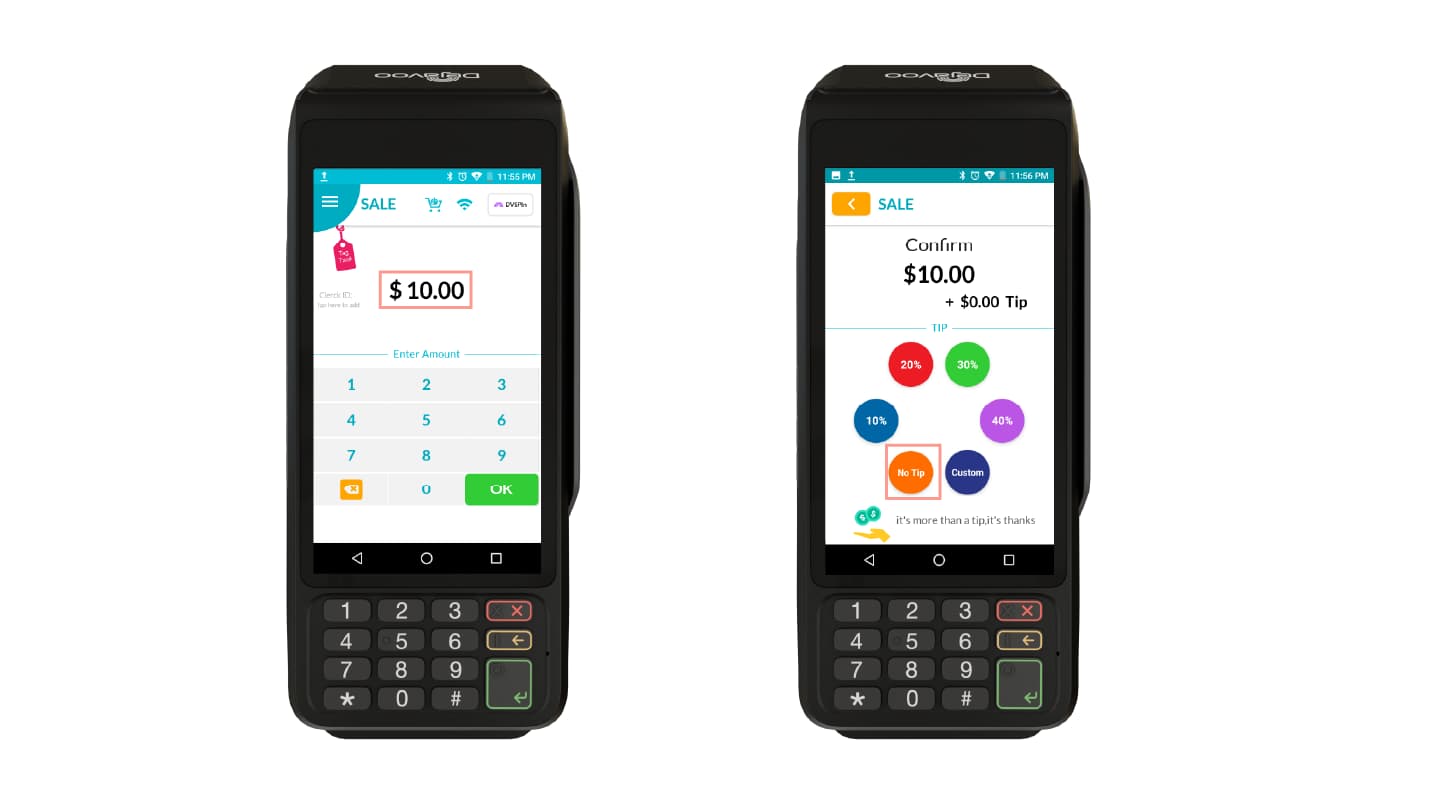
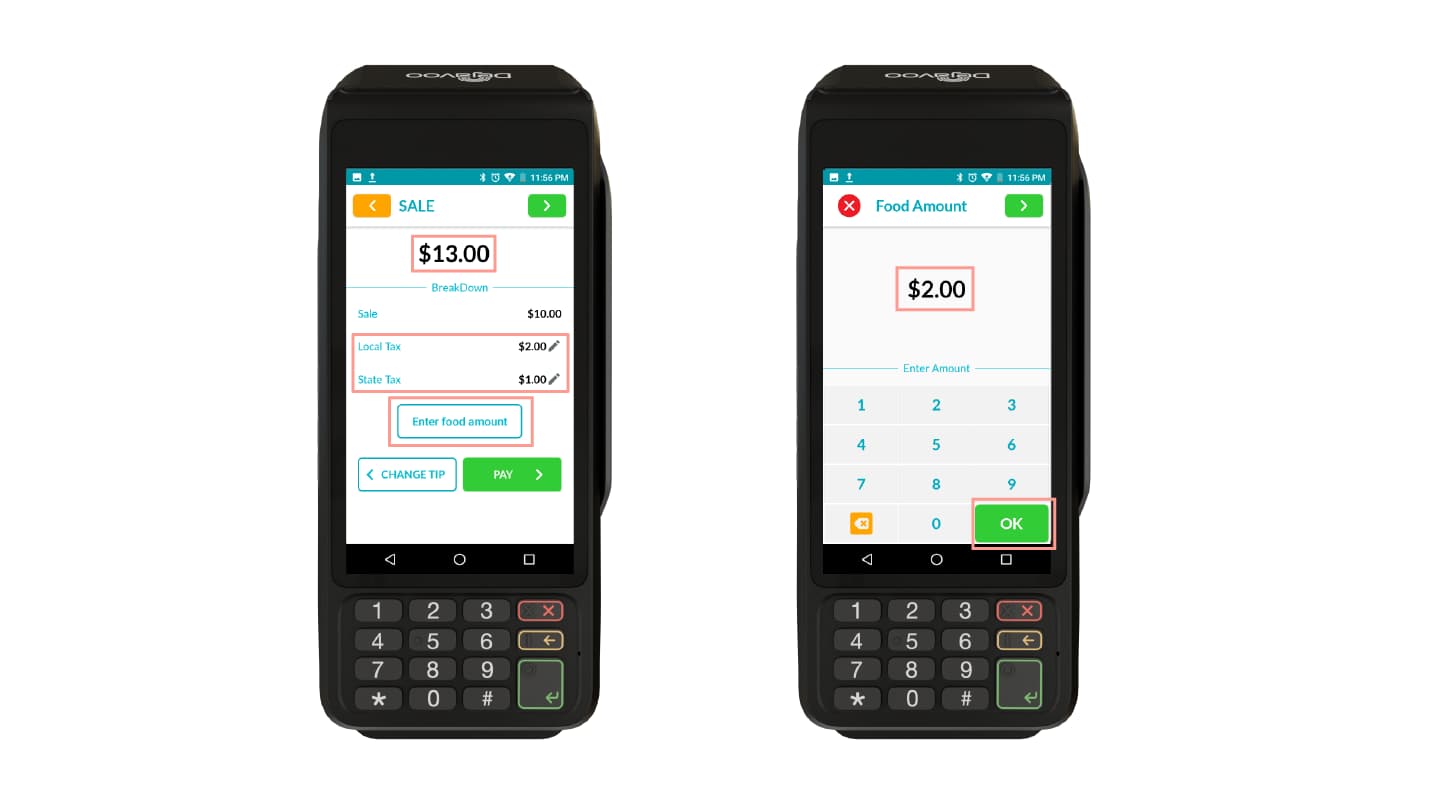
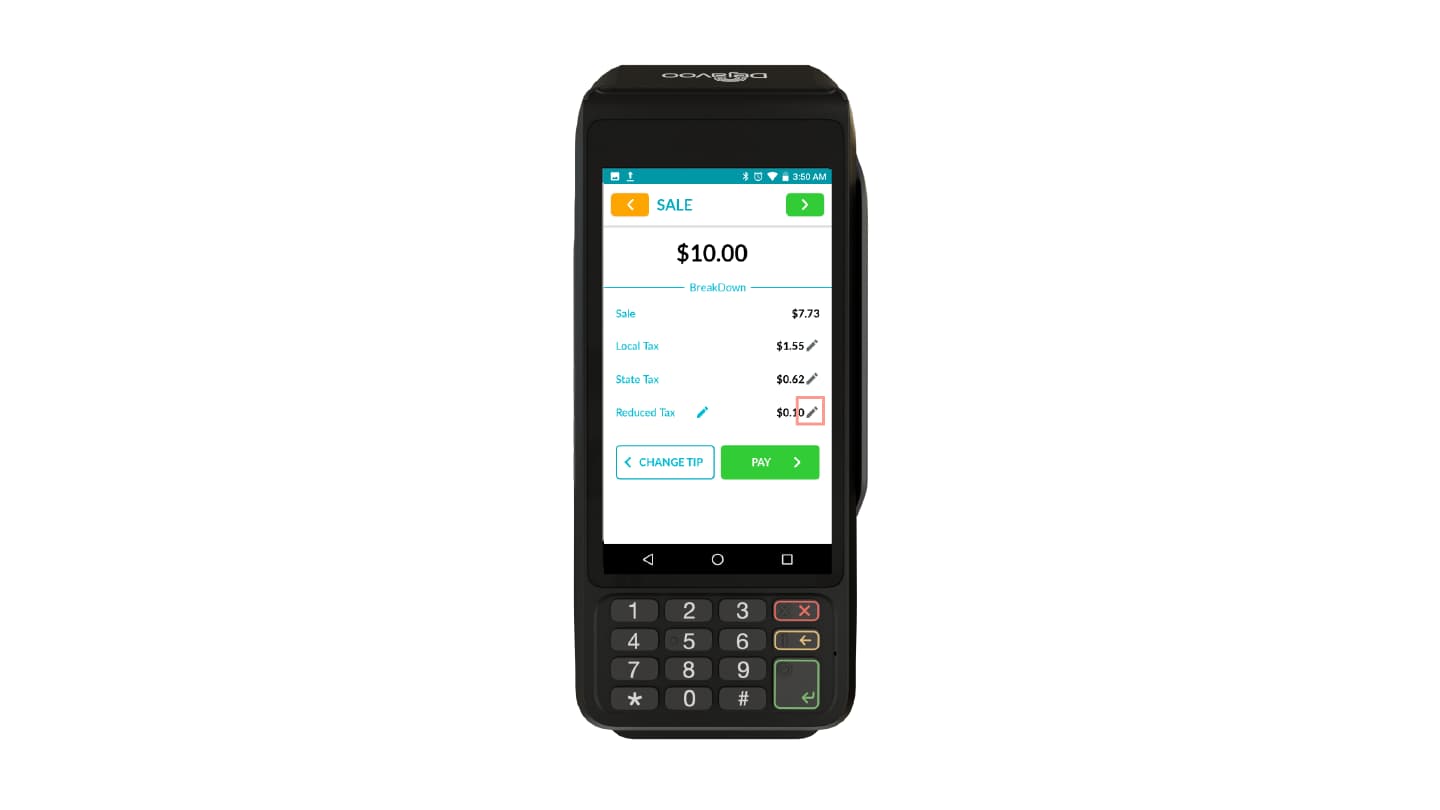
Step 7: Edit Tax Amount (Optional)
-
Tap the Edit icon next to the tax value
-
Adjust tax if required (if enabled)
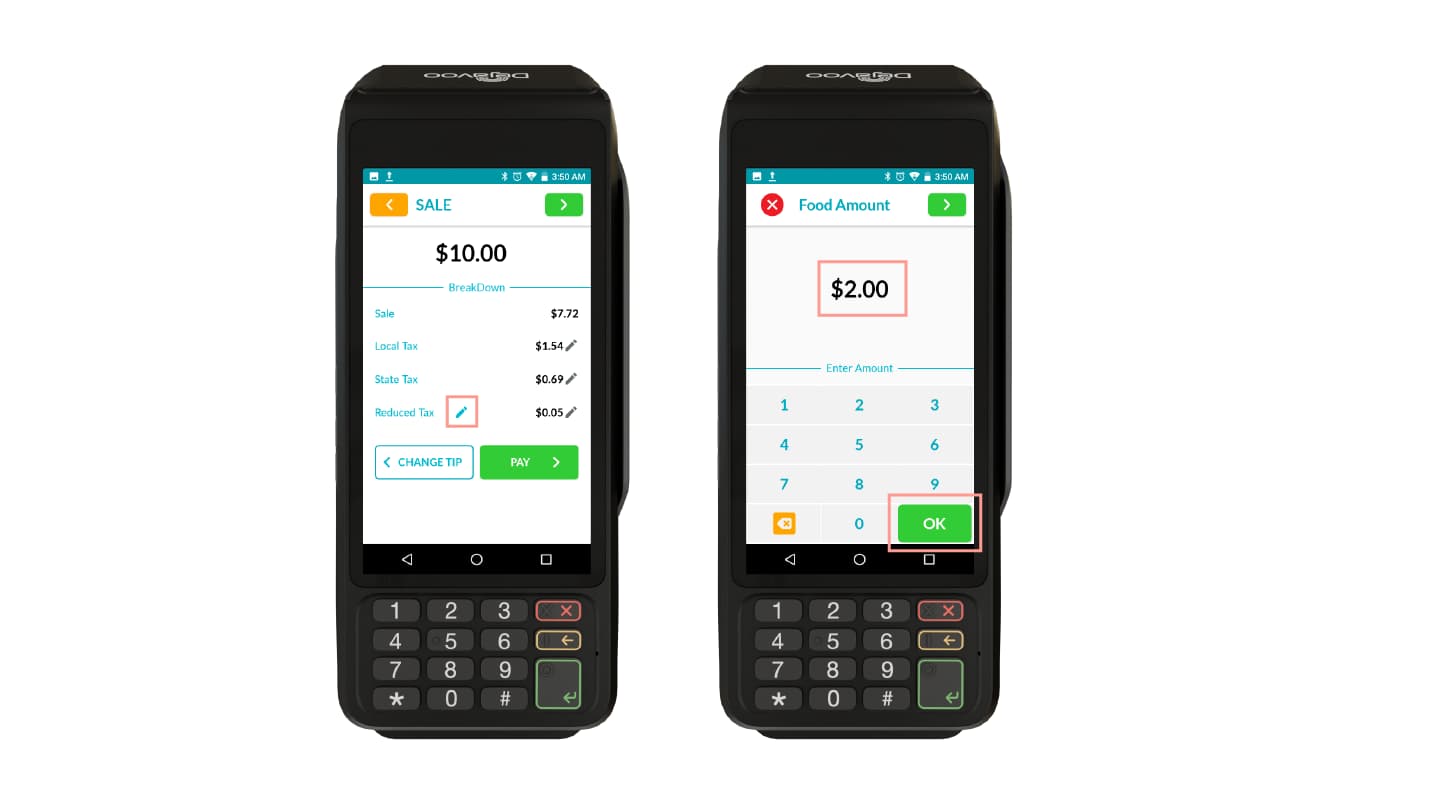
Step 8: Edit Food Amount (Optional)
-
Tap the Edit icon next to the Reduced Tax
-
Modify the food amount if needed
-
Click OK
-
Tax will be recalculated automatically
Step 9: Complete Payment
-
Tap Pay
-
Proceed with the selected payment method
-
Complete the transaction
-
Once the payment is completed, the receipt is either printed (if enabled) or can be sent to the customer via SMS or Email.
To View Receipt on the iPOSpays Portal
-
Log in to the iPOSpays Portal using ISO or Merchant credentials
-
Go to Transactions
-
Select the required transaction
-
Click View Receipt
-
Choose Merchant Copy or Customer Copy
Receipt Calculation Breakdown (Tax Split Display)
When Reduced Tax (R-Tax) is enabled and applicable, the transaction amount is automatically split and displayed across tax components on both the POS screen and the receipts.
How the amount is split:
-
Base Amount (Sale Amount) – Original amount before taxes
-
Local Tax – Standard local tax applied
-
State Tax – Standard state tax applied
-
RTax (Reduced Tax) – Applied only to eligible items (e.g., food)
On the Receipt:
The above values are displayed as separate line items:
-
Base Amt
-
Local Tax
-
State Tax
-
RTax
-
Total
Hacienda and Reduced Tax in SPIn (SOAP & REST API)
Hacienda and Reduced Tax in SPIn (SOAP API and REST API) integrations allow tax calculation to be controlled either through the server/register/POS or via TPN configuration in the portal. Terminal behavior depends on whether tax parameters are included in the transaction request.
Requirements
-
The Hacienda parameter must be enabled at the TPN level
-
The Reduced Tax parameter must be enabled at the TPN level
Tax Parameters
The server/register/POS can pass
-
State Tax
-
City (Local) Tax
-
Reduced Tax
If provided, these values override the TPN (portal) configuration.
SPIn Tax Behavior
- State Tax and/or City Tax provided
Terminal displays the passed tax values
The “Enter Food Amount” option is not displayed
Reduced Tax is not applied
- Only Reduced Tax provided
Terminal reflects the passed Reduced Tax
The “Enter Food Amount” option is not displayed
- All three parameters provided (State Tax, City Tax, and Reduced Tax)
Terminal displays only the State and City Tax values
Reduced Tax is ignored
The “Enter Food Amount” option is not displayed
- No tax parameters provided
TPN (portal) configuration is applied
The “Enter Food Amount” option is displayed
Reduced Tax is calculated based on TPN Portal settings
The food amount must not exceed the total sale amount
Reduced Tax applies only when neither State Tax nor City Tax is provided; if either is present, Reduced Tax is ignored.
For more details, refer to Secure Payment Interface (SPIn)