Configure and Manage Terminals in DejaUP!
The Terminals module in DejaUP! provides a centralized interface for monitoring and managing connected vending payment devices. Merchants can view terminal status, search for terminals, filter terminal records, configure terminal settings, and send remote commands.
This document explains how to access the Terminals module and manage supported payment devices.
Prerequisites
- Merchant account with access to the iPOSpays Portal.
- DejaUP! is enabled for the merchant.
- A supported vending payment terminal with DejaUP! installed and assigned to the merchant.
For instructions, refer to:
Access DejaUP!
- Log in to the iPOSpays Portal using your merchant credentials.
- From the navigation menu on the left, click DejaUP!.
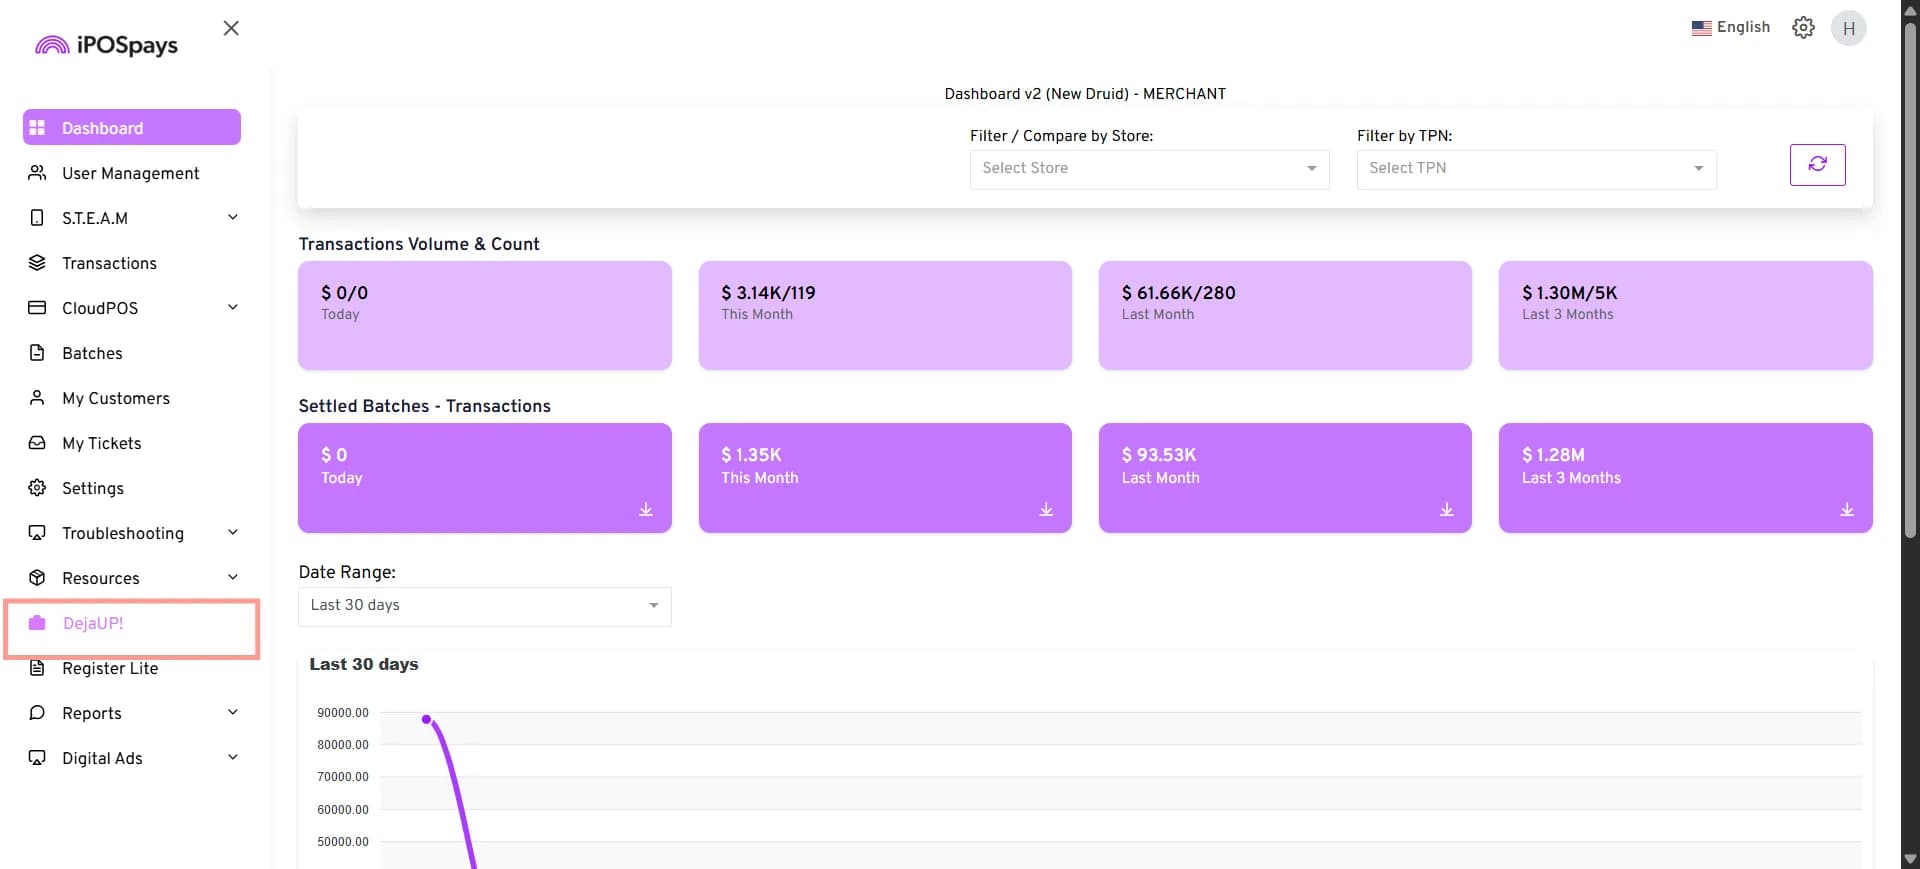
The DejaUP! portal opens in a new browser tab.
Open the Terminals Module
From the navigation menu on the left, under Vending Interface, click Terminals.
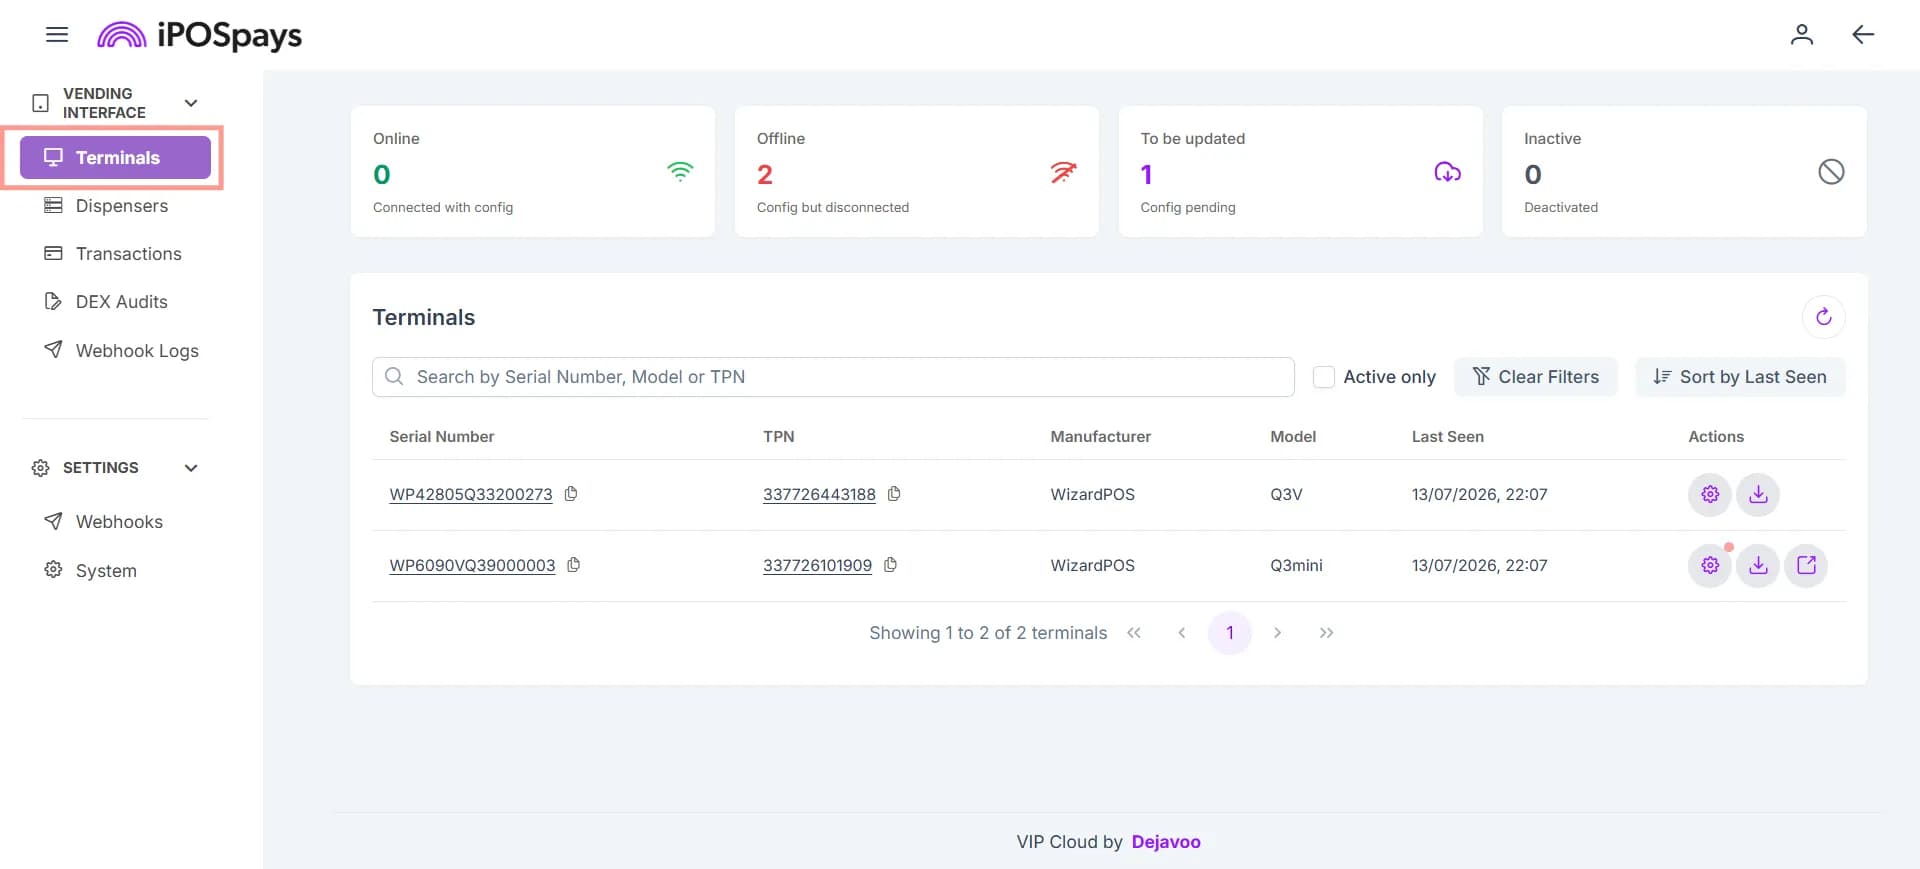
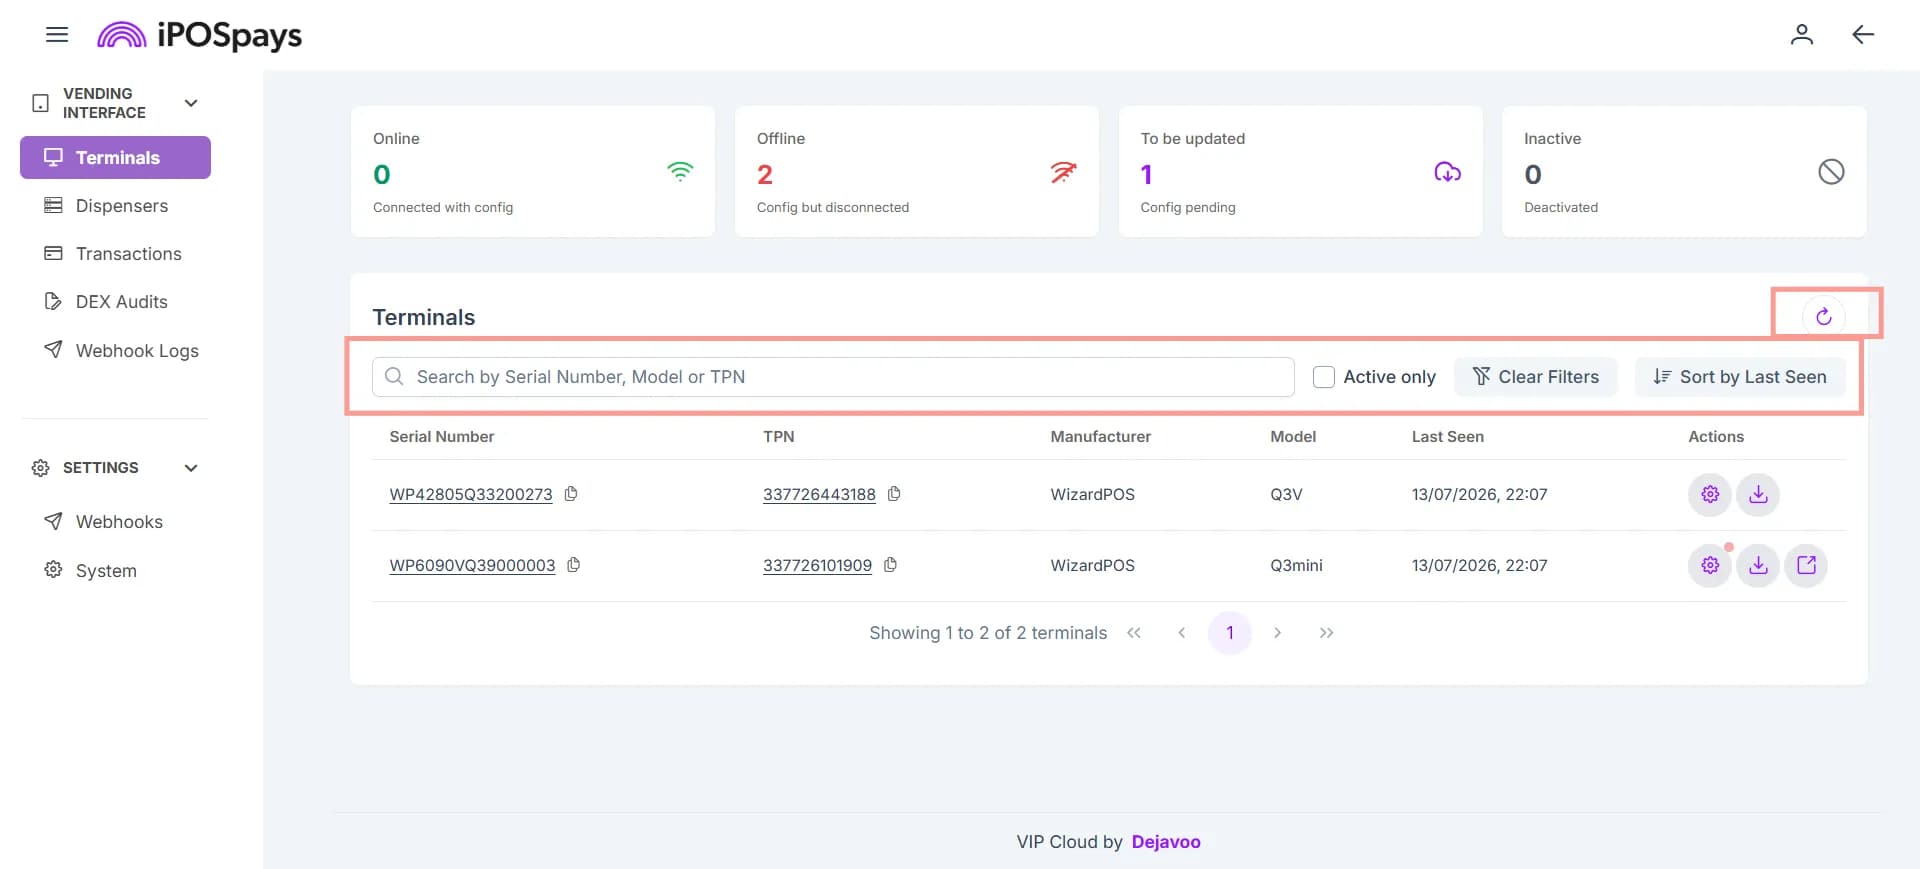
The Terminals page displays all payment terminals with the DejaUP! app installed and associated with your merchant account.
View Terminal Status
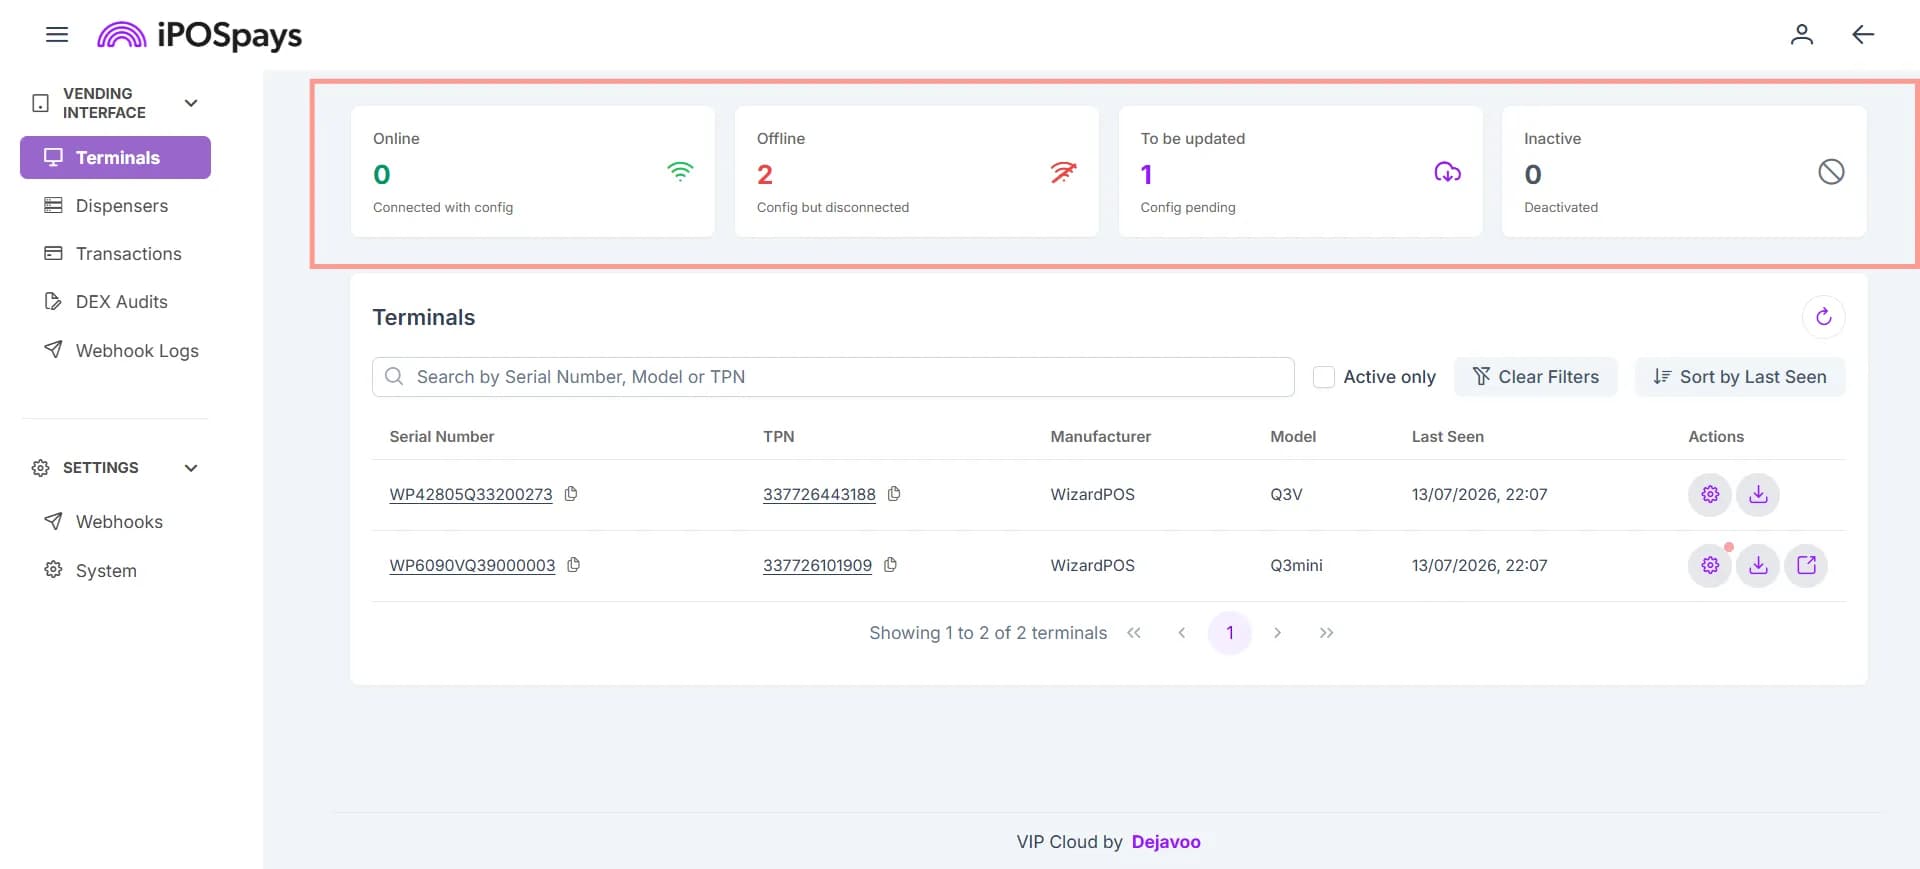
The dashboard displays the following:
| Status | Description |
|---|---|
| Online | Connected terminals that are currently communicating with DejaUP!. |
| Offline | Configured terminals that are currently disconnected. |
| To Be Updated | Terminals with pending configuration updates. |
| Inactive | Deactivated terminals. |
Search and Filter Terminals
Use the available search and filter options to quickly locate terminals.
- Search for a Terminal
Use the search box to search by:
- Serial Number
- Model
- TPN
- View Active Terminals
Enable Active Only to display only active terminals.
- Sort Terminals
Use Sort by Last Seen to arrange terminals based on their most recent communication time.
- Clear Filters
Click Clear Filters to remove all applied filters.
- Refresh the Page
Click Refresh to display the latest terminal status and information.
View Terminal Details
- Click the Serial Number, TPN, or Settings icon for the required terminal.
The Terminal Details page opens.
The page contains the following tabs:
- Information
- Vending
- iPOSpays
- Remote Commands
Information Tab
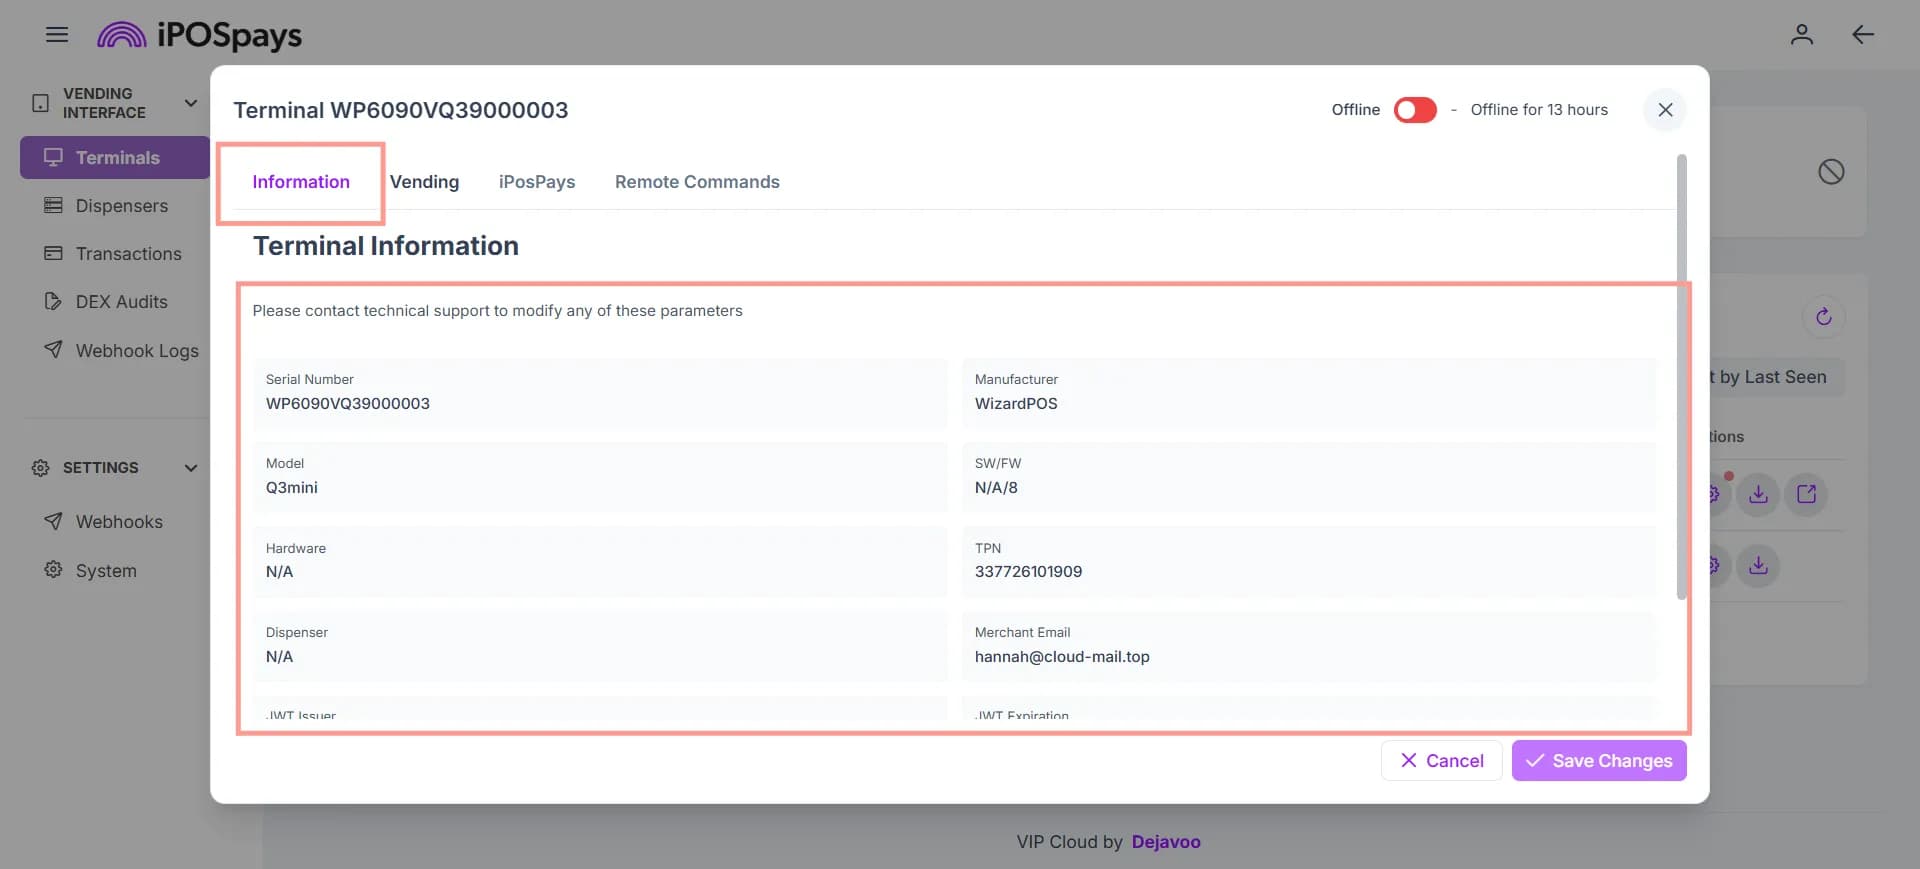
The Information tab displays general information about the selected payment terminal, including:
- Serial Number
- TPN
- Manufacturer
- Model
- Hardware Version
- Software Version
- Environment
- Merchant Email
- JWT Issuer
- JWT Expiration
- Connected Dispenser
Configure Vending Settings
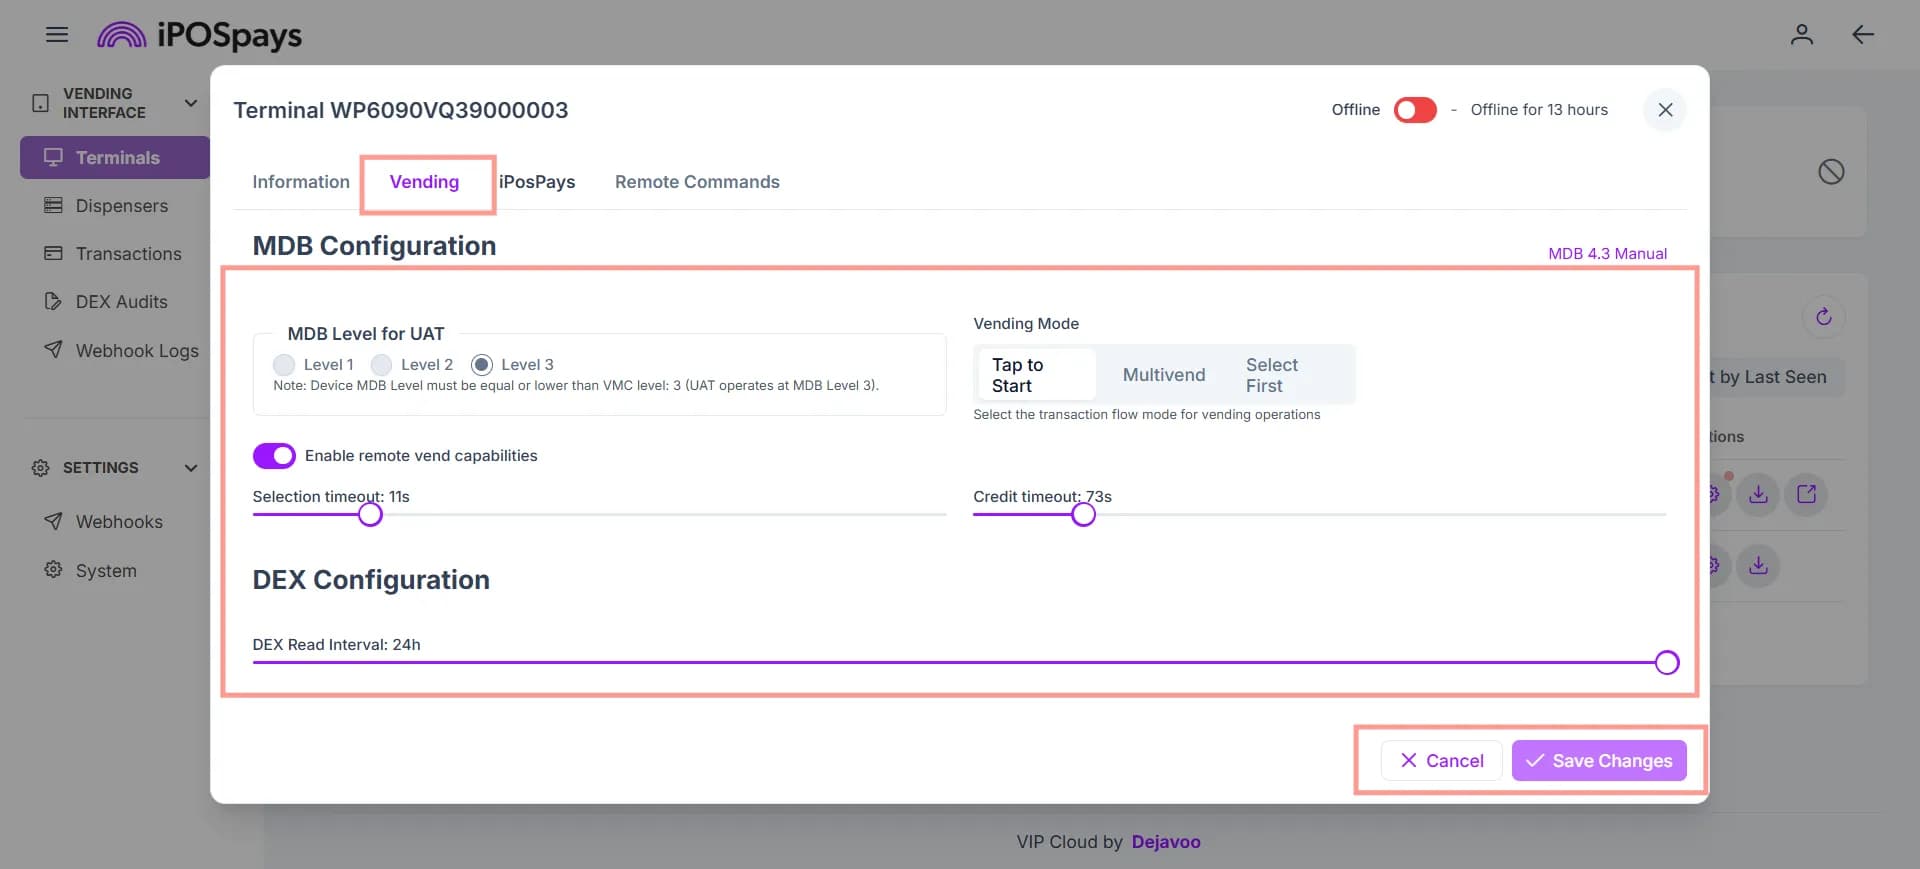
The Vending tab allows you to configure MDB communication, vending transaction flow, remote command capabilities, timeout values, and DEX audit settings.
Open the Vending Tab
From the Terminal Details page, click the Vending tab.
The following configuration sections are available:
- MDB (Multi-Drop Bus) Configuration
- DEX (Data Exchange) Configuration
Configure the MDB
The MDB Configuration section controls communication between the payment terminal and the connected vending machine.
This setting is dynamically configured once the payment device performs a handshake with the connected VMC.
- MDB Levels
Select the required MDB communication level.
Available options:
- Level 1
- Level 2
- Level 3
Level 3 is the default MDB communication level. It uses the Select → Pay transaction flow and supports advanced vending features, including EMV transactions, contactless payments, multi-item purchases, and remote vending.
- Configure the Vending Mode
- Under Vending Mode, select the required transaction flow.
The available vending modes are:
| Vending Mode | Description |
|---|---|
| Tap to Start | Customers tap or present their payment method before selecting a product. |
| Multivend | Allows customers to purchase multiple products within a single payment session. |
| Select First | Customers select a product before completing the payment. |
Select the vending mode that matches the connected vending machine’s operation.
For detailed instructions on configuring and processing transactions for each vending mode, refer to:
After changing the vending mode, restart the vending machine so the new configuration takes effect and DejaUP! can establish a new handshake.
- Enable Remote Vend Capabilities
- Enable Remote Vend Capabilities to allow the payment terminal to receive and process remote vending requests initiated through DejaUP!.
- Configure the Selection Timeout
- Use the Selection Timeout slider to specify how long the terminal waits for a customer to select a product after payment has been initiated.
- The timeout is measured in seconds.
- Configure the Credit Timeout
- Use the Credit Timeout slider to specify how long payment credit remains available before it expires if no product is selected or dispensed.
- The timeout is measured in seconds.
Configure the DEX Read Interval
The DEX Configuration section controls how frequently the terminal automatically retrieves DEX audit data.
- Use the DEX Read Interval slider to specify how often the terminal performs an automatic DEX read.
- The interval is measured in hours.
Save the Configuration
After configuring the required settings:
- Click Save Changes.
- To discard unsaved changes, click Cancel.
Configure iPOSpays Settings
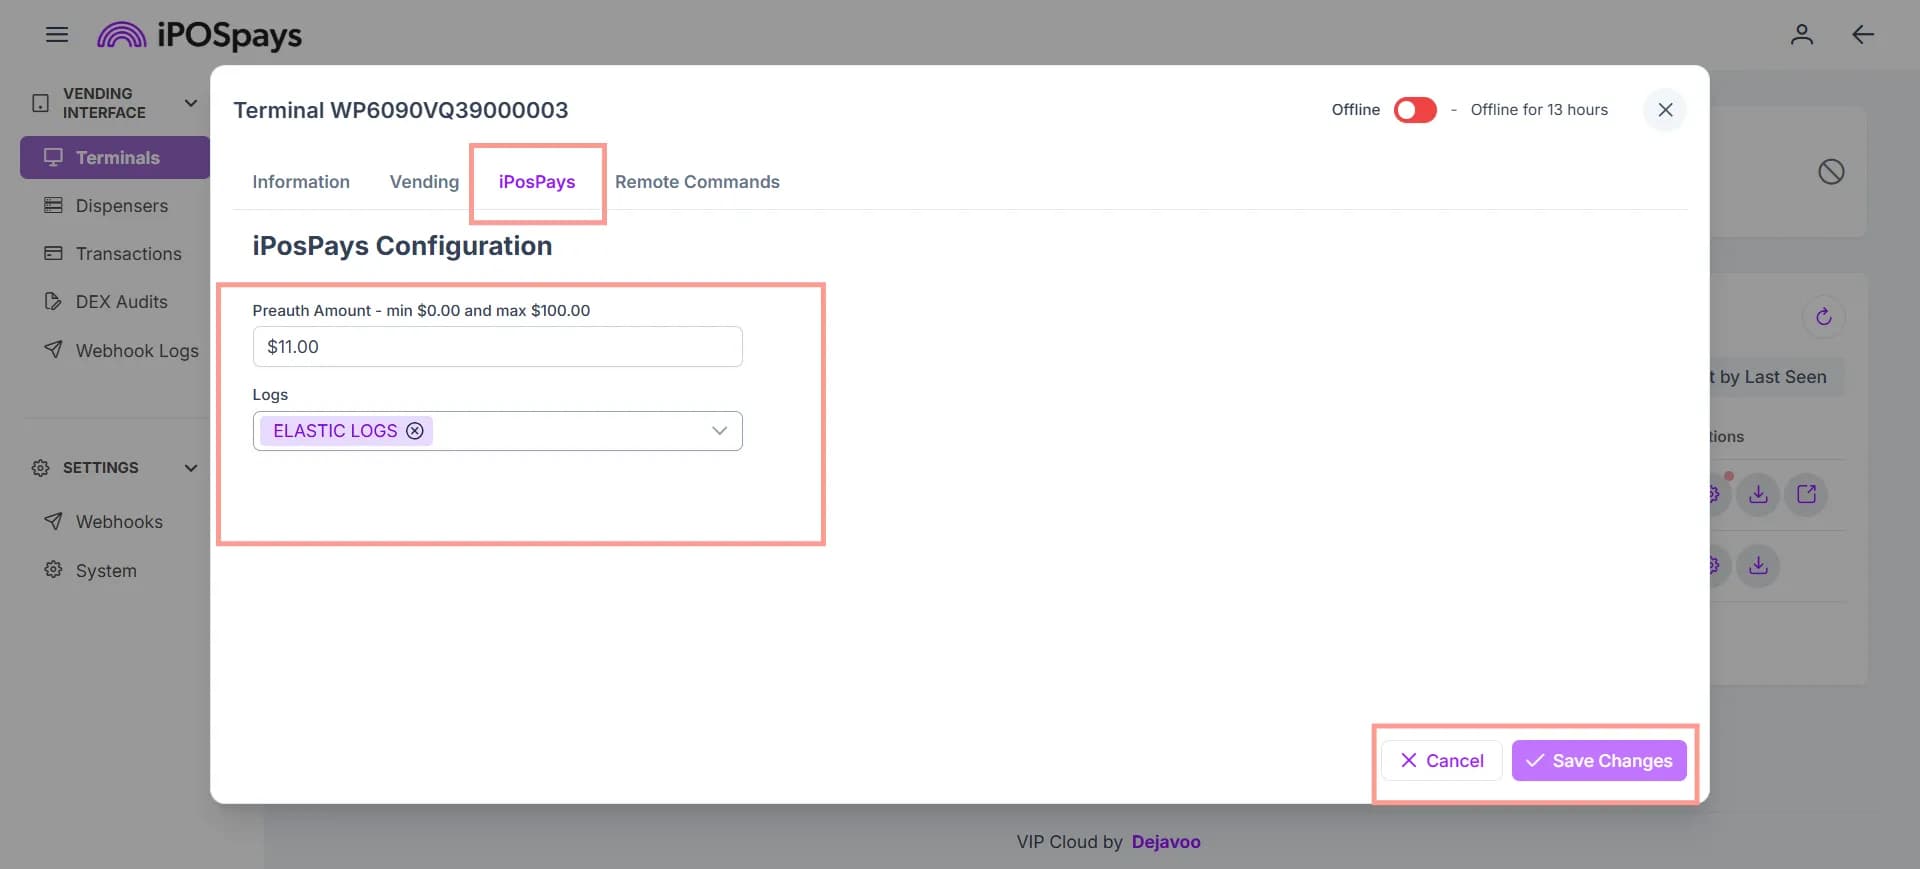
The iPOSpays tab allows you to configure terminal-specific payment settings.
Open the iPOSpays Tab
From the Terminal Details page, click the iPOSpays tab.
The following settings are available:
- Preauth Amount
- Logs
1. Configure the Preauthorization Amount
Under Preauth Amount, enter the amount to preauthorize for payment transactions.
The pre-auth amount in the iPOSpays tab is normally used with Tap to Start or Multivend.
Supported range:
- $0.00–$100.00
2. Configure Terminal Logs
- Under Logs, select the required log type from the drop-down list.
- The selected log configuration is used for terminal diagnostics and troubleshooting.
Only available to the Developer team and Level 2 support.
Save the Configuration
After updating the settings:
- Click Save Changes.
- To discard unsaved changes, click Cancel.
Send Remote Commands
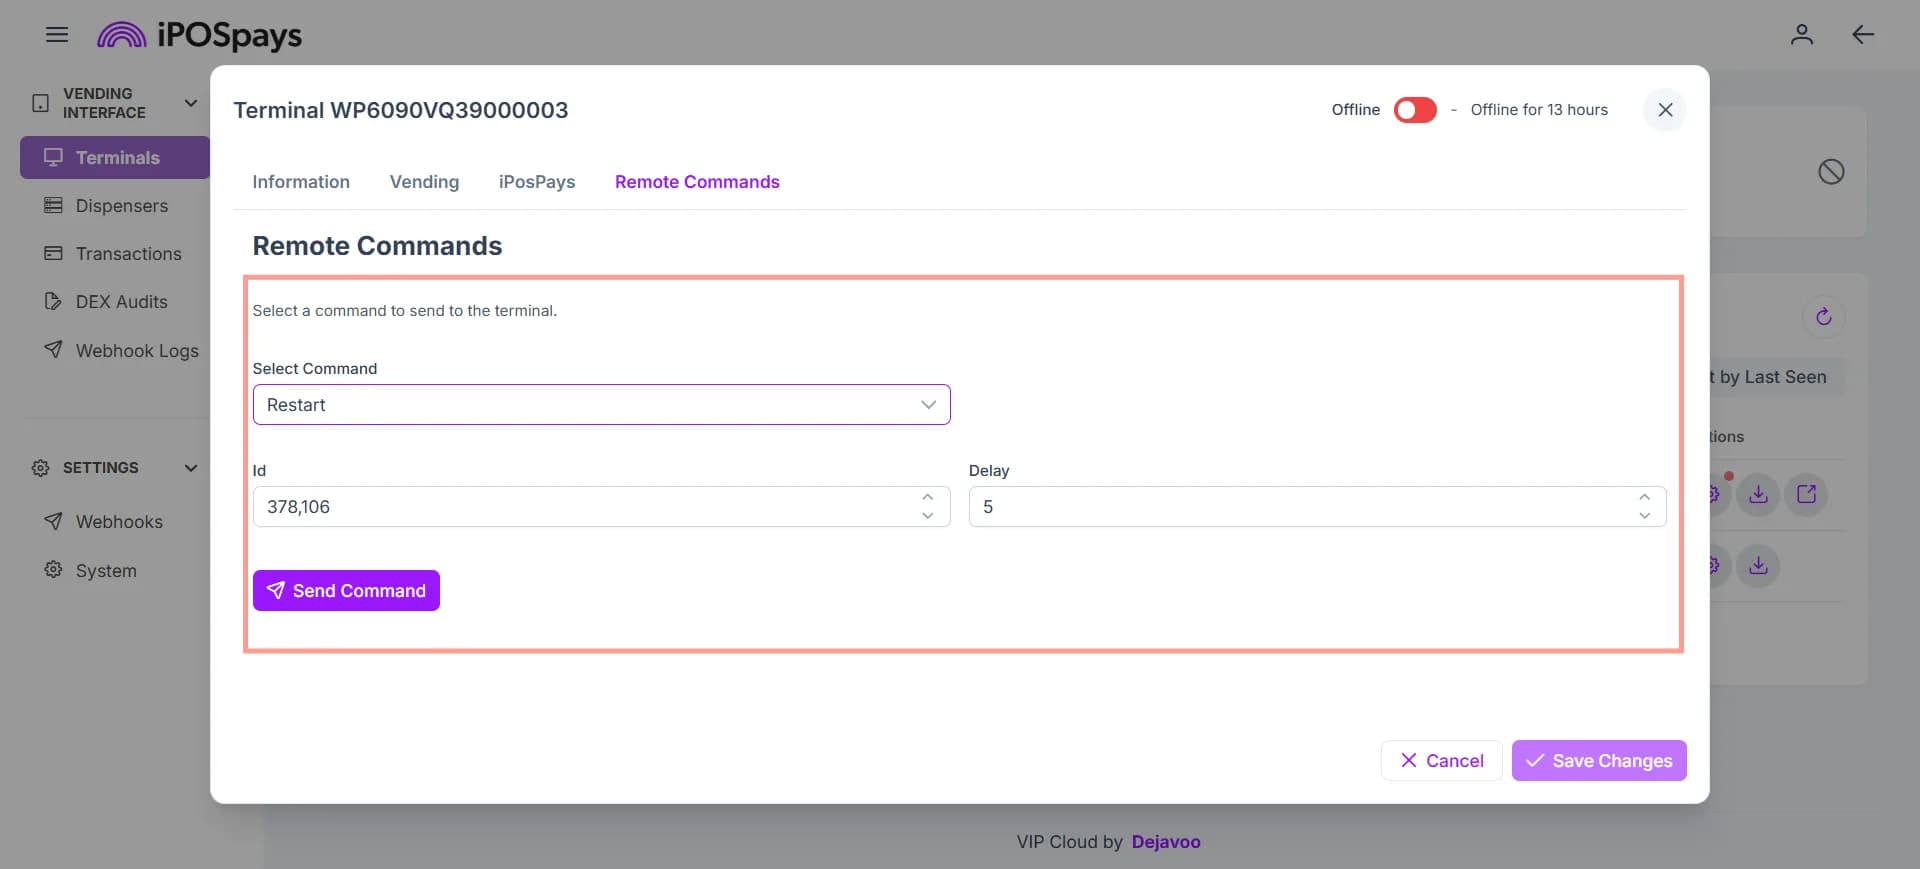
The Remote Commands tab allows you to manage the payment terminal remotely.
Open the Remote Commands Tab
From the Terminal Details page, click the Remote Commands tab.
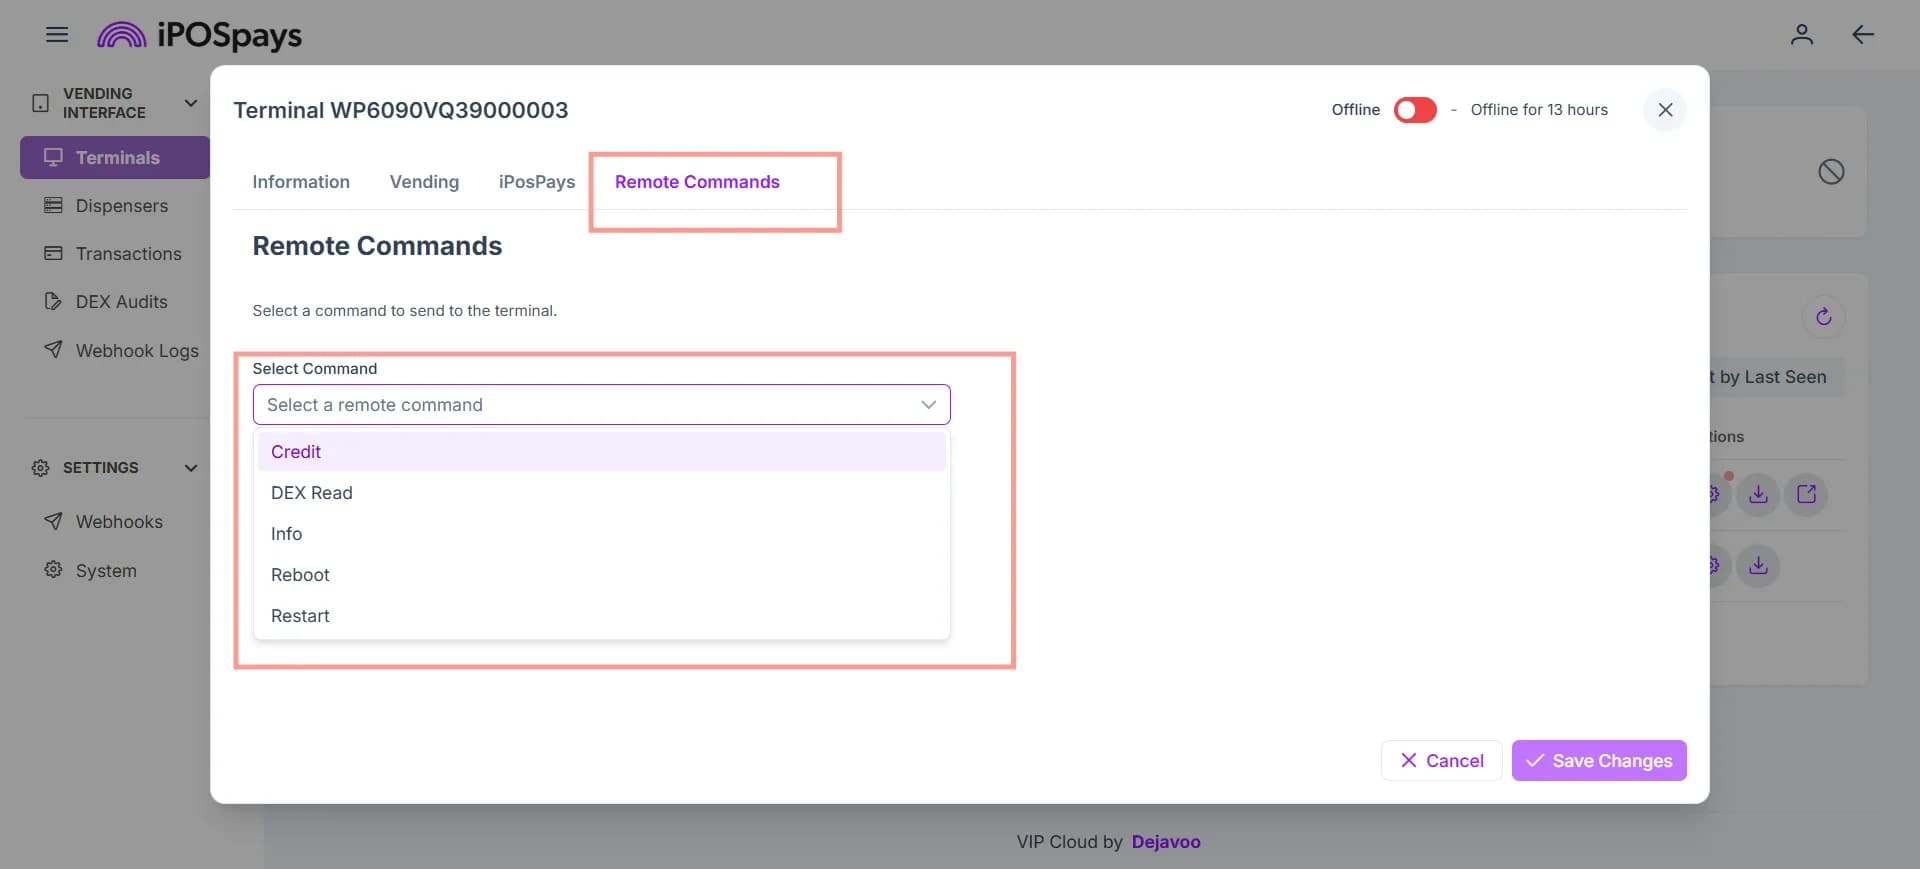
Select a Remote Command
Under Select Command, choose one of the following:
- Credit
- DEX Read
- Info
- Reboot
- Restart
The available fields change based on the selected command.
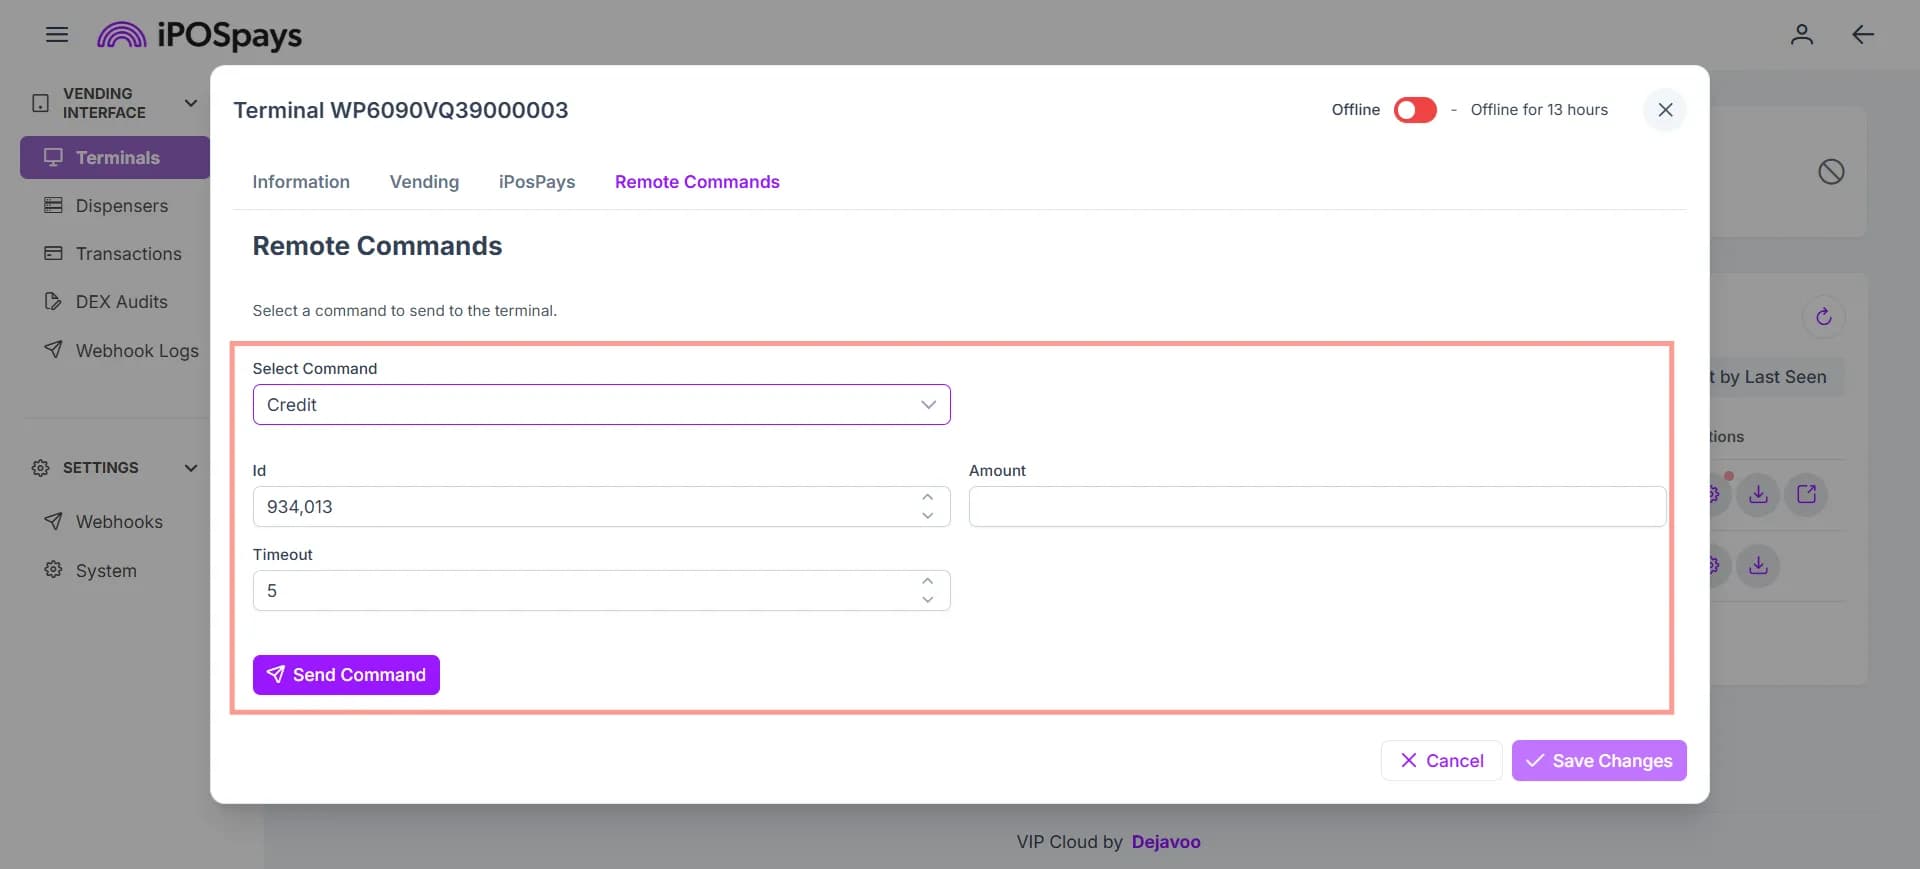
1. Send a Credit Command
The credit remote command sends a credit balance to the DejaUP! app to the VMC. This is recorded as a mobile transaction in the Transactions tab. This remote credit command does not require a credit card, since it runs within the DejaUP! infrastructure and not through the payment software.
Step 1: Select the Credit Command
From Select Command, select Credit.
Step 2: Configure the Command
Enter the following information:
- Id – Specifies the command identifier.
- Amount – Specifies the credit amount to send to the vending machine.
- Timeout – Specifies the amount of time, in seconds, that the terminal waits for the vending operation to complete.
Step 3: Send the Command
Click Send Command.
The terminal sends the credit request to the connected vending machine.
2. Send a DEX Read Command
The DEX Read remote command retrieves DEX audit data from the connected vending machine on demand, without waiting for the scheduled DEX Read Interval. This allows merchants to pull up-to-date audit data immediately, whenever it’s needed.
Step 1: Select the DEX Read Command
From Select Command, select DEX Read.
Step 2: Configure the Command
Enter the following information:
- Id – Specifies the command identifier.
Step 3: Send the Command
Click Send Command.
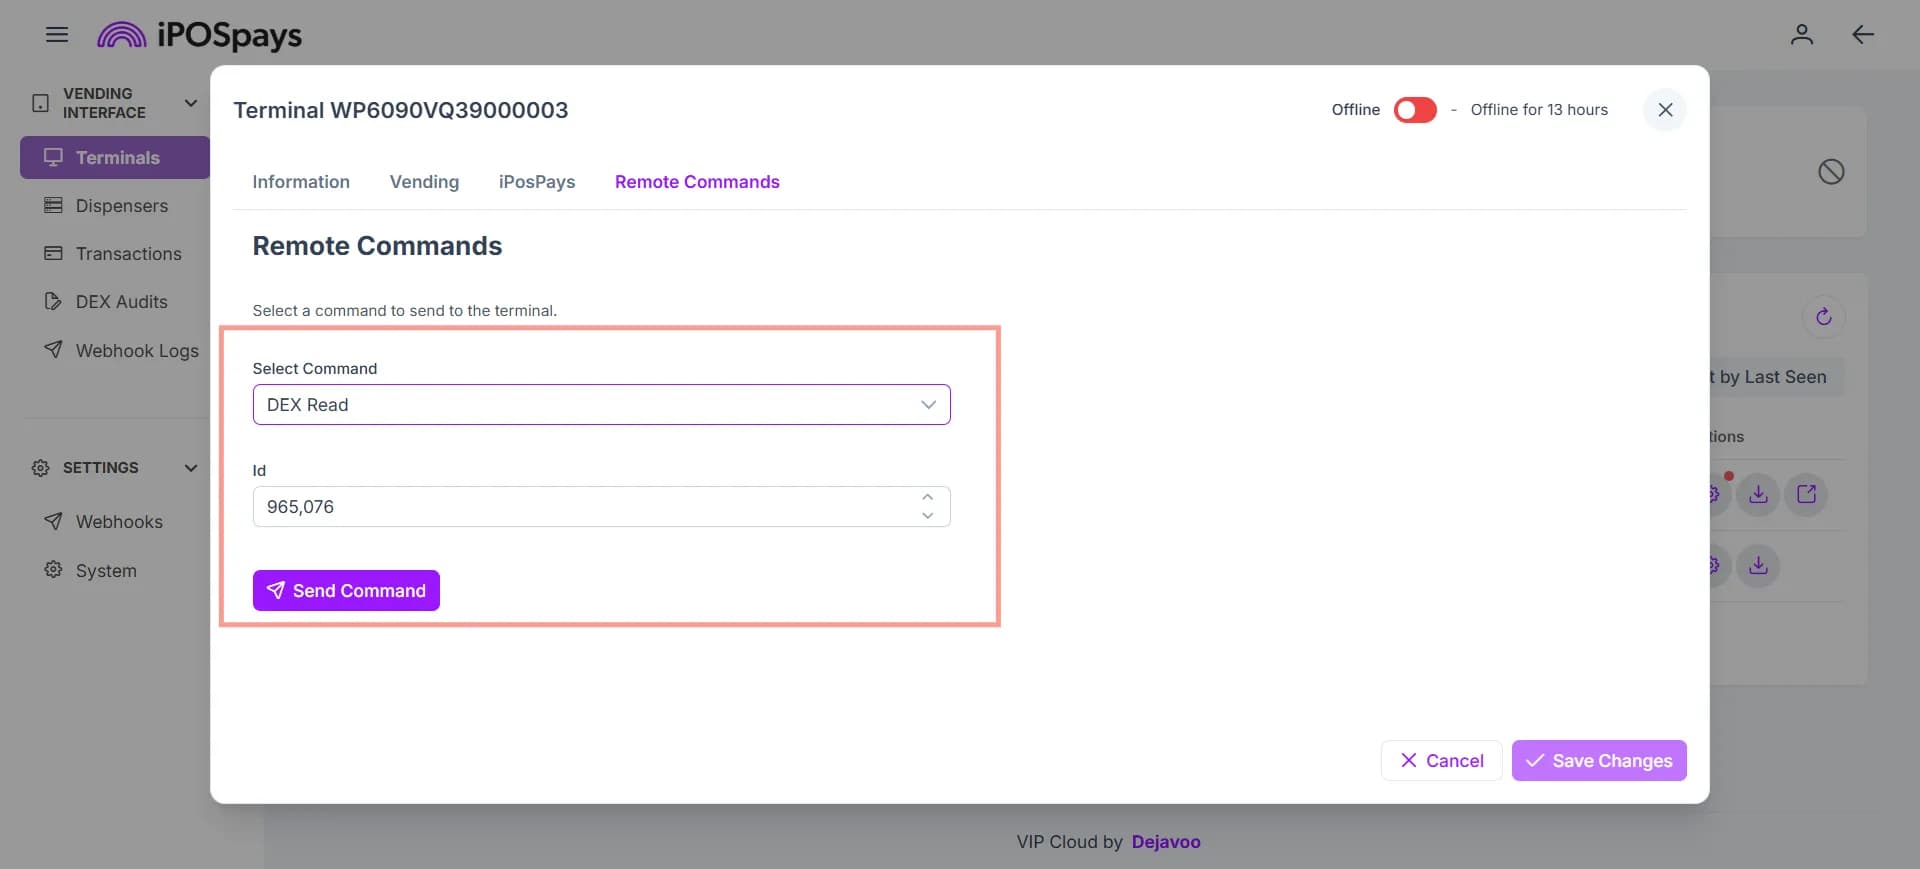
The terminal retrieves DEX audit data from the connected vending machine.
3. Send an Info Command
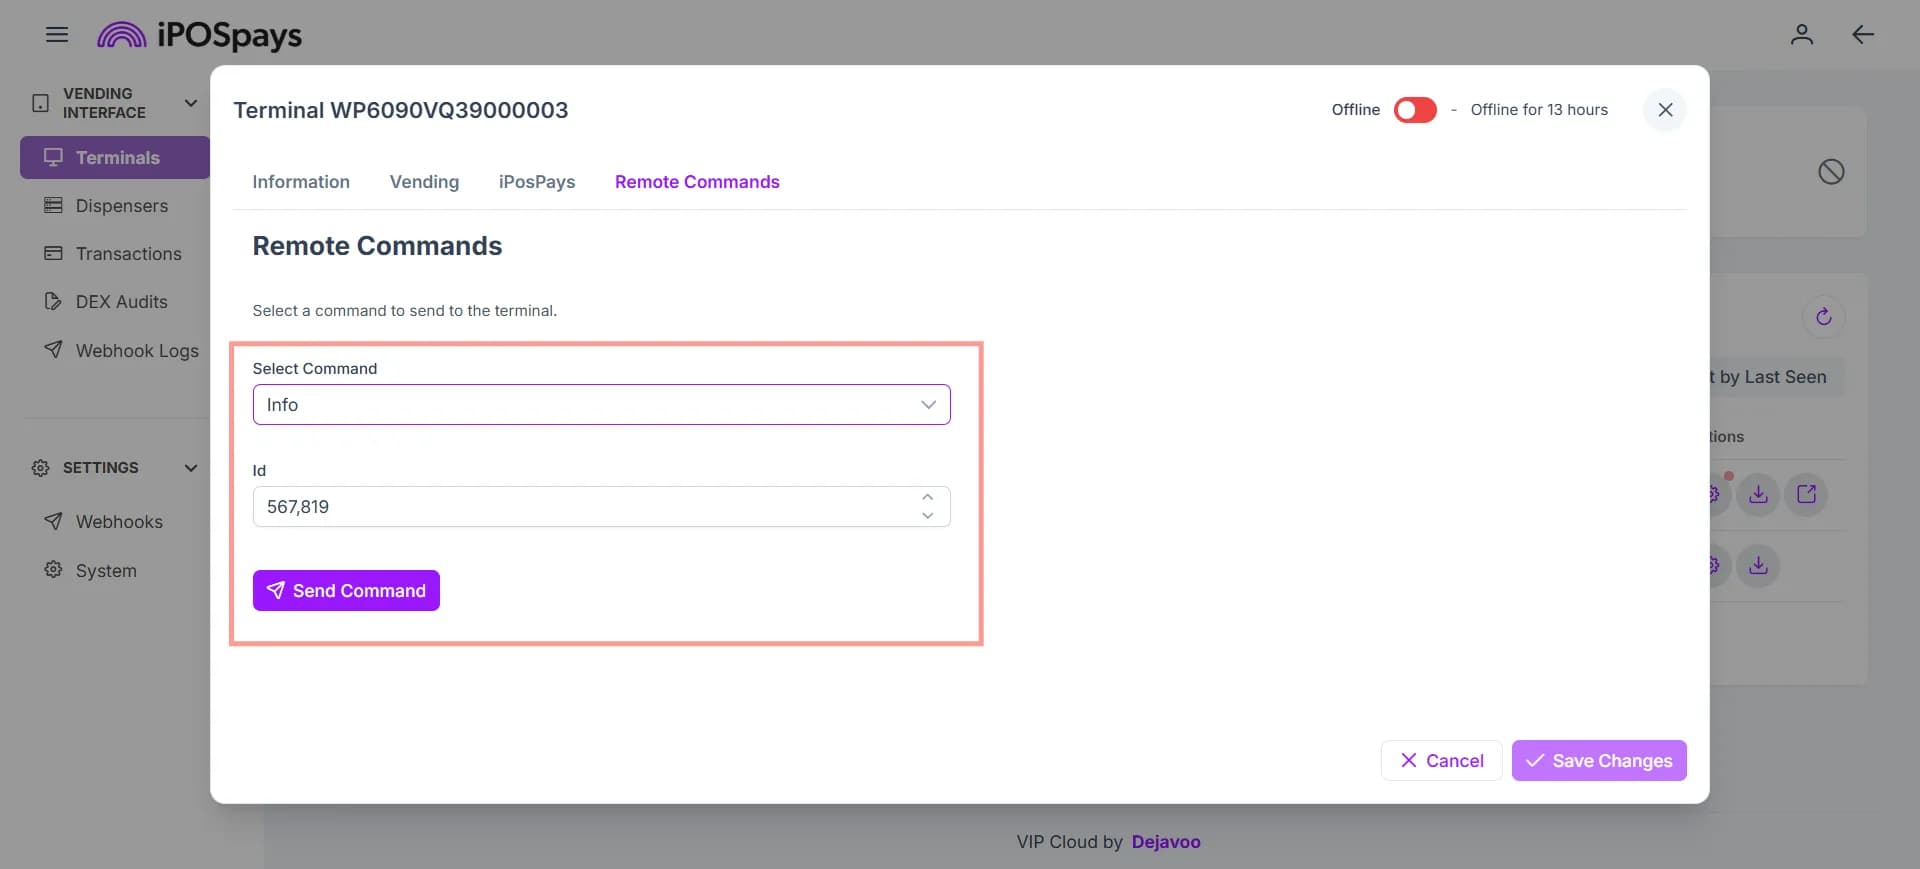
The Info remote command retrieves the current information of the selected payment terminal, such as serial number, TPN, and software version. This allows merchants to verify terminal details remotely, without needing physical access to the device.
Step 1: Select the Info Command
From Select Command, select Info.
Step 2: Configure the Command
Enter the following information:
- Id – Specifies the command identifier.
Step 3: Send the Command
Click Send Command.
The terminal returns the available payment terminal information.
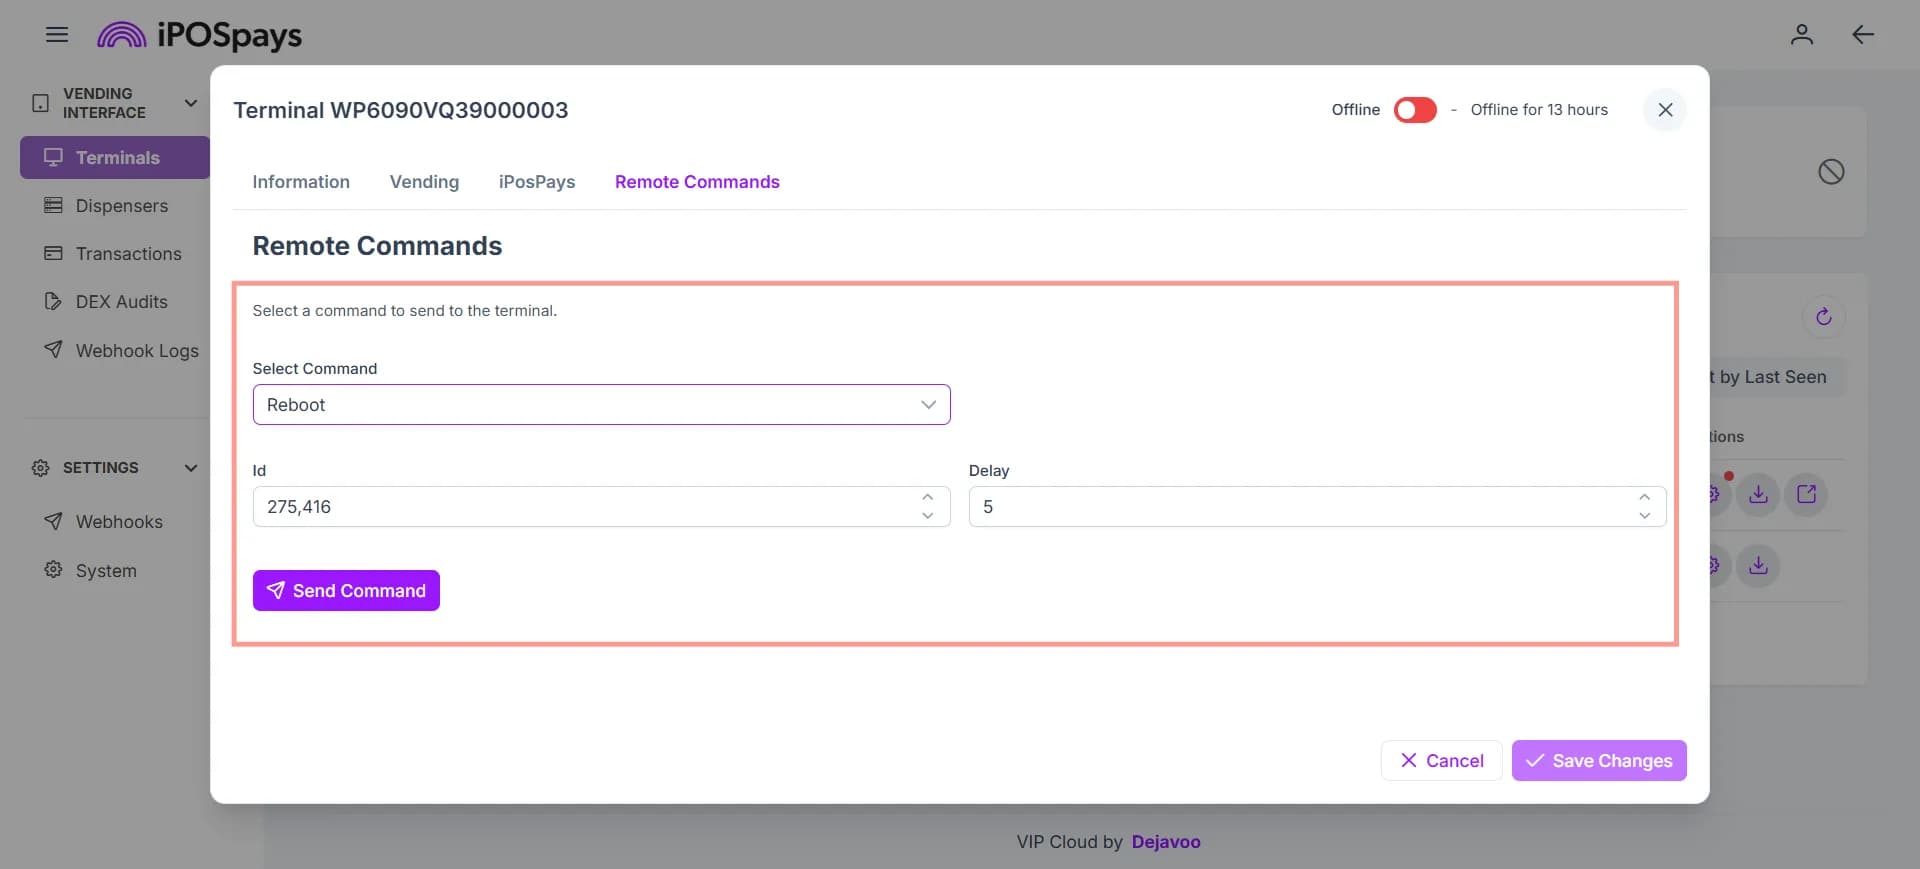
4. Send a Reboot Command
The Reboot remote command restarts the entire payment terminal after the configured delay. This is used to resolve device-level issues, such as hardware or firmware faults, without requiring on-site access.
Step 1: Select the Reboot Command
From Select Command, select Reboot.
Step 2: Configure the Command
Enter the following information:
- Id – Specifies the command identifier.
- Delay – Specifies the delay, in seconds, before the payment terminal reboots.
Step 3: Send the Command
Click Send Command.
The payment terminal reboots after the configured delay.
5. Send a Restart Command
The Restart remote command restarts only the payment application after the configured delay, without rebooting the terminal itself. This is used to resolve application-level issues faster, since the underlying device stays powered on.
Step 1: Select the Restart Command
From Select Command, select Restart.
Step 2: Configure the Command
Enter the following information:
- Id – Specifies the command identifier.
- Delay – Specifies the delay, in seconds, before the payment application restarts.
Step 3: Send the Command
Click Send Command.
The payment application restarts after the configured delay.